8. User Management
8.1. Public folder
Once the server has been correctly started, stores can be created. There are two type of stores: Private and public stores. There can only be one public store. It can be created with the following command:
/usr/sbin/kopano-admin -s
The public store is the folder every user can always open. After installation and configuration of the server a public store needs to be created before private stores can be made. If KC is configured for multi-tenancy, a public store will be automatically created per company.
When using multi-server support, the Public store can only be created on the multi-server node which has the KopanoContainsPublic attribute enabled. Currently the Public Store can be created on only one server. See Prepare / setup the LDAP server for multi-server setup for more information.
Note
The Public store is by default accessible and writable for all users. Please review the permissions before start using the Kopano system.
8.2. General usage of kopano-admin tool
Kopano offers the kopano-admin administration tool for managing user and groups. When using the DB plugin the tool can be used to create or delete users and groups. When using the unix or ldap plugin the tool can’t be used for creation of users and groups, but the tool can still be used to get more information about users and groups.
8.2.1. Listing users
All available users or groups can be displayed by using the following commands:
kopano-admin -l
kopano-admin -L
8.2.2. Displaying details
To display more information of a specific user, use:
kopano-admin --details john
Name:                  john
Full name:             John Doe
Email address:         john.doe@kopano.com
Active:                yes
Administrator:         no
Address Book:          visible
Features:              mobile; outlook
Store:                 ABCD1234EFGH5678
Store size:            462.40 MB
Send-as:
Delegation:
Auto-accept meeting requests: no
Out-Of-Office:                disabled
Current user store quota settings:
    Quota overrides:          no
    Warning level:            1024.00 MB
    Soft level:               2048.00 MB
    Hard level:               3072.00 MB
Groups (2):
               Groupname
        ----------------
                Everyone
              Sales team

Permissions:
To display more information of a specific group, use:
kopano-admin --details --type group sales
Name:             sales
Email address:
Address book:     Visible
Send-as:
Users (2):
   Username        Fullname        Homeserver     Store
   ----------------------------------------------------
   john            John Doe        Kopano         ABCDE
   mary            Mary Jones      Kopano         FGHIJ
8.2.3. Reattaching stores from deleted users
When a user is deleted the mailbox of the user will be still kept in the database. Use the following command to retrieve a list of stores without a user, and users without a store:
/usr/sbin/kopano-admin --list-orphans
Stores without users:
    Store guid                        Guessed username      Last modified     Store size
    ---------------------------------------------------------------------------------------
    CAC27E6D70BB45B0B712B760AE6BA0A8  steve                 2017/05/01 14:22  2334KB

Users without stores (1):
    Username
    -----------------------------
    jane
It can be decided to remove the store from the database or hook the store to another user to be able to access it once again. To remove the store from the database, an action which is irreversible, use the following command:
/usr/sbin/kopano-admin --remove-store <store-guid>
Note
When removing a store, it is not immediately removed from the database, instead it is marked as softdeleted and will be removed as soon as it exceeded the defined softdelete_lifetime defined in server.cfg. If you want to delete the store permanently, you need to issue the command “kopano-admin –purge-softdelete” as well. Please note that in this case the entire softdelete area will be emptied as well.
To hook the store to another user, use the following command:
/usr/sbin/kopano-admin --hook-store <store-guid> -u <user>
The user given with the --user option will now have the new store attached to it. With the next re-login the new store will be accessed.
Calling --hook-store without --user will hook the public store.
Important
When a store is hooked to a user that already has a store attached to it, the original store will be orphaned. This original store can be found using the list-orphans options of the kopano-admin command.
8.2.4. Additional commands and further information
More information about all options of the kopano-admin can be found in the man-page.
man kopano-admin
8.3. Users management with DB plugin
By default the DB plugin will be used as user management plugin. Below will be described how to manage users with the kopano-admin command. For user management with the LDAP user plugin, please see User Management with LDAP or Active Directory.
At the moment KC doesn’t provide a graphical or webbased user management interface, however there are different 3rd party product that provide webbased management of the Kopano system.
8.3.1. Creating users with DB plugin
To create a new user, use the following command:
/usr/sbin/kopano-admin -c <user name> \
        -p <password> \
        -e <email> \
        -f <full name> \
        -a <administrator>
The fields between <> should be filled in as follows:
- User name: The name of the user. With this name the user will log on to the store.
- Password: The password in plain text. The password will be stored encrypted in the database.
- Email: The email address of the user. Often this is
<user name>@<email domain>. - Full name: The full name of the user. Because the full name will contain space characters, and maybe other non-alphanumeric characters, the name should be entered with quotes (
''). - Administrator: This value should be
0or1. When a user is administrator, the user will be allowed to open all Kopano stores of any user. It is also possible to pass2as administrator level, this will make the user a system administrator who can access mailboxes within other companies.
All fields except the email address are case sensitive.
The password can also be set using the -P switch. The password is then not given at the command prompt, but asked for by the kopano-admin tool. The password is not echoed on the screen and needs to be typed twice for verification.
8.3.2. Non-active users
A non-active user cannot login to KC, but email can be delivered to this user, and the store can be opened by users with correct permissions. Non-active users can especially used for functional mailboxes, resources and rooms.
To create a non-active user, use the following command:
kopano-admin -c -u <user name> -e <email> -f <full name> -n 1
8.3.3. Updating user information with DB plugin
The same kopano-admin tool can be used to update the stores and user information. Use the following command to update:
/usr/sbin/kopano-admin -u <user name> \
                                                [-U <new username>] \
                                                [-p <new password>] \
                                                [-e <email>] \
                                                [-f <full name>] \
                                                [-a no/yes]
All the changes are optional. For example, only the password for an existing user may be updated, leaving the other user information the same as it was.
8.3.4. Deleting users with DB plugin
To delete a user from the server, use the following command:
/usr/sbin/kopano-admin -d <user name>
The user will be deleted from the database. However the store will be kept in the database, but is not accessible. See General usage of kopano-admin tool for more information about handling orphant stores.
8.3.5. Configuring ‘Send as’ permissions
KC supports two kinds of send delegation:
Send on Behalf permissions
If a user grants the appropriate permission to another user, the latter can send items ‘on behalf of’ the other user. In this case an email or meeting request will be sent with the following ‘from’ field: <delegate> on behalf of <user>. This setting can only be set from Kopano WebApp or DeskApp.
Send As permissions
If the system administrator gives the rights to user B to ‘send as’ user A, the receiver of an email will not see that user B sent the email. The receiver will only see the email address of user A in the ‘from’ field.
Setting up sendas delegation with kopano-admin is only applicable with the DB or UNIX plugin. For setting up LDAP or Active Directory see User Management with LDAP or Active Directory.
Add a user to the list of the delegate being updated as a ‘send as’ user. The delegate can now send mails as the updated users’ name, unless the updated user set the delegate as a user based delegate.
kopano-admin --add-sendas <user> -u <delegate>
For example:
kopano-admin --add-sendas john -u helpdesk
Remove a user from the list of the delegate being updated as a ‘send as’ user.
kopano-admin --remove-sendas <user> -u <delegate>
A list of all user who are delegates is part of the normal user information.
kopano-admin --details helpdesk
Name:           helpdesk
...
Send-as:        john
Note
With the DB plugin sendas permissions can not be configured on groups.
Note
When both the “send on behalf of” and “sendas” permissions are configured on the same user, the email will always be sent with “on behalf of”.
8.3.6. Groups
The server supports groups. Users can belong to any number of groups. Every user always belongs to the special group Everyone. Defining security settings on folders and items are the same for both users and groups.
For example, the group Everyone has read access to the Inbox of Peter. At this point, every user may read the email in Peter’s Inbox, because all users are a member of the group Everyone.
When a new Kopano user is created, only the free/busy information is open for read access for the group Everyone by default.
8.3.6.1. Creating groups with the DB plugin
By using the kopano-admin tool, groups can be created and users can be added or removed from groups. In the following example, a user john is created, a group administration is created, and the user john is added to the group administration.
kopano-admin -c john -p secret -f "John Doe" -e "john.doe@kopano.com"
kopano-admin -g administration
kopano-admin -b john -i administration
Using the options -l or -L, a list of users or groups can be listed from the server.
All created users will be member of the group ‘Everyone’, this can not be changed. Groups created with DB plugin can be used both for configuring permissions and sending emails to a specific group.
8.4. Users management with UNIX plugin
When integrating KC with the default users and groups of the Linux server, some of the user administration has to be done via the default Linux usermanagement tools, like the useradd tool and the Kopano specific user administration has to be done with the kopano-admin tool.
8.4.1. Creating users with Unix plugin
To create a new user, use the default adduser command.
useradd <username> -c "Full name"
passwd <username>
As the emailaddress of user can’t be specified in the adduser command, the default email address will be <username>@default_domain. The default domain is specified in the /etc/kopano/unix.cfg.
This email address can be changed by using the kopano-admin tool.
kopano-admin -u <username> -e <email address>
8.4.2. Non-active users
A non-active user cannot login to KC, but email can be delivered to this user, and the store can be opened by users with correct permissions. Non-active users can especially used for functional mailboxes, resources and rooms.
To create a non-active user with the unix plugin, make sure the login shell of the user is set to /bin/false. The login shell for non-active users can be configured as well in the /etc/kopano/unix.cfg.
8.4.3. Updating user information with Unix plugin
Changing user information when using the unix plugin can be done for some information with the default Linux user management tools and for other information with the kopano-admin tool.
The following information has to be changed in the /etc/passwd file or with default Linux user management tools:
- Username
- Password
- Fullname
- Mailbox type (active or non-active)
- Group membership
The following other information has to be changed and configured with the kopano-admin tool.
- Email address
- Administrator flag
- Quota
- Sendas permissions
8.4.4. Deleting users with Unix plugin
To delete a user from the server, use the following Linux command:
userdel <username>
The user will be deleted from the database. However the store will be kept in the database, but is not accessible. See General usage of kopano-admin tool for more information about handling orphant stores.
8.4.5. Configuring ‘Send as’ permissions
See “Configuring ‘Send as’permissions” in the db plugin section.
Note
With the Unix plugin sendas permissions can not be configured on groups.
8.4.6. Groups with Unix plugin
The server supports groups. Users can belong to any number of groups. Every user always belongs to the special group Everyone. Defining security settings on folders and items are the same for both users and groups.
For example, the group Everyone has read access to the Inbox of Peter. At this point, every user may read the email in Peter’s Inbox, because all users are a member of the group Everyone.
When a new Kopano user is created, only the free/busy information is open for read access for the group Everyone by default.
8.4.6.1. Creating groups with the Unix plugin
Groups can be created and users can be added or removed from groups by the default Linux usermanagement tools. In the following example, the group administration is created and the user john is added to the group administration.
groupadd administration
usermod -a -G administration john
Using the options -l or -L, a list of users or groups can be listed from the server.
All created users will be member of the group ‘Everyone’, this can not be changed. Groups created with unix plugin can be used both for configuring permissions and sending emails to a specific group.
8.5. User Management with LDAP or Active Directory
The Kopano-server features a system whereby the administrator of a server can specify an LDAP-based server to retrieve user, group and company information. This means that user management can be simplified for installations and standard LDAP administration tools can be used for user management. Also, using an LDAP server makes it possible to integrate Kopano into an existing environment.
Various LDAP server systems are supported, and Kopano will communicate with any standard LDAP protocol version 3 or later server. This means Kopano works in combination with industry-standard solutions as Microsoft Active Directory, OpenLDAP and eDirectory.
This chapter describes loosely how Kopano uses the LDAP server as a source for user, group, contact and company information. In most cases, the particular setup used will require other options and settings than those described in this document. It is therefore assumed that the reader has a good understanding of how LDAP trees work, and how they are configured in their network.
For more information, please refer to the example configurations and manual pages available on all systems on which Kopano is installed.
Note
Please note that due to performance problems in Samba 4, Samba 4 is not supported as a user source for setups larger than 50 users.
8.5.1. The Kopano user synchronization principle
In any Kopano server, there is a database holding the actual data needed while running Kopano. Apart from the actual folder and item data, the database also holds information on data access rights, user settings, and user meta-data set for users and groups. A lot of this data refers to a specific user ID. For example, an ACL (Access Control List) for the ‘inbox’ for user A will be stored in the database as a record in the ACL table. This record holds the actual access rights for the objects, and the user ID to whom the access control entry has been assigned.
The user ID stated above is therefore a reference to a user ID within the Kopano database. This ID is stored in the ‘users’ table, along with a reference to the ID of the user in the external user database (in this case, an LDAP server). For example, user ‘A’ may have user ID 5 in the Kopano system, and may refer to the item (dn=cn=user,dc=example,dc=com) on the LDAP server.
Keeping a list of users in this way also solves the problem of creating the store for a user; There is no way to trigger a store creation event on the Kopano server whenever a user is added in the LDAP server. The ‘users’ table provides a convenient way to track which users are new to the system and therefore require a new store. The same goes for deleting users, as the user store needs to be removed when the user is deleted.
So, the ‘users’ table in Kopano is almost exclusively a mapping between the user ID which is used internally in Kopano, and an external reference to a user in the LDAP database. Naturally, when any new users are added or users are removed from the LDAP server, this table must be kept in-sync with the changes.
There are many ways of keeping the ‘users’ table synchronised with the LDAP server, but Kopano has chosen by default for a ‘just-in-time’ approach. This means that any time a user is requested from the system, it is first checked in the LDAP server for existence, and then it is checked in the ‘users’ table for existence. If the user does not exist locally on the Kopano server, then the user is created on-the-fly, before returning the information to the caller.
This means that for users and administrators, the synchronisation seems to be real-time; never will there be a delay between adding or removing users from the LDAP server and the users showing up in Kopano.
Because all Kopano components use the same MAPI interface to connect to the server backend, a situation can’t arise with any of the Kopano tools where the user database is out-of-sync. For example, delivering an email to a user that was just created will never fail due to the user not existing in the Kopano users table.
To optimise this synchronisation with very large Global Address Books in LDAP, there is a optional setting sync_gab_realtime in the server.cfg configuration file. When this option is set to no there is no real-time synchronisation between the LDAP directory and the Kopano-server. In this case all Global Address Book entries will be retrieved from the cache of the Kopano-server. This is especially useful for setups which have large addressbooks (more than 10000 entries in the addressbook).
Synchronisation between the LDAP and Kopano server need to be forced with the following command:
kopano-admin --sync
This command can be executed on daily or hourly basis from a cronjob.
8.5.1.1. Add/Remove events
The mechanism above creates a situation in which there are six events that can be signaled:
- User creation
- Group creation
- Company creation
- User deletion
- Group deletion
- Company deletion
These six events can be coupled to a script (which will be described later) so that system administrators can perform specific actions on their servers with these events. By default, Kopano will only perform the absolute necessary actions during these events; ie store creation and removal. Any other events can be scripted by the system administrator. This means that by default, no actions are performed during group creation and group deletion.
8.5.1.2. Group membership
Kopano synchronises users, groups and companies so that it can assign user ID’s to them, but the group membership for users is never stored on the Kopano server. This means that group membership changes are real-time also, and the Kopano server will query group membership for a user or a user list for a group directly from the LDAP server. How the mapping between group members and users is done will be discussed later.
8.5.1.3. LDAP server dependency
Due to the fact that the Kopano ‘users’ database doesn’t actually hold the user or group information, but only a reference to the LDAP server, the Kopano server cannot function without a running and accessible LDAP server. If the LDAP server goes down while Kopano is running, Kopano tools will not be able to perform any actions, as almost all server-side actions require some kind of interaction with the LDAP server. For example, just opening an email requires a query to the LDAP server for the groups that the current user has been assigned to. Only after fetching this information, can Kopano determine whether the current user has the access rights to open the message.
When using OpenLDAP as an LDAP source, it’s recommended to use LDAP replication to guarantee that an LDAP server is available at all times by running an OpenLDAP server on the same machine as Kopano. This will make sure that the local LDAP server will always be reachable, and Kopano will always keep running as normal.
8.5.1.4. Setting up the LDAP repository
While in principle almost any LDAP repository can be used with Kopano, this chapter describes how Kopano requests the data from the server and how that data is used within the Kopano server and tools.
The following information can be read from the LDAP server:
- User details (name, email address, etc)
- Contacts (name, email address)
- Group details (name of group)
- Company details
- User/Group relationships (group membership)
- Company members (users and group membership)
- Company relationships (cross-company view and administrator permissions)
The objects that are classified as users, contacts, groups, dynamic groups, addresslists or companies and the attributes that contain the data can be configured within the Kopano configuration files, so Kopano can meet the LDAP schema needs. However, here are some pointers to keep the LDAP repository clean and easy-to-manage:
- Always use some sort of graphical user interface for user and group management. There are many LDAP configuration tools. (For example, phpLDAPadmin for OpenLDAP as a web based interface)
- If there are users that will be using Kopano, while other users will not, try to group these users into separate ‘folders’. An
OUrecord or any otherdc-typeobject can be used to create these folders. - If Microsoft Active Directory is run, make sure that the real users are in a separate LDAP folder so that Kopano doesn’t need to import the standard users like ‘Administrator’ and ‘Guest’ into the database. It is also possible to filter the users using an LDAP search query, but these search queries can become unsatisfactorily large when using ADS.
As a general rule, always use the LDAPS (SSL) protocol while contacting the LDAP server. When SSL is not used, information will be transmitted clear-text over the wire. This opens possibilities to sniffing user (and administrator!) passwords from the network wire. Kopano supports connecting through LDAP via SSL and a certificate specified in /etc/ldap/ldap.conf which is compatible with both Microsoft Active Directory as OpenLDAP servers.
Note
Please note that if plan to set profile pictures for the users, the jpegPhoto and thumbPhoto attributes have a limit size. Surpassing these limit sizes can cause issues, especially for offline profiles. These limit sizes for these attributes are shown in the propmap.cfg.
8.5.2. User management from OpenLDAP
8.5.2.1. Creating users using OpenLDAP
Users and groups can be created by using a standard OpenLDAP administration for example phpldapadmin or the Windows tool ldapadmin.
To configure Kopano specific information for the user, the objectClass kopano-user has to be added to the user. Adding this objectClass enables you to add Kopano attributes to the user, like quota settings, sendas permissions, mailbox type.
8.5.2.2. Creating groups using OpenLDAP
Created groups in OpenLDAP will be used by default as security groups in KC. The security groups can be used for settings permissions and sending emails. Distributions groups can only be used for sending emails and will not be displayed when setting the security permissions on a folder.
To switch a group to a distribution group the attribute kopanoSecurityGroup has to be set to 0.
8.5.2.3. Creating contacts using OpenLDAP
The Global Address Book can be extended with contacts. Contacts are typically external SMTP addresses and can be used as members of distributionlist. Contacts can have the same additional attributes (Telephone, ..) as normal users.
Contacts must have the same unique attribute as users. Please check the ldap_unique_user_attribute in the ldap.cfg for the correct attribute.
8.5.2.4. Configuring sendas permissions using OpenLDAP
Sendas permissions can be configured both on users and contacts. The users or groups that should be able to sendas a specific address, need to be added in the sendas privilege list.
To check wether the permissions are correctly set, use:
kopano-admin --details <username>
For example:
kopano-admin --details helpdesk
Name:           helpdesk
...
Send-as:        john
The users that have the sendas permissions, should now be able to add the other address in the ‘FROM’ field and ‘sendas’ this account.
‘Sendas’ permissions have to be configured on the user which is select as the FROM address. Groups can also be used for setting sendas permissions.
Note
When using groups for the sendas permissions, make sure the ldap_sendas_attribute_type is set to dn. See the following LDAP configuration:
ldap_sendas_attribute = kopanoSendAsPrivilege
ldap_sendas_attribute_type = dn
ldap_sendas_relation_attribute =
8.5.2.5. Setup addresslists in OpenLDAP
Addresslists are subsets of the Global Address Book that match a specific criteria. For example, you can create an address list that contains all users in Manchester and another that contains all users in Stuttgart.
To setup an addresslist in OpenLDAP, follow these steps:
- Create an
Organisation Unitfor all the addresslists in the LDAP tree. - Create a new LDAP object and add the objectClass
kopano-addresslist - Set the cn attribute to the unique name of the addresslist
- Create a condition query in the
kopanoFilterattribute, see LDAP Condition examples for example condition queries.
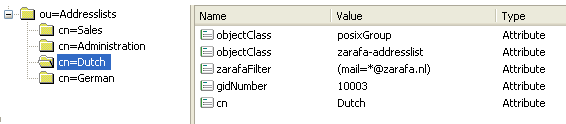
Figure 8.5. Addresslists in LDAP
After restarting the kopano-server, the addresslists should be visible in the global addressbook.
8.5.2.6. Hide information from Global Address Book with OpenLDAP
With KC it is possible to hide users, contacts or groups from the Global Address Book.
Hiding information from the Global Address Book can be done by setting the kopanoHidden attribute in OpenLDAP to 1 on a specific object.
Note
The internal System user and the Everyone group can be made hidden in the /etc/kopano/server.cfg.
8.6. LDAP Condition examples
For both addresslists and dynamic groups a LDAP filter need to specified. For example, the Global Address Book contains Dutch and German users. It is possible to view these users per country by creating two addresslists in the LDAP tree. All German users have the domain example.de in the mail address, and all the Dutch have example.nl.
In this situation, the condition (mail=*@example.de) is used for the addresslist German, and (mail=*@example.nl) for the addresslist Dutch.
Any combination with LDAP attributes are applicable. This following example selects everyone that is a Kopano administrator and has the character p in the cn value.
(&(cn=*p*)(kopanoAdmin=1))
This example selects all users with mailaddress piet@example.de or klaas@example.nl.
(|(mail=piet@example.com)(mail=klaas@example.com))
8.7. Kopano Feature management
Some features within KC can be disabled. By default, all features are disabled. Enabling can be done globally or on a per-user basis. When a feature has been globally disabled, you may enable the feature in a per-user basis too. Currently the only features that can be controlled are ‘imap’, ‘pop3’, ‘mobile’ and ‘outlook’.
If the ‘pop3’ feature is disabled, users won’t be able to login using the POP3 protocol. The same goes for the ‘imap’ feature, but this has an extra effect aswell. When a user receives email when the ‘imap’ feature is enabled, the original email and some other imap optimized data will also be saved in the Kopano database and attachment directory. This will make the IMAP services provided by the kopano-gateway more reliable. On the other hand, it will also use more diskspace. Disabling the ‘imap’ feature will thus save diskspace.
The following table will show when a user can use IMAP or POP3.
Table 8.1. Access control overview
| Service enabled for user | Service disabled for user | Nothing configured for user | |
|---|---|---|---|
| Service listed in disable_feature in server.cfg |  |
 |
|
| Service not listed in disable_feature in server.cfg | |
|
|
8.7.1. Globally enabling features
To enable a specific feature, edit the disabled_features setting in your server configuration:
disabled_features = imap pop3 mobile outlook
8.7.2. Per-user en- or disabling features
Managing the feature per user depends on the user plugin which is used. For the db and unix plugin the kopano-admin tool has to be used to control the features:
kopano-admin -u john --enable-feature imap
kopano-admin -u john --disable-feature pop3
For Active Directory or OpenLDAP setups (using the ldap or ldapms user plugin), the features will be managed from two LDAP attributes kopanoEnabledFeatures and kopanoDisabledFeatures. Make sure the latest schema file or Active Directory plugin is installed, before using these attributes. These multi-valued attributes can contain any string, but only the features Kopano knows about will actually be provided through the system.
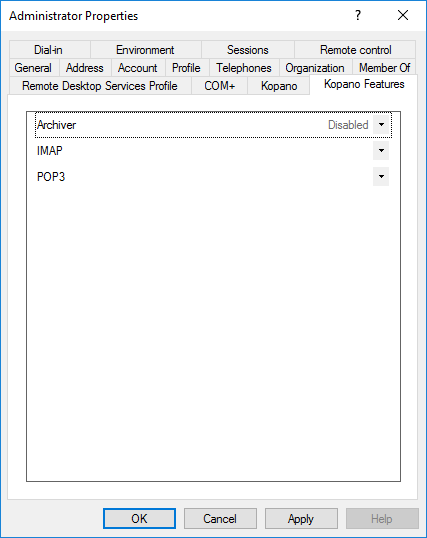
Figure 8.6. Kopano features tab in ADS
Note
Make sure a particular feature isn’t listed in both kopanoEnabledFeatures and kopanoDisabledFeatures. Consistency will not be guaranteed.
8.8. Resource configuration
KC supports automatic booking of resources, like beamers, rooms or other equipment. To create a resource add a new non-active mailbox or select in Active Directory or OpenLDAP the resource user type.
Before a resource can be booked by users, the resource has to configured to automatically accept meeting requests. The automatic acceptance of meeting request can be configured using the kopano-admin tool.
To configure the resource from Outlook, use the following steps:
- Make the resource temporarily active
- Login as the resource in Outlook
- On the Tools menu, click Options, and then click Calendar Options.
- Under Advanced options, click Resource Scheduling
- Enable the automatic acceptance of meeting request
- If the resource should decline double bookings of the resource or bookings of recurrent meetings, the options “Decline recurrencing meeting request” and “Decline conflicting meeting requests” should be enabled.
- Configure the permissions on the calendar of the resource, so the users can book the resource. Users should have at least write permissions to the calendar of the resource.
To configure the resource with the kopano-admin tool, use the following command:
kopano-admin -u <resource name> --mr-accept yes
The resource will now automatically accept meeting requests. To decline double booking or recurrent meeting, use:
kopano-admin -u <resource name> --mr-decline-conflict yes
kopano-admin -u <resource name> --mr-decline-recurring yes
After the automatic acceptance of meeting requests is configured, make sure the users have at least write permissions on the calendar of the resource. The permissions can be configured by opening the resource mailbox to an administrator user and setting the permissions.
To automatic book a resource make sure the resource option is really selected in the Freebusy times when scheduling the meeting.
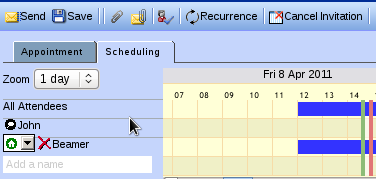
Figure 8.7. Resource option in Freebusy times
8.8.1. Resource booking methods
There are two methods for booking resources:
- Direct booking
- Meeting-request booking
Both methods are used to book resources; The final outcome is that the user can book a resource, after which the resource’s calendar will show that it is busy for the allocated timeslot. Both methods support declining recurring and conflicting meetings, but the way that they work differ in various ways:
Table 8.2. Table Comparison of resource booking methods
| Direct booking | MR booking |
|---|---|
| Books directly in target calendar | Sends meeting request which is responded to |
| Needs read/write access to resource’s calendar | Needs no read or write access to resource’s calendar |
| Possible to limit bookers through permissions | Not possible to limit bookers |
| Does not support multiple resources using the same calendar | Possible to set double-booking limit to 2 or higher for equipment |
| Doesn’t work with external bookers | Works with external bookers |
8.8.2. Meeting request (MR) booking
Booking by meeting requests works exactly the same as sending a meeting request to another user; When booking the resource, a user sends a meeting request to the resource in an e-mail. The resource then receives the e-mail, checks its own availability and replies to the meeting requests just like a human user would; the booker receives an Accepted or Declined meeting response by email.
This means that when the meeting is sent to the attendees, the resource has actually not been booked yet; it is possible that another user has booked the resource in the mean time, resulting in a declined response from the resource. The booker must then re-schedule and send all participants an update.
The main advantage of this method is that the booker needn’t have write permissions on the resource’s calendar. Also, the MR method allows for more flexible handling of meeting requests. For example, if the user has 5 projectors, which have been created as a resource, then they could be created as 5 separate resources, each of which would normally be directly booked. However, this would require the user to search for a free projector and book that specific projector.
With MR booking, the administrator can set the equipment’s capacity to a number other than 1, for example 5 in this case. The administrator then only needs one resource with a capacity of 5 to represent all the projectors. When the MR is processed by the resource, it will check whether all projectors were booked at that moment, only declining when all 5 projectors were not available at that moment.
Please note that you must use the equipment type for your resource if you wish to use the capacity feature. The capacity of room resources is ignored (you can not double-book a room).
MR booking is processed by the kopano-mr-accept script which is installed by default. This script is triggered by kopano-dagent in both direct and LMTP mode when the destination user’s mr-accept setting is set to TRUE AND the incoming message is a meeting request or meeting cancellation. If the kopano-mr-accept script fails, delivery processing is done as usual, possibly triggering delivery rules and out-of-office messages.
Note
In rare cases kopano-mr-accept prints out a warning about using localtime(). This relates to the - per default - unspecified date.timezone variable of php.ini. Setting it to for example date.timezone = Europe/Berlin fixes these messages.
8.9. Out of office management
Users can normally manage their out of office replies from the Outlook, webclients and certain mobile devices. Sometimes users forget to turn on their out of office reply or out of office replies should be enabled for shared mailboxes.
For these purposes KC ships a commandline utility to manage out of office replies.
To use the utility, use the following command:
kopano-set-oof -u <username> -m 1|0 -t "Out of office subject" -n <path to out of office text>
To enable an out of office reply for the user john use:
kopano-set-oof -u john -m 1 -t "I'm on holiday till the 30th of June" -n /tmp/oof.txt
Other options can be gathered from the help of the script. This can be reached when the script is called without any arguments.