6. Special KC Configurations
This chapter describes how to configure special setups that go beyond most common installations of KC.
6.1. Running KC components beyond localhost
When using the SSL connection with certificates it will not only be possible to encrypt the connection, but Linux services will also be able to login using a client SSL certificate.
Repeat the certificate creation script to create certificates for client programs like the kopano-spooler, kopano-monitor, kopano-gateway, kopano-dagent and kopano-admin. It’s possible to create one certificate for all these programs, or a certificate can be created for each program separetely. These clients can then login on the SSL connections with their certificate as authentication.
sh /usr/share/doc/kopano/ssl-certificates.sh client
Again, when entering the certificate details, at least make the Organizational Unit Name different from the other certificates. Also, do not forget to fill in the Common Name field.
When asked for the creation of the public key, enter y and press enter. Now a new certificate called client.pem and a public key called client-public.pem are present. As an example, the configuration options needed to edit on the dagent.cfg file are as follows:
server_socket = https://name-or-ip-address:237
sslkey_file = /etc/kopano/ssl/client.pem
sslkey_pass = ssl-client-password
Important
For the kopano-admin tool to function correctly in a multi-server set-up, a admin.cfg file is required in the KC configuration directory, usually /etc/kopano/. It also should contain the options mentioned above.
Enter the correct name or IP-address in the server_socket option. If Another port number for the SSL connections on the server is used, enter the right port number as well. Replace the password with the password used while creating the certificate.
Copy the client-public.pem file to the server location:
mkdir /etc/kopano/sslkeys
mv client-public.pem /etc/kopano/sslkeys
Now the client knows the private key, and the server knows the public key. The client can login with this key to the server from anywhere on the network or internet.
Note
Be careful with the client.pem file. Anybody who has this private key can login to the Kopano server and will be the internal SYSTEM user, who can do anything without restriction.
6.2. Multi-tenancy configurations
This section will provide information regarding the multi-tenancy functionality available with Kopano Core. The feature is available in all editions, but only officially supported in the Enterprise and Hosted editions.
Multi-tenancy mode enables organisations to run multiple organisations on a single KC server where the members of the different organisations won’t see each other.
6.2.1. Support user plugins
Multi-tenancy support can only be enabled when using the DB or LDAP plugin. Currently it’s not possible to use the Unix plugin. When using the DB plugin, the kopano-admin tool can be used to manage tenants (companies), while with the LDAP plugin all information will come directly from LDAP or Active Directory.
Important
The preferred user plugin for multi-tenancy setups is the LDAP plugin.
6.2.2. Configuring the server
The following configuration options in server.cfg will be used when enabling the multi-tenancy support.
enable_hosted_kopano = false
When set to true, it is possible to create tenants within the Kopano instance and assign all users and groups to particular tenants. When set to false, the normal single-tenancy environment is created.
createcompany_script
Location of the createcompany script which will be executed when a new tenant has been created.
deletecompany_script
Location of the deletecompany script which will be executed when a tenant has been deleted.
loginname_format
See Configuring login name for more details about this configuration option.
storename_format
See Configuring store name for more details about this configuration option.
6.2.2.1. Enabling Multi-tenancy
To enable multi-tenancy support in Kopano change the following configuration option in server.cfg:
enable_hosted_kopano = true
6.2.2.2. Configuring login name
The loginname of a user must be unique in order to correctly allow the login attempt. When enabling multi-tenancy support in Kopano, having an unique loginname can become difficult as the number of companies (tenants) increases. It is easier when the loginname contains the companyname as well, to ensure all loginnames are unique.
The way the companyname is ‘attached’ to the username to create the loginname can be configured with the loginname_format configuration option in server.cfg. This configuration option can contain the following variables:
%u- The username%c- The companyname to which the user belongs
As separation character between the username and companyname a character should be chosen that does not appear inside the username or companyname itself. Valid characters for example are @ and \.
Some example loginname_format for a user named “John Doe” who is member of “Exampleorg”:
%u> john%u@%c> john@exampleorg\\%c\%u> \exampleorg\john
Although having a loginname that contains a %c is mandatory for the DB plugin, it is optional for the LDAP plugin. Managing unique loginname_s is easier in LDAP because it is possible to use the email address as the _loginname attribute. See the LDAP configuration file for more information about the loginname attribute.
Note
When passing a username to the kopano-admin tool it should be formatted as configured. For example if the loginname_format configuration value includes company name variable (%c), the company name should be passed to the kopano-admin tool every time a username is needed.
6.2.2.3. Configuring store name
When relations between multiple tenants (companies) are allowed, it is possible that users share their store with users from other tenants. To easily differentiate stores from different tenants, the store name can be formatted to contain the tenant’s name (companyname) to which the user/store belongs.
In server.cfg the configuration option storename_format is provided for exactly this purpose. In the format different variables are provided which can be used to different kinds of information.
%u- The username%f- The fullname of the user%c- The companyname, name of the tenant, to which the user belongs
Some examples for a user named ‘John Doe’ who is member of the tenant ‘Exampleorg’:
%u> john%f> John Doe%f (%c)> John Doe (Exampleorg)
6.2.2.4. Configuring the LDAP plugin
While when using the DB plugin no additional configuration is required, for the LDAP plugin there are several configuration options that might require changes.
For a multi-tenancy LDAP setup, it is necessary to have the different company in the LDAP tree and below every company container the users, groups and contacts within that specific company. It’s not possible to assign a user to a specific company by an LDAP attribute.
See the screenshot below for an example LDAP structure.

Figure 6.1. LDAP tree multi-tenant environment
Change the following lines in the LDAP configuration file, to configure the multi-tenancy support.
ldap_company_unique_attribute = ou
ldap_companyname_attribute = ou
Test the settings by using kopano-admin --list-companies and kopano-admin -l.
If no companies or users are shown, please check the Kopano server log file for errors. Setting the loglevel to 6 in the /etc/kopano/server.cfg will display all LDAP queries by the Kopano server and possible errors.
With multi-tenancy support enabled it’s not only possible to have different organizations on a single server, but also more advanced settings can be configured, like cross-organization mailbox delegation, different administrator levels and organization quota levels.
See the kopano-ldap.cfg man page for more detailed information about these multi-tenancy LDAP features.
man kopano-ldap.cfg
6.2.2.5. Public stores
Once the server has been correctly started, stores can be created. There are two type of stores: Private and public stores. There can only be one public store per company space. When creating a company, the public store will be created simultaneously. If for some reason the public store for the specific company is not created, the public store can be created manually by executing the following command:
/usr/sbin/kopano-admin -s -I <tenant>
Replace <tenant> with the name of the tenant (company) for which the public store should be created. When the -I option is not used, the public folder will be created for a single-tenancy environment (And will not be accessible when multi-tenancy Kopano is enabled). The public folder is by default available for all users within a tenant (company).
6.2.3. Managing tenant (company) spaces
Note
Management of tenant (company) spaces through kopano-admin is only available when using the DB plugin. When the LDAP plugin is used, all administration needs to be done through the LDAP or Active Directory server.
To create a company space use the following command:
/usr/sbin/kopano-admin --create-company <companyname>
To delete a company space use the following command:
/usr/sbin/kopano-admin --delete-company <companyname>
To change a company space use the following command:
/usr/sbin/kopano-admin --update-company <companyname>
This command can be combined with the option --quota-warn for setting the quota warning level for the specified company space.
To control the view privileges for company spaces the following commands can be used:
/usr/sbin/kopano-admin --add-to-viewlist <viewer> -I <companyname>
/usr/sbin/kopano-admin --add-to-viewlist <viewer> -I <companyname>
/usr/sbin/kopano-admin --list-view -I <companyname>
The <viewer> is the companyname which receives or looses permission to view company <companyname>. With the view privileges the Global Address Book can be shared between multiple organizations or use cross organization mailbox delegation.
/usr/sbin/kopano-admin --add-to-adminlist <admin> -I <companyname>
/usr/sbin/kopano-admin --del-from-adminlist <admin> -I <companyname>
/usr/sbin/kopano-admin --list-view -I <companyname>
The <admin> is the loginname of the user who receives or looses admin privileges over the company <companyname>. Please note that a user that is administrator over a tenant still needs to be given view privileges to this tenant to see its stores.
6.2.4. Managing users and groups
When using the DB plugin users and groups should be created using the kopano-admin tool. For details about using the kopano-admin tool see man kopano-admin. The user- or group name that should be given to the kopano-admin tool depends on the loginname_format configuration option.
For example, when loginname_format is set to %u@%c creating a user for tenant exampleorg would be:
/usr/sbin/kopano-admin -c john@exampleorg ...other options...
And creating a new group for tenant exampleorg would be:
/usr/sbin/kopano-admin -g group@exampleorg ...other options...
6.2.5. Quota levels
When using a multi-tenancy installation there are 2 types of quota, namely the quota for the tenant (company) and the quota for the individual user. The quota for the tenant is checked over the total store size of all users within that tenant plus the public store.
At this time only the warning quota can be configured for a tenant, this means it is not possible to set the soft or hard quota to limit the tenant’s email capabilities.
Just like the user quota, there are multiple levels for tenant quota, and there is even a new level for the user quota. A summary of the possible quota levels which can be set in a multi-tenancy environment:
Tenant (company) quota:
Global company quota: Configured in/etc/kopano/server.cfgand affects all tenants within the system.Specific company quota: The quota level for a tenant configured through the plugin (LDAP orkopano-admintool).
User quota:
Global user quota: This is configured in/etc/kopano/server.cfgand affects all users from all tenants.Company user quota: This is the default quota level for all users within a tenant, and is configured through the plugin at tenant level.Specific user quota: This is the quota level for a specific user, and is configured through the user plugin.
As mentioned above the Global company quota and Global user quota can be configured in the /etc/kopano/server.cfg file, in there the options quota_warn, quota_soft and quota_hard for the user quota, and the options companyquota_warn for the tenant quota.
To configure the Specific company quota the kopano-admin tool can be used when using the DB plugin. The following command will set the various quota levels over the tenant:
kopano-admin --update-company <tenant> --qo y --qw <warningquota>
To configure the Specific user quota the kopano-admin tool can be used when using the DB plugin. The following command will set the various quota levels over the user:
kopano-admin -u <user> --qo y --qh <hardquota> --qs <softquota> --qw <warningquota>
To configure the Company user quota the kopano-admin tool can be used when using the DB plugin by using the --update-company argument. The following command will set the various user default quota levels over the tenant:
kopano-admin --update-company <tenant> --udqo y --udqh <hardquota> \
             --udqs <softquota> --udqw <warningquota>
When using the LDAP plugin, the attributes which control the quota levels can be configured in /etc/kopano/ldap.cfg.
6.2.6. Administrator users
In a multi-tenancy installation there are two types of administrator users:
- System wide administrator
- Company administrator
The system administrator can access all mailboxes within the hosted environment. A company administrator can only access the mailboxes within the local organisation.
A system administrator can be configured by setting the kopanoAdmin attribute to 2 when using LDAP or use -a 2 when using the DB plugin. A company administrator can be configured by setting the kopanoAdmin attribute to 1.
The type of administrator user can be requested by using the kopano-admin tool:
kopano-admin --details <admin username>
Username:              admin@example.com
Fullname:              Administrator
Emailaddress:          admin@example.com
...
6.3. Multi-server setup
This chapter will provide information regarding the multi-server functionality available in Kopano Core.
6.3.1. Introduction
The KC multi-server feature gives the possibility to distribute KC over multiple servers. In this situation the Kopano-user-stores are divided over several servers, but still acting as one central system. The users, groups and tenants (companies) have to be managed in a LDAP or Active Directory server.
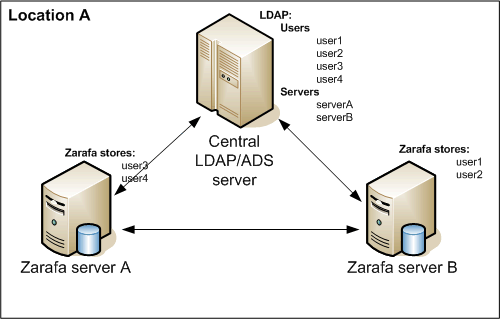
Figure 6.2. Multiserver environment in one location
The multi-server support can also be used to support larger number of users or to spread mailboxes over different geographical locations, see Multiserver environment on two locations.
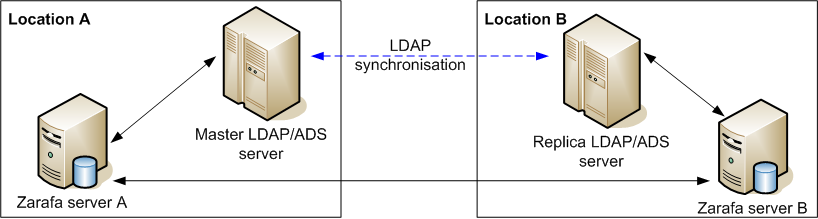
Figure 6.3. Multiserver environment on two locations
The mailbox of a user is always stored on only one server. It’s not possible to synchronize mailboxes over multiple servers.
When accessing mulitple mailboxes, that are located on different servers, the client will make a connection to the different multi-server nodes. See the flowchart Multiserver environment.
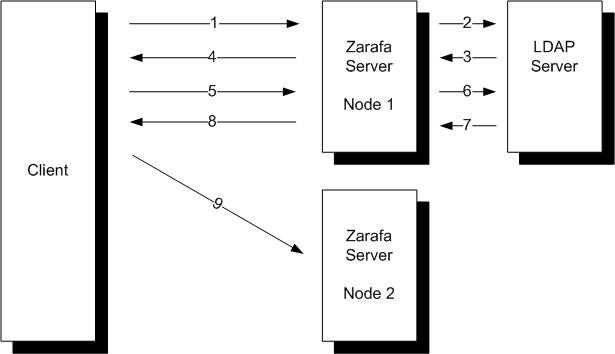
Figure 6.4. Multiserver environment
User John is located on Node 1 and the user Mary is located on Node 2. John has read access on the mailbox of Mary.
- John starts his Outlook client, which connects to Node 1.
- The Kopano Server Node 1 checks the Home Server attribute in the central LDAP server.
- The Home Server of user John is returned to the Kopano Server.
- John’s mailbox is located on Node 1, so the mailbox is loaded.
- John sends a request to the Kopano Server to open the mailbox of Mary.
- The Kopano Server Node 1 checks the Home Server attribute of Mary in the central LDAP server.
- The Home Server of user Mary is returned to the Kopano Server
- A redirect request is send back to the client
- The client makes a connection to Node 2 to open the mailbox of Mary.
In the above example the client has a connection open to both nodes to access the mailboxes.
6.3.2. Prepare / setup the LDAP server for multi-server setup
The Kopano multi-server version can only be used with the LDAP user plugin.
In a multi-server setup the Kopano Server will not only request user and group information from the LDAP server, but also information about the different multi-server nodes.
Setup the LDAP server using Configure Kopano for user management with LDAP (e.g. OpenLDAP/ADS) or Configuring ADS to use the Kopano schema in this manual.
In the LDAP structure add a folder or organizational unit for each Kopano Server node in the multi-server setup.
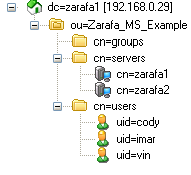
Figure 6.5. Setup directory with all the multi-server nodes
Add all the multi-server nodes to this directory or organizational unit. In Active Directory the
Computertemplate can be used for this. When using OpenLDAP a custom LDAP object can be created, with thedevice,ipHostandkopano-serverobjectClass.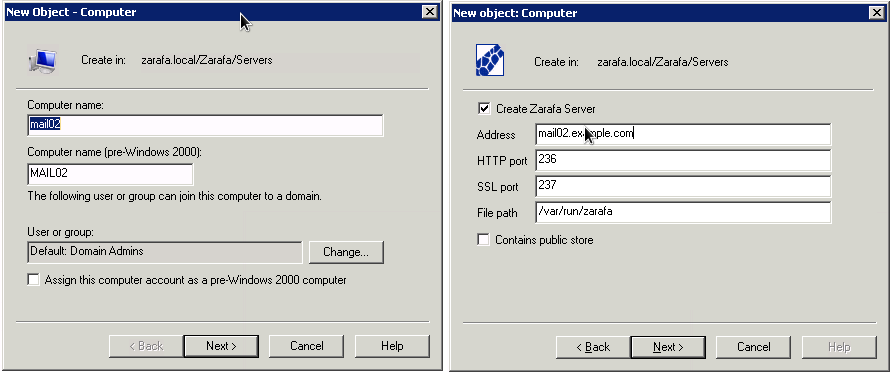
Figure 6.6. Computer creation wizard in ADS
Every multi-server node should have a
common name,FQDN(recommended) orip-addressand theKopano server details. Make sure theFQDNcan always be resolved by the clients.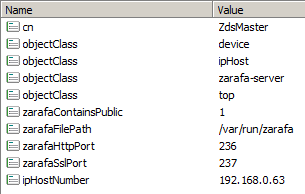
Figure 6.7. LDAP server attributes
The attribute
KopanoContainsPubliccan only be set for one multi-server node at a time. At the moment there is no support for having a single Public Folder onto multiple nodes.The Kopano LDAP configuration needs to be extended with some extra multi-server configuration options. An example configuration file for the multi-server setup can be found in the
/usr/share/doc/kopano/example-configdirectory. The filesldapms.*.cfgare the specific multi-server configuration files. The following LDAP configuration entries need to be configured for a multi-server setup:
ldap_server_type_attribute_value = kopano-server
ldap_user_server_attribute = kopanoUserServer
ldap_server_address_attribute = ipHostNumber
ldap_server_http_port_attribute = kopanoHttpPort
ldap_server_ssl_port_attribute = kopanoSslPort
ldap_server_file_path_attribute = kopanoFilePath
ldap_server_search_filter =
ldap_server_unique_attribute = cn
- Every created Kopano user in the LDAP server needs to be assigned to a Kopano server node. This can be set by using the KopanoUserServer attribute. The attribute should contain the unique server name.
In a multi-tenancy situation, all created tenants (companies) in LDAP have to be updated with the kopanoCompanyServer attribute. Use the server name as well for this.
6.3.3. Configuring the servers
The following configuration options in server.cfg are provided for Multi-server support.
enable_distributed_kopano
Enable multi-server environment. When set to true it is possible to spread users and companies over multiple servers. When set to false, the single-server environment is created.
server_name
The unique server name used to identify each node in the setup. This server name should be configured correctly in the DNS. This server name should be the same as the value of the kopanoUserServer attribute.
To enable multi-server support in Kopano change the following configuration options in server.cfg:
user_plugin = ldapms
enable_distributed_kopano = yes
server_name = <servername>
server_listen_tls = *:237
Note
An upgrade from single server to multi-server support is not a simple task. Please check with the Kopano Support if migration is possible for the setup used.
6.3.4. Creating SSL certificates
In a multi-server setup, it is required to configure SSL support, because clients like the kopano-dagent, kopano-admin, kopano-monitor need an SSL certifcate to login to the different multi-server nodes.
It’s required to first create server side certificates, so the Kopano Server is able to accept SSL connections. For the SSL authentication of the Linux clients, like the kopano-dagent, a private and public key need to be created.
Follow the steps below to create the required server and client certificates. You need once certificate per server, but could theoretically reuse one client certificates for all client connetions.
- First, create the directory which will contain the certificates.
mkdir /etc/kopano/ssl
chmod 700 /etc/kopano/ssl
- Create the server certificate, by using the
ssl-certificates.shscript in the/usr/share/doc/kopanodirectory, which uses the openssl command and theCA.plscript. Before a server certificate can be created a root CA is required. If no root CA is found, the script will first create an own CA.
cd /etc/kopano/ssl/
sh /usr/share/doc/kopano/ssl-certificates.sh server
- Enter a password (passphrase) if you want to use a password for the server key. If a password is set, then this password is needed later on to sign certificate requests. Then enter the certificate information. Give extra attention to the Common Name. This has to be the fqdn of the server and match the value returned by
ldap_server_address_attribute. The challenge password at the end may be left empty. At the end of the certificate creation the certificate need to be signed against the CA. Accept twice the question for the signing and fill the password of the CA again when asked for. - In the last step, the script will ask if it should display the public key of this certificate. This is not necessary, since the certificates have already been created.
- After completing the
ssl-certificates.shscript, the server certificate is created in the current directory. The root CA certificate can be found in the same directory or in the default SSL directory of the Linux distribution. On Ubuntu the root CA will be created as./demoCA/cacert.pem, on RedHat the root CA will be created as/etc/CA/cacert.pem. Edit the following lines in/etc/kopano/server.cfg.
Note
The certificate of the server does not neccesarily need to be created from the same CA as the client certificate. The CA used for creating the client certiticates must be known to kopano-server to be able to validate the certificate chain.
server_listen_tls              = *:237
server_ssl_ca_file             = /etc/kopano/ssl/demoCA/cacert.pem
server_ssl_key_file            = /etc/kopano/ssl/server.pem
server_ssl_key_pass            = <ssl-password>
sslkeys_path                   = /etc/kopano/sslkeys
- After a restart of the Kopano-server, the server should accept HTTPS connections. Please check the server logfile for any errors.
- For more options concerning ssl certificates please also see the manpages of kopano-server.cfg.
- If the server certificates are successfully created, the client certificates can be created by the following steps:
cd /etc/kopano/ssl
sh /usr/share/doc/kopano/ssl-certificates.sh client
- Fill in all the information, like the server certificate. On some Linux distributions, the Common Name may not be the same as in the server certificate. While the Common Name is important for the certificate creation, it is not of any importance for the Kopano clients. At the end of the creation, it is required to sign again the certificate against the CA and create a public key for the certificate.
- Two client certificates are created:
client.pemandclient-public.pem. Theclient.pemis the private key and will be used by a client (like dagent or spooler). Theclient-public.pemis the public key which is used by the server. - Create
/etc/kopano/sslkeysand move the public key into it.
mkdir -p /etc/kopano/sslkeys
mv /etc/kopano/ssl/client-public.pem /etc/kopano/sslkeys
- Restart the
kopano-serveron all nodes to activate the new certificates:
systemctl restart kopano-server
- To test the client SSL certificates change the following lines in the
/etc/kopano/dagent.cfg.
server_socket = https://127.0.0.1:237/kopano
sslkey_file = /etc/kopano/ssl/client.pem
sslkey_pass = <ssl-client-password>
When the certificates have been set up email can now be delivered by using the ssl socket with the dagent’s private-key, in this test case on localhost.
kopano-dagent -v -c /etc/kopano/dagent.cfg <username_on_this_node>
Subject: test email
Test
<ctrl-d>
Note
Another way of verifying your ssl client configuration is by passing the individual configuration files to `kopano-admin with the -c parameter. This is possible since the ssl options are the same between all client programs. If you are able to query user details of a non-local store your certificate configuration is valid.
When connecting through ssl the dagent will verify the private against the root CA. On Red Hat based systems generated hashed file names have to created of the root certificates:
yum install openssl-perl
cp /etc/CA/cacert.pem /etc/pki/tls/certs/kopano-ca.pem
c_rehash /etc/pki/tls/certs
This way the dagent is able to verify the private-key against the CA bundle. On Debian based systems this step can be ignored.
- If the test case is successful, it is possible to change the following value in the dagent.cfg back to:
server_socket = file:///var/run/kopano/server.sock
- Deploy the invididual certificates to the different multi-server nodes:
scp -r /etc/kopano/ssl /etc/kopano/sslkeys root@node2:/etc/kopano/
Remember to copy the root CA to the different nodes if this file is placed outside the directories that have just been copied.
- Repeat the above steps to configure the
server.cfganddagent.cfgon all the different nodes. On Red Hat based nodes also add the root CA to the CA bundle. When done test remote delivery width:
kopano-dagent -v -c /etc/kopano/dagent.cfg <username_on_other_node>
Subject: test email
Test
<ctrl-d>
This delivery should not result in any delivery errors, otherwise please check created certificates. It’s now possible to deliver email from a central MTA to the different multiserver nodes.
The client SSL certificates can be used for the following tools to connect to a remote Kopano-server:
kopano-backup
kopano-admin
kopano-dagent
kopano-search
kopano-spooler
For advanced multi-server environments and the best Kopano configuration for a specific setup, the Kopano Professional Services are open for advise and support.
6.4. Single Instance Attachment Storage
The Kopano Server provides Single Instance Attachment Storage to avoid redundant storage of attachments. This feature, as its name implies, only keeps one copy of each attachment when a message is sent to multiple recipients within the same server. This mechanism, thus, minimizes the disk space requirements and remarkably enhances delivery efficiency when messages with attachments sent to large distribution lists.
Let’s assume the following situation: user A belongs to a Kopano server; he sends a message with 10 MB of attachments to 30 users that reside on the same server. In a normal situation 30 copies of the files would be saved on the database, leading to an inefficient usage of the storage space (310 MB of data). With single instance attachment store, only one copy of each attachment is saved on the database (only 10 MB of data in this example) and all the 30 users can access the attachment through a reference pointer.
Note
Single instance attachments are accessible between tenants (companies) as well (even when the tenants cannot view each other), the handling of single storage will be transparent. Thus, considering the example above, if user A sends the message to 30 users of tenant1 and 50 users of tenant2, provided that the tenants reside on the same server, only one copy of the attachments is saved.
Note
Single instanced attachments will be handled per server, when sending an email with attachment to multiple Kopano users spread over multiple servers, each server will get its own Single instance attachment.
6.4.1. Single Instance Attachment Storage and LMTP
To use the Single Instance Storage it’s required to use the LMTP delivery method executed from the virtual_transport in Postfix.
With the aforementioned setup, externally received email with an attachment sent to multiple internal users will be processed efficiently by saving the attachment only once.
The usage of virtual_transport in Postfix will deliver only one email with a list of the internal users to the dagent instead of one email per internal user. Without virtual transport option, Single Instance can not know that the attachment is similar in the email item(s).
6.5. Single Sign On with KC
This chapter will describe how to set up a Single Sign On environment with KC, so users can authenticate without entering their password. KC supports both the NTLM and Kerberos authentication protocol.
Both methods will be described in the following sections.
6.5.1. NTLM SSO with ADS
6.5.1.1. Installing Linux software
The following software needs to be installed:
winbindkinit
Depending on the linux distribution used, this comes through various package names. On Debian use:
apt-get install krb5-user winbind
krb5-user will also install the Kerberos library configuration files in /etc. The package winbind depends on samba-common which will therefore be installed as well. On Red Hat Enterprise Linux both the krb5-workstation and the samba-common package are required for this.
To enable NTLM SSO with KC set the following option in /etc/kopano/server.cfg:
enable_sso = yes
6.5.1.2. ADS: Specific network setup
The following prerequisites have to be met before proceeding:
- Every server must have a DNS name, so their IP-addresses can be found by DNS.
- The time of all servers must be in sync. Time cannot lag for a few minutes.
This document has the following names as example:
FQDNof the Windows ADS server:ADSERVER.ADSDOMAIN.EXAMPLE. Therefore, the windows server is named:ADSERVER, the realm isADSDOMAIN.EXAMPLE, and the domain name isADSDOMAIN. Workstations can therefore either join the domain using theADSDOMAINorADSDOMAIN.EXAMPLEname.FQDNof the Linux server isLINUXSERVER.EXAMPLE. This name does not matter much, as long as it is handled by the DNS server.
6.5.1.3. Configuring the Kerberos library
First we are going to configure the Kerberos library. The configuration file is /etc/krb5.conf. Under the libdefaults section, set:
default_realm = ADSDOMAIN.EXAMPLE
Under the realms section, add the windows realm:
[realms]
ADSDOMAIN.EXAMPLE = {
    kdc = 192.168.0.100
    admin_server = 192.168.0.100
    password_server = 192.168.0.100
    default_domain = ADSDOMAIN.EXAMPLE
}
Here, 192.168.0.100 is the IP-address of the Windows ADS domain server.
Now that the Kerberos library is configured, it is possible to login using kinit on the linux server:
kinit Administrator
This will ask for a password:
Password of Administrator@ADSDOMAIN.EXAMPLE:
Type the administrator password there, and a Kerberos ticket should be provided by the ADS server.
6.5.1.4. Joining the ADS domain
First we’ll configure samba. Edit the /etc/samba/smb.conf file, and add/set the following options:
For Samba < 3.4
[global]
realm = ADSDOMAIN.EXAMPLE
use kerberos keytab = true
security = ads
For Samba >= 3.4
[global]
realm = ADSDOMAIN.EXAMPLE
kerberos method = dedicated keytab
dedicated keytab file = /etc/krb5.keytab
security = ads
The value of kerberos method may also be set to system keytab, and dedicated keytab file may be left out. Please consult the smb.conf(5) manual page for more information about these settings.
With this ticket we can join the Windows domain, without typing the password again:
net ads join
or if this doesn’t work:
net ads join -S ADSDOMAIN -U Administrator
This command may also be different for different versions of Samba. If this command asks for a password, something goes wrong and it should be killed with Ctrl-C. When all goes well, the following line is printed to the screen:
Joined 'LINUXSERVER' to realm 'ADSDOMAIN.EXAMPLE'
or some other success message.
Now it’s required to restart the winbind daemon, because it keeps too many items cached:
/etc/init.d/winbind restart
And that’s it. To test if authentication actually worked, try the following command:
ntlm_auth --username=john
Where john is a user on the ADS server.
The program will asks for a password. After entering the password, it should say:
NT_STATUS_OK: Success (0x0)
If this step does not work, try restarting winbind, check the DNS names, check with strace what ntlm_auth tries to do, check with tcpdump if there is actual traffic on the network from ntlm_auth to the domain server and other lowlevel debugging tools.
6.5.2. NTLM SSO with Samba 3
6.5.2.1. Installing Linux software
Depending on the Linux distribution used, winbind comes through various package names. On Debian use:
apt-get install winbind
On Red Hat Enterprise Linux the samba-common package is required for this.
To enable NTLM SSO with KC set the following in the /etc/kopano/server.cfg file:
enable_sso = yes
6.5.2.2. Joining the domain
Now the server need to join the Samba domain by executing the following command:
net rpc join
Finish by typing the Administrator password. If successful the prompt should give:
Joined domain <DOMAIN>
The SSO configuration is now done. To test if authentication actually worked, try the following command:
ntlm_auth --username=john
Where john is a valid Samba user.
The program will asks for a password. After entering the password, it should say:
NT_STATUS_OK: Success (0x0)
If this step does not work, try restarting winbind, check the DNS names, check with strace what ntlm_auth tries to do, check with tcpdump if there is actual traffic on the network from ntlm_auth to the domain server and other lowlevel debugging tools.
6.5.3. SSO with Kerberos
6.5.3.1. Requirements and Conventions
- The server that runs KC must have the MIT Kerberos software installed.
- Every server must have a DNS name, so their IP-addresses can be found by DNS. It is also required that all servers have a PTR record.
- The time of all servers must always be in sync with each other.
This document has the following names as example:
- FQDN of the Windows Active Directory Server:
ADSERVER.ADSDOMAIN.EXAMPLE. Therefore the windows server is named:ADSERVER, the realm isADSDOMAIN.EXAMPLE, and the workgroup name isADSDOMAIN. - FQDN of the Kopano Server is
KOPANO.LINUXDOMAIN.EXAMPLE.
In this example the Kopano Server is placed in a different domain. This is no requirement, but this makes the document a bit more clear on how to create the Kerberos principal.
6.5.3.2. Active Directory configuration
Create a Kerberos principal in Active Directory:
- Add a new user
httpd-linuxto the Active Directory (this user will be used to create the principal for SSO with use for WebApp and DeskApp, username may differ). - Make sure that the option Password never expires is enabled.
- On the account properties for these users, enable: Use DES encryption types for this account.
- After setting this account property it is strongly advised to reset the password for these users.
Note
The following commands will use the ktpass.exe utility, which should be installed by default when the ActiveDirectory is running on the same machine. In any other case you can find it with the “Windows Support tools” on the install cd or download them from the Microsoft website.
Note
When creating a keytab on Windows Server 2008 be sure to specify RC4-HMAC-NT as the crypto, -mapop set +desonly must be left out.
Execute the following command to create the keytab file for the Apache webserver:
ktpass.exe -princ HTTP/fqdn@REALM -mapuser account@DOMAIN -crypto DES-CBC-MD5 \
           -ptype KRB5_NT_PRINCIPAL -mapop set +desonly -pass <password> \
           -out c:\keytab.apache
or for Windows Server 2008:
ktpass.exe -princ HTTP/fqdn@REALM -mapuser account@DOMAIN -crypto RC4-HMAC-NT \
           -ptype KRB5_NT_PRINCIPAL -pass <password> -out c:\keytab.apache
Execute the following command to create the keytab file for the Kopano Server:
ktpass.exe -princ fqdn@REALM -mapuser account@DOMAIN -crypto DES-CBC-MD5 \
           -ptype KRB5_NT_PRINCIPAL -mapop set +desonly -pass <password> \
           -out c:\keytab.kopano
or for Windows Server 2008:
ktpass.exe -princ fqdn@REALM -mapuser account@DOMAIN -crypto RC4-HMAC-NT \
           -ptype KRB5_NT_PRINCIPAL -pass <password> -out c:\keytab.kopano
- Copy the file
keytab.apacheto/etc/apache2(Deban and Ubuntu) or/etc/httpd/(RHEL & SLES) on the Linux server. - Copy the file
keytab.kopanoto/etc/kopano/on the Linux server.
6.5.3.3. Kerberos configuration
Open the file /etc/krb5.conf and insert the following lines:
[libdefaults]
   default_realm = ADSDOMAIN.EXAMPLE
   default_tgs_enctypes = des-cbc-md5 arcfour-hmac-md5
   default_tkt_enctypes = des-cbc-md5 arcfour-hmac-md5
   permitted_enctypes = des-cbc-md5 arcfour-hmac-md5

[realms]
   ADSDOMAIN.EXAMPLE = {
           kdc = adserver.adsdomain.example
           admin_server = adserver.adsdomain.example
   }

[domain_realm]
.adsdomain.example = ADSDOMAIN.EXAMPLE
adsdomain.example = ADSDOMAIN.EXAMPLE
Configuring KC for Kerberos SSO with Outlook:
Add the following line to the [libdefaults] section of /etc/krb5.conf:
default_keytab_name = /etc/kopano/keytab.kopano
6.5.3.4. Kopano Server configuration
To enable Outlook SSO with KC set the following in the server.cfg file:
enable_sso = yes
If the hostname of the Linux server (see the hostname command) does not equal the FQDN of the Linux server, the server_hostname variable will need to be changed in the server.cfg file:
server_hostname = kopano.linuxdomain.example
Restart the kopano-server to activate all changes.
service kopano-server restart
6.5.3.5. Apache configuration (for SSO with WebApp)
Install the mod_auth_kerb/libapache2-mod-auth-kerb Apache module, e.g. for Red Hat:
yum install mod_auth_kerb
For Debian/Ubuntu: apt-get install libapache2-mod-auth-kerb
Open the vhost configuration of WebApp and add the following lines to the <Directory> directive:
<Directory /usr/share/kopano-webapp>
  AuthType Kerberos
  AuthName "Kerberos Login"
  KrbMethodNegotiate On
  KrbServiceName HTTP
  KrbAuthRealms ADSDOMAIN.EXAMPLE
  Krb5KeyTab /etc/httpd/keytab.apache
  require valid-user
</Directory>
Set the filesystem permissions of the keytab file to 400 and change the owner to the Apache user:
chmod 400 /etc/httpd/keytab.apache
chown apache:apache /etc/httpd/keytab.apache
Restart Apache to activate all changes, e.g. for Redhat:
service httpd restart
6.5.3.6. WebApp configuration
To setup a Single Sign On environment for Kopano Collaboration Platform, it’s necessary to make a trust between the Apache webserver and the Kopano Storage Server. The trust is necessary to manage the user authentication through the webserver and not anymore through Kopano.
There are two ways to establish this trust. The first option is to have the system user running the Apache process acting as an administrator within Kopano, which can only be recommended when Kopano is running on the same systen and no other applications (for instance Z-Push) are running on the same server. The second option is to use ssl client certificates (see Creating SSL certificates) to establish this trust only for a specific web application.
6.5.3.6.1. Using client certificates for authentication
To use ssl client certificates for authentication (see Creating SSL certificates) the client certificate has to be readable by the user of the webserver. Afterwards the DEFAULT_SERVER, SSLCERT_FILE and SSLCERT_PASS has to be changed in the config.php of WebApp.
// Default Kopano server to connect to.
define("DEFAULT_SERVER","https://localhost:237/kopano");
// When using a single-signon system on your webserver, but Kopano is on another server
// you can use https to access the kopano server, and authenticate using an SSL certificate.
define("SSLCERT_FILE", "/usr/share/kopano-webapp/kopano-client.pem");
define("SSLCERT_PASS", mypassword);
6.5.3.6.2. Running the webserver as an administrator
To have the webserver act as an administrator, the user running the webserver process has to be added on the following line of the server.cfg:
local_admin_users = root apache
Typical users are apache for RHEL, www-data for Debian/Ubuntu and wwwrun for SLES.
Note
This method will only work, when the WebApp is running on the same server as Kopano.
Restart the kopano-server processes to activate this change, e.g. for Red Hat:
service kopano-server restart
Warning
Setting the webserver als local_admin_user will allow other applications running on the same server to log in with admin privileges as well. As passwords will no be checked for admin users this means, that user will be able to log in with any password!
6.5.3.6.3. Common steps
As the passed user in Single Sign On environments also contains the domain/realm (e.g. user@domain), the WebApp has to remove this before logging in. This can be configured in the config.php file:
define("LOGINNAME_STRIP_DOMAIN", true);
6.5.3.7. Browser configuration
Before Single Sign On can be used in a browser, configure the following settings:
Firefox
- Type in the addressbar
about:config - Filter on
auth - Change the options:
network.negotiate-auth.trusted-urisandnetwork.negotiate-auth.delegation-uristo.testdomain.com
Internet Explorer
- Go to Tools > Internet options > Advanced
- Make sure the option Enable integrated Windows authentication is enabled
- Add the url of the Kopano Server (http://kopano.linuxdomain.example) to the Local Intranet sites.
Restart the browser and open the WebApp via the FQDN (http://kopano.linuxdomain.example). If the configuration is done correctly, the user will be logged in to the WebApp without typing the username and password.
6.5.4. Up and running
Now that SSO seems to work with the Linux server, it will automatically be used by kopano-server. Now log on to a Windows workstation on the domain and use either WebApp or DeskApp to authenticate with the backend, but leave the password field empty.
6.6. Tracking messages with Kopano Archiver
This section provides information on how to track all incoming and outgoing messages using Kopano’s Archiving technology. This can be useful in more strict e-mail environments where it’s important to be able to see what has been sent and received regardless of what the owner of the messages has done with them.
6.6.1. Archive on delivery
Archive on delivery is the process of making sure each message that is received will also be placed in each attached archive. If the message can not be archived it will not be delivered. Instead it will result in a temporary failure, causing the MTA to retry the deliver the message at a later time.
Archive on delivery is implemented by the kopano-dagent process and can be controlled with the archive_on_delivery configuration option in the dagent configuration file.
For Archive on delivery to work, an archive configuration file needs to be present in the Kopano configuration directory. In this configuration file settings for sslkey_file and sslkey_pass must me set to values such that Kopano server can contact the archvier server sucessfully.
When a message is archived with the archive on delivery method, it will become a regular archive entry, meaning the normal rules apply. This means that if a user moves the message in the primary store, the message will also move in the archive. This includes moving to the trash folder.
Important
When a message is deleted from the primary store, the message is not deleted from the archive. Instead it is moved to the special Deleted folder in the archiver.
Warning
Due to the current implementation of the Dagent messages that are moved by a rule will sadly be skipped during any subsequent archiving.
6.6.2. Archive on send
Archive on send is the process of making sure each message that is being send by the spooler will also be placed in each attached archive. If the message not be archived it will not be send. Instead it will return a failure message to the user.
Archive on send is implemented by the kopano-spooler process and can be controlled with the archive_on_send configuration option in the spooler configuration file.
Important
E-mail that is sent directly to an SMTP server (usually when using an IMAP account) will not be archived directly because the kopano-spooler is not involved in the send process in this situation.
When a message is archived with the archive on send method, it becomes a detached archive. This means it has no reference to the original message in the primary store. There’s also no message in the primary store that will contain a reference to the archived message.
Note
Unless disabled, messages in the sent items folder are archived as any other message. Extra storage is required because those message have also been archived by the spooler.
6.7. Kopano Python plugin framework
The Kopano Spooler and the Kopano Dagent support the Kopano python plugin framework. This framework makes it easier for advanced system administrators and developers to integrate systems with the spooler and dagent. The advanced system administrator and developer can easily add new functionality or change some behaviours of the existing system. The plugin framework is based on the programming language Python which means that you need to create your own hook in python.
6.7.1. How it works
If the plugin framework in the spooler or dagent is enabled it will search for python files in the directory plugin_path and look for a specific type of plugin. If the plugins are found it will be verified and loaded. Everytime the spooler or dagent is called it will execute the hooks based on priority. Plugins can validate and change a message on different stages of the spooler and dagent process.
6.7.2. General Options
The options for the python plugin framework are for every client the same except the file locations, see Table Python plugin framework options
Table 6.1. Table Python plugin framework options
| Option | Default | Description |
|---|---|---|
| plugin_enabled | yes | Enable the plugin framework in the specfic component |
| plugin_manager_path | /usr/share/kopano-<co
mponentname>/python |
Path to the plugin manager. |
| plugin_path | /var/lib/kopano/<comp
onentname>/plugins |
Path to the activated plugins. |
The value <componentname> can be dagent or spooler
6.7.3. How to use
After the installation of the component kopano-dagent or kopano-spooler, it is possible to activate a plugin. The default plugins are installed in the directory ‘/usr/share/kopano-<componentname>/python/plugins/’. To activate a plugin, create a symbolic link in the plugin_path directory to the plugin which you want to activate. For example, to activate the disclaimer plugin in the spooler, run the following command:
ln -s /usr/share/kopano-spooler/python/plugins/disclaimer.py \
      /var/lib/kopano/spooler/plugins/disclaimer.py
6.7.4. Kopano-DAgent plugins
6.7.4.1. Move to public
The move to public plugin moves incoming messages to a folder in the public store.
Enable the move to public plugin, run the following command:
ln -s /usr/share/kopano-dagent/python/plugins/movetopublic.py \
      /var/lib/kopano/dagent/plugins/movetopublic.py
For this plugin is a config file required. Make a copy of the configuration file with the following command:
cp /usr/share/kopano-dagent/python/plugins/movetopublic.cfg /etc/kopano/movetopublic.cfg
6.7.4.2. BMP2PNG converter
The BMP2PNG plugin converts a BMP to PNG in the incoming email. This plugin can be used to reduce the image size of the delivered email.
Enable the BMP2PNG plugin, run the following command:
ln -s /usr/share/kopano-dagent/python/plugins/BMP2PNG.py \
      /var/lib/kopano/dagent/plugins/BMP2PNG.py
Note
The package python-imaging is required to use this plugin.
6.7.5. Kopano-Spooler plugins
6.7.5.1. Disclaimer
The disclaimer plugin add a disclaimer to every email sent with the Kopano spooler.
The disclaimer plugin supports plain text and HTML emails. RTF emails are not supported. To use the disclaimer plugin, it is necessary to create the directory /etc/kopano/disclaimers which must include the disclaimers. The plugin is using the following files for the disclaimer:
Table 6.2. Table Disclaimer files
| Filename | Description |
|---|---|
| default.txt | The plain text version of the disclaimer |
| default.html | The HTML version of the disclaimer |
| <companyname>.txt | The plain text version of the disclaimer of a company |
| <companyname>.html | The HTML version of the disclaimer of a company |
Important
All files must encoded in utf8
Enable the disclaimer plugin, run the following command:
ln -s /usr/share/kopano-spooler/python/plugins/disclaimer.py \
      /var/lib/kopano/spooler/plugins/disclaimer.py
6.7.6. Troubleshooting
How to troubleshoot issues you might have while installing or using the Python plugin framework in the Kopano dagent and spooler.
6.7.6.1. Log explanation
The Python plugin framework can log a lot of information, so if there are issues, it is recommended to set the log_level to 6. This will show all the information about the plugin framework.
Python error: No module named mapiplugin
The path to the plugin manager is invalid, this means the plugin framework can not be loaded and will result in the following error:
[TS] [id] PYTHONPATH = /usr/share/kopano-dagent/python/Unknown_path
[TS] [id]   Python type: (null)
[TS] [id]   Python error: No module named mapiplugin
[TS] [id] Unable to initialize the dagent plugin manager
Check the path in plugin_manager_path should refer to the directory with the following files,
- mapiplugin.py
- pluginmanager.py
- plugintemplates.py
- wraplogger.py
Plugins not loaded
The path to the plugins directory is invalid or the permissions on the directory are invalid if this is the case you will receive the following error:
[TS] [id] * Loading plugins started
[TS] [id] ! Plugins directory '/invalid/path' doesn't exists. Plugins not loaded.
Check the path in plugin_path by default it refer to the directory ‘/var/lib/kopano/dagent/plugins’, the permissions on the directory must atleast have read and execute permissions.
Python error: PySwigObject object has no attribute Log
There is an invalid version of MAPICore loaded. The old beta python-MAPI package installed the files in another directory but after removing the package the generated files are not removed after you start the dagent or spooler the old generated file is loaded an cause the following error:
<DATE> [id] PYTHONPATH = /usr/share/kopano-dagent/python/
<DATE> [id]   Python type: (null)
<DATE> [id]   Python error: 'PySwigObject' object has no attribute 'Log'
<DATE> [id]   Python trace: /usr/share/kopano-dagent/python/mapiplugin.py(13) __init__
<DATE> [id]   Python trace: /usr/share/kopano-dagent/python/pluginmanager.py(16) loadPlugins
<DATE> [id]   Python trace: /usr/share/kopano-dagent/python/wraplogger.py(16) logInfo
<DATE> [id] Unable to initialize the dagent plugin manager
To fix this issue remove the MAPICore.pyc files from your system. One of the locations can be /usr/lib/python2.6/dist-packages/MAPICore.pyc
6.7.6.2. Problem - Solution
- No plugins are loaded in the kopano-dagent
Does the plugin exist in the directory
plugin_pathby default in ‘/var/lib/kopano/dagent/plugins’? If not, create a symlink to the plugin to activated or just copy the plugin into the directory. - No plugins are loaded in the kopano-spooler
Does the plugin exist in the directory
plugin_pathby default in ‘/var/lib/kopano/spooler/plugins’? If not, create a symlink to the plugin to activated or just copy the plugin into the directory.
6.8. Running KC multi-server behind Reverse Proxy
Certain setups require that kopano-server is not exposed directly to the internet. When offering Outlook access, it is sometimes needed to configure a reverse proxy so that Outlook users can connect to the reverse proxy and not directly to kopano-server.
Setting up a reverse proxy with a single kopano-server is quite easy and can be found in chapter 5.1.3 of this administrator manual, however when using a multi-server setup this is a completely different story. Due to the redirection protocol within Kopano it is quite difficult to setup a reverse proxy for a MutliServer environment, however not impossible.
6.8.1. Description of redirection problem
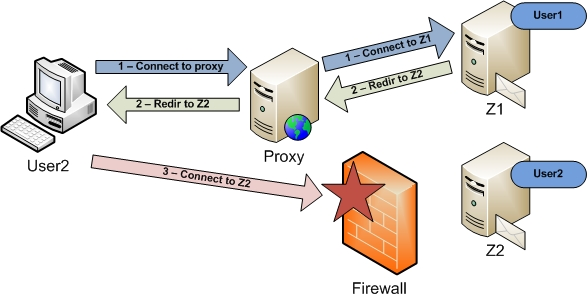
With redirection the following problem may arise when using a reverse proxy:
- Outlook connects to a reverse proxy, and the reverse proxy connects to node Z1.
- Node Z1 will send a redirect for User2 to node Z2.
- Outlook tries to connect directly to node Z2, but this connection will break on the Firewall.
In our new setup the reverse proxy will add extra header information, so the kopano-server will detect that a connection is being made through a reverse proxy. When a connection is made through a reverse proxy (when the extra header is detected) Kopano will not reply with the normal redirection string, but it will fetch the connection string from a new ldap attribute: KOPANOPROXYURL.
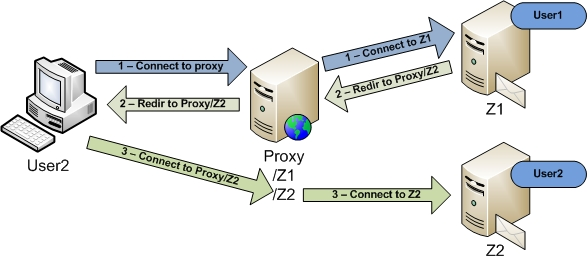
Outlook will then still connect to the reverse proxy, even when a redirect command is given:
- Outlook connects to the reverse proxy, and the reverse proxy adds the extra header and connects to node Z1.
- Node Z1 detects the extra header and will send a redirect for User2 to node Proxy/Z2.
- Outlook will now connect again to the proxy, but with a different path /Z2. The proxy will now connect to Z2 so the store of User2 can be opened.
6.8.2. Setup Prerequisites
When setting up a reverse proxy for a multi-server setup using the new KC options, the following prerequisites need to be met:
- OpenLDAP or ADS with the schema extensions from KC or newer.
- A reverse proxy which fully supports HTTP/1.1 (make sure that also the transport encoding “Chuncked Encoding” is supported).
6.8.3. Example Setup with Apache
Apache 2.2 and newer fully supports HTTP/1.1 in the mod_proxy module.
In our example setup we will use an Apache setup which listens on port 237. In your Apache config you will need to add the following:
<IfModule mod_ssl.c>
   NameVirtualHost *:237
   Listen 237
</IfModule>
We assume that you have created the correct certificates for Apache, so that Outlook is able to connect using SSL.
6.8.3.1. Configuring Apache
In our example setup we will create a virtual host which is used for reverse proxying:
- /kopano will be reverse proxied to node Z1 (Default connection is made to /kopano)
- /z1 will be reverse proxied to node Z1 (When a redirection is made to node Z1)
- /z2 will be reverse proxied to node Z2 (When a redirection is made to node Z2)
In our Apache config we will setup this virtual host:
<VirtualHost *:237>
   ServerName zproxy.example.com
   SSLProxyEngine On

   ProxyPass /kopano https://z1:237/kopano retry=0
   ProxyPassReverse /kopano https://z1:237/kopano retry=0

   ProxyPass /z1 https://z1:237/z1 retry=0
   ProxyPassReverse /z1 https://z1:237/z1 retry=0

   ProxyPass /z2 https://z2:237/z2 retry=0
   ProxyPassReverse /z2 https://z2:237/z2 retry=0

   Header add kopano_proxy "yes"
   RequestHeader set kopano_proxy "yes"

   SSLEngine On
   SSLVerifyDepth 2

   SSLCertificateFile /path/to/WEB.CRT
   SSLCertificateKeyFile /path/to/WEB.KEY
   SSLCACertificateFile /path/to/CA.CRT

   CustomLog /var/log/apache2/zproxy.example.com-access.log combined
   ErrorLog /var/log/apache2/zproxy.example.com-error.log
</VirtualHost>
Note
When using Apache as a reverse proxy, it is advised to use Apache in a threaded model and not in a prefork model, as the threaded model is able to handle far more concurrent connections then the prefork model.
6.8.3.2. Adding attribute to Servers
We assume you have installed the KC schema extensions.
In ldap add the attribute KOPANOPROXYURL to all servers in the multi-server environment.
For node Z1 this will be:
KOPANOPROXYURL: https://zproxy.example.com:237/z1
So the complete ldap record for node Z1 may look something like this:
objectClass: top
objectClass: kopano-server
objectClass: device
objectClass: ipHost
KOPANOHTTPPORT: 236
KOPANOSSLPORT: 237
KOPANOFILEPATH: /var/run/kopano/server.sock
ipHostNumber: z1.example.lan
cn: z1
KOPANOPROXYURL: https://zproxy.example.com:237/z1
For node Z2 this will be:
KOPANOPROXYURL: https://zproxy.example.com:237/z2
So the complete ldap record for node Z2 may look something like this:
objectClass: top
objectClass: kopano-server
objectClass: device
objectClass: ipHost
KOPANOHTTPPORT: 236
KOPANOSSLPORT: 237
KOPANOFILEPATH: /var/run/kopano/server.sock
ipHostNumber: z2.example.lan
cn: z2
KOPANOPROXYURL: https://zproxy.example.com:237/z2
6.8.3.3. Configuring Kopano Server
Now kopano-server needs to be configured, so that it will send the correct redirect command when the proxy header is detected.
In this example we configured Apache to add the header “kopano_proxy”, if a connection is being made through our reverse proxy.
On all the kopano servers in the multi-server environment we will need to add an extra config option to the server.cfg:
proxy_header = kopano_proxy
Kopano-server will now send the KOPANOPROXYURL as redirect string to the client when the header “kopano_proxy” is detected.
However, internal (´behind´ the proxy) redirections must not be redirected to the proxy since this is not necessary. So any internal service will not connect to the reverse proxy, so the extra header is not added and kopano-server will send the normal redirect string which is generated from the ldap database.
The proxy_header option can have different values:
- Empty: proxy_header option will not be used.
- [header]: kopano-server will check for [header], when found kopano-server send the KOPANOPROXYURL as redirect string.
- *: will force kopano-server to send the KOPANOPROXYURL as a redirect string everytime a redirect command is given. With this value set, you do not need to add the extra header in your reverse proxy. However also internal (´behind´ the proxy) services will be redirected to the reverse proxy.
6.9. Running KC with Active Directory in multi-forest environment
To be able to run Kopano Core in a Domain Forest environment, it is recommended to utilize AD’s global catalog. Per default, AD runs it’s global catalog on TCP port 3268, which needs to be configured in your LDAP configuration.
ldap_search_base =
ldap_port = 3268
Alternatively, using multiple GC ports is also possible by utilizing the LDAP URI configuration mechanism to support multiple GC ports in an AD forest environment, like this:
ldap_search_base =
ldap_uri = ldap://ad_with_gc_1:3268 ldap://ad_with_gc_2:3268
Please make sure, that the Kopano AD extension has been installed on the schema master of both directory forests. The schema addition automatically installs the new attributes as part of the global catalog. Additionally, this can be verified by checking whether the attributeSchema object has the isMemberOfPartialAttributeSet set to TRUE. More details can be found in the “Global Catalog Partial Attribute Set” section at https://technet.microsoft.com/en-us/library/how-global-catalog-servers-work(v=ws.10).aspx
Note
Setting up global catalog also has performance benefits, especially in environments with multiple thousand user objects, since global catalog data is kept in memory. Microsoft Exchange Server for comparison depends by default on the performance of global catalog.
It is possible to resolve groups with members from different, trusted forests. To be able to resolve these, it is required to configure postfix to chase referrals.
chase_referrals = yes
This needs to be configured with your working ldap-group configuration file or postifx/ldap configuration section (with the above as a suffix).
Since it is required for postfix to have a search_base configured, you are required to define multiple alias map definitions for each forest. Enabling this behavior is configured (with a separated configuration file structure for each LDAP forest) like this:
virtual_alias_maps = ldap:/etc/postfix/forest-a-ldap-aliases.cf,ldap:/etc/postfix/forest-b-ldap-aliases.cf, ...
Important
For this functionality it is required to use at least LDAP library version >= 2.4.13 (which is provided by all supported distributions by default).
When Postfix is configured to chase referrals, subsequent binds (for referral query) are done anonymously. This requires anonymous bind to your GC. Enabling this is well described here: http://support.microsoft.com/kb/320528
Note
It is recommended to either use ldapsearch and/or “postmap -q ldap:<ldapmap> <test_e-mail>” to verify the correct resolution of groups.
Using ldapsearch, you can verify correct resolution by using first an authenticated search and an anonymous search after:
ldapsearch -h <ip-of-an-AD-controller> -p 389 -b "dc=one-of-the,dc=forests" -LLL -W -x -z0 objectCategory=person -D "cn=Administrator,cn=Users,dc=one-of-the,dc=forests" dn
and
ldapsearch -h <ip-of-an-AD-controller> -p 389 -b "dc=one-of-the,dc=forests" -LLL -W -x -z0 objectCategory=person dn
By comparing the results you can verify the correct result.
6.10. Configuring kopano-spamd for automatic spam/ham learning
kopano-spamd is an optional component to Kopano Groupware Core. It is a local service which listens for changes in a users mailbox and exports mails for spam learning once they are moved into the Junk E-mail folder. Once a message is moved out of the Junk E-mail folder and back into the Inbox, it is exported for ham learning (message wrongly classified as spam).
kopano-spamd by default runs in the user context of the user kopano (as defined by run_as_user and run_as_group). To succesfully run sa-learn make sure that the provided user is both part of the amavis group (so spamassasin can process the item), as well as local_admin_user within Kopano (so kopano-spamd has access to the users mailboxes). The amavis group is automatically created when installing Amavis. Installing and configuring Amavis/Spamassasin is not part of this manual. Please change the options run_as_user, run_as_group and sa_group in spamd.cfg to match your local environment.
Note
All kopano-spamd does is exporting the messages as eml files. These files then still need to be fed to the preferred anti spam engine (for example Spamassasin). This feeding can for example be achieved by watching for changes in the spam/ham folders and kicking off sa-learn. See https://github.com/bkram/inotify-spamlearn for an example of such a script.