11. High Availability
Nowadays the email system is one of the most critical systems within organisations, therefore making the email system high available is getting more important.
The flexible architecture of KC offers different solutions to create a high available mail solution. This whitepaper will show some examples of high available Kopano setups and contains a full description of configuring a High Availability setup with Pacemaker and DRBD.
11.1. High Availability example setups
More and more organization will virtualize their server environment to have a limit resource usage and have more flexibility. Most virtualization solutions like VMware Vsphere, Red Hat Enterprise Virtualization, OpenStack and Citrix Xen server will offer high availability as one of the standard features. The HA feature of the virtualization software can also be used for KC. When a hardware failure occurs the virtualization software will automatically start the virtual machine on one of the other virtualization hosts, see figure 1.1.
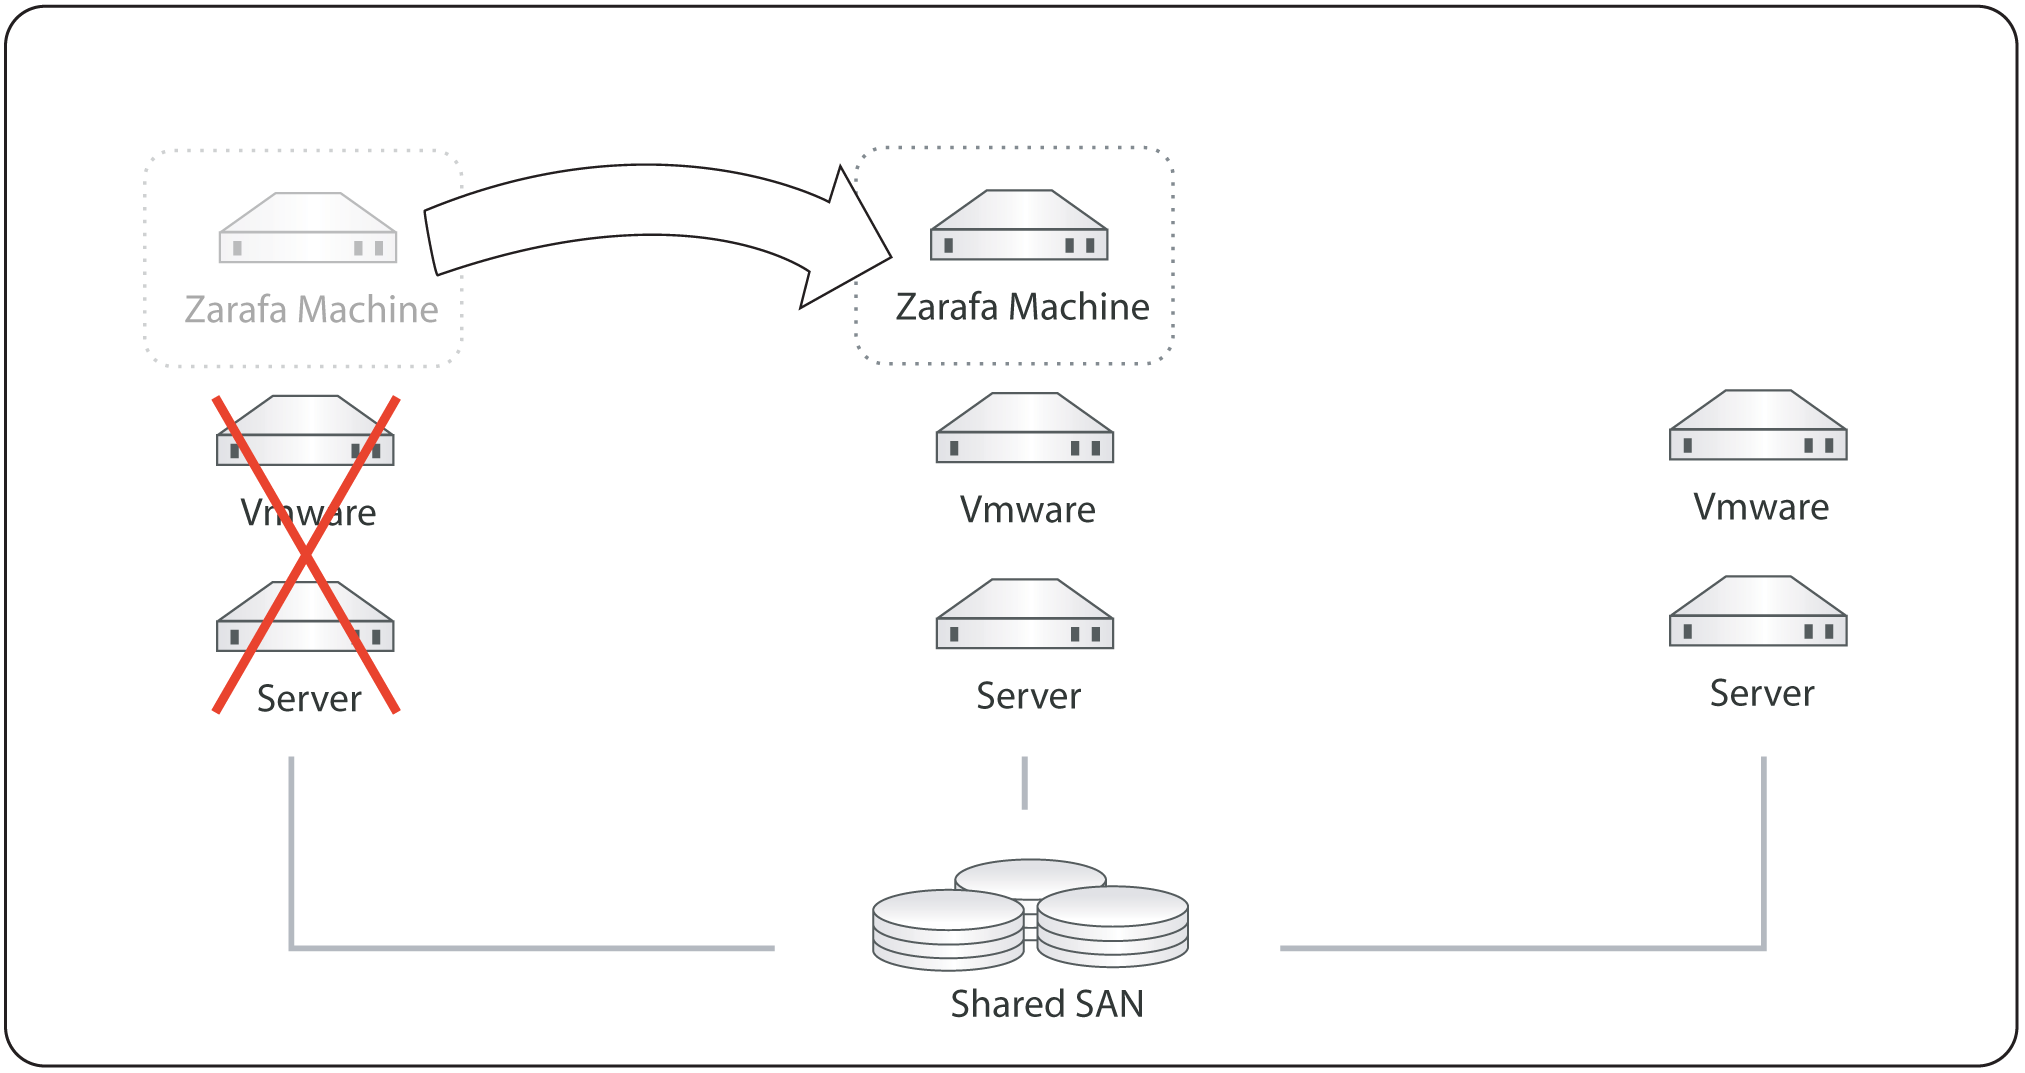
Kopano in a high available virtualization platform
When an organization doesn’t have a HA virtualization solution or want to run KC on bare metal to have the best performance, KC can be integrated with different opensource cluster suite solutions, like Red Hat Cluster Suite or Pacemaker.
“Kopano in a high availability setup with a shared storage” shows a High Availability setup where both the MySQL database as the attachments are stored on a shared storage. In case of a failure of one of nodes the resources will be automatically started on the second node. When no shared storage is available the MySQL database and attachments can be stored on a DRBD device (Distributed Replicated Block Device), to have the data available on both nodes. In case of a node failure the DRBD device will be mounted on the second node and the Kopano services will be automatically started, see “Kopano in a high availability setup with DRBD”.
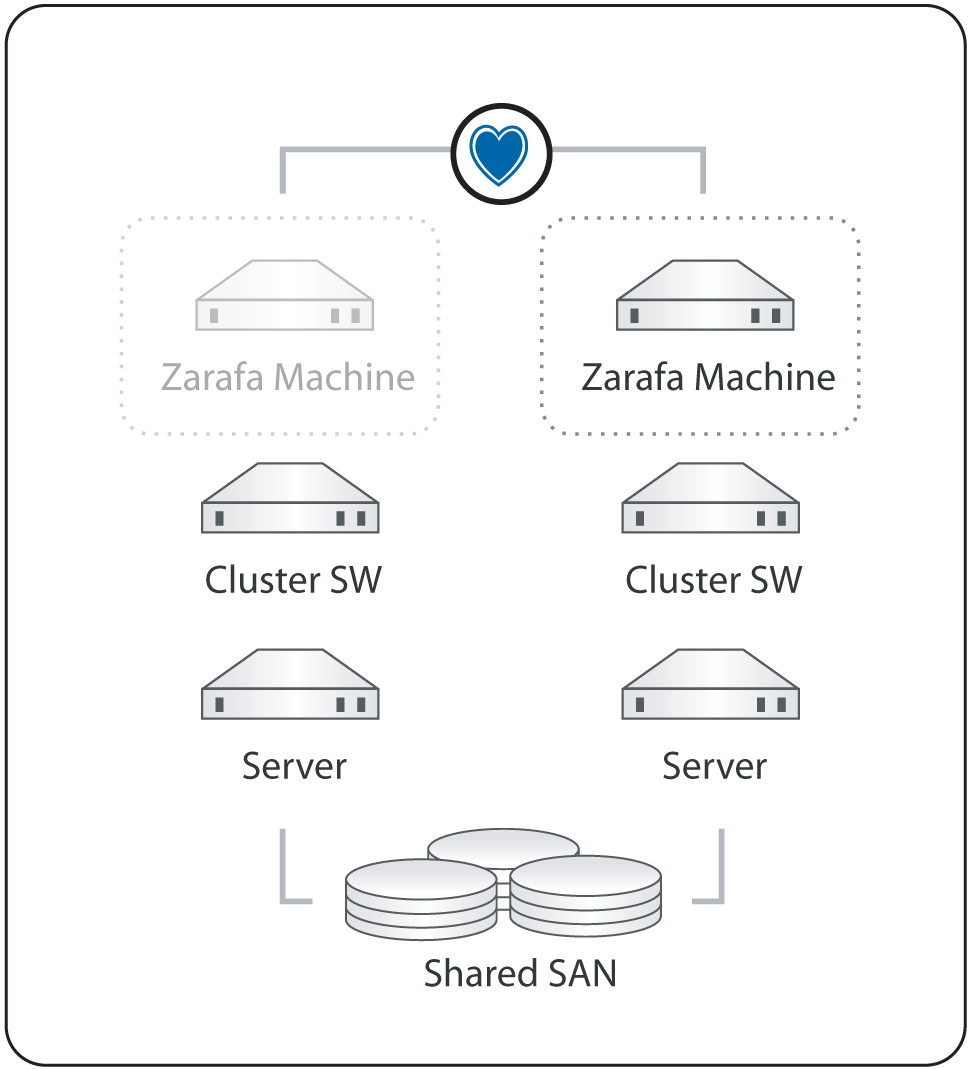
Kopano in a high availability setup with a shared storage
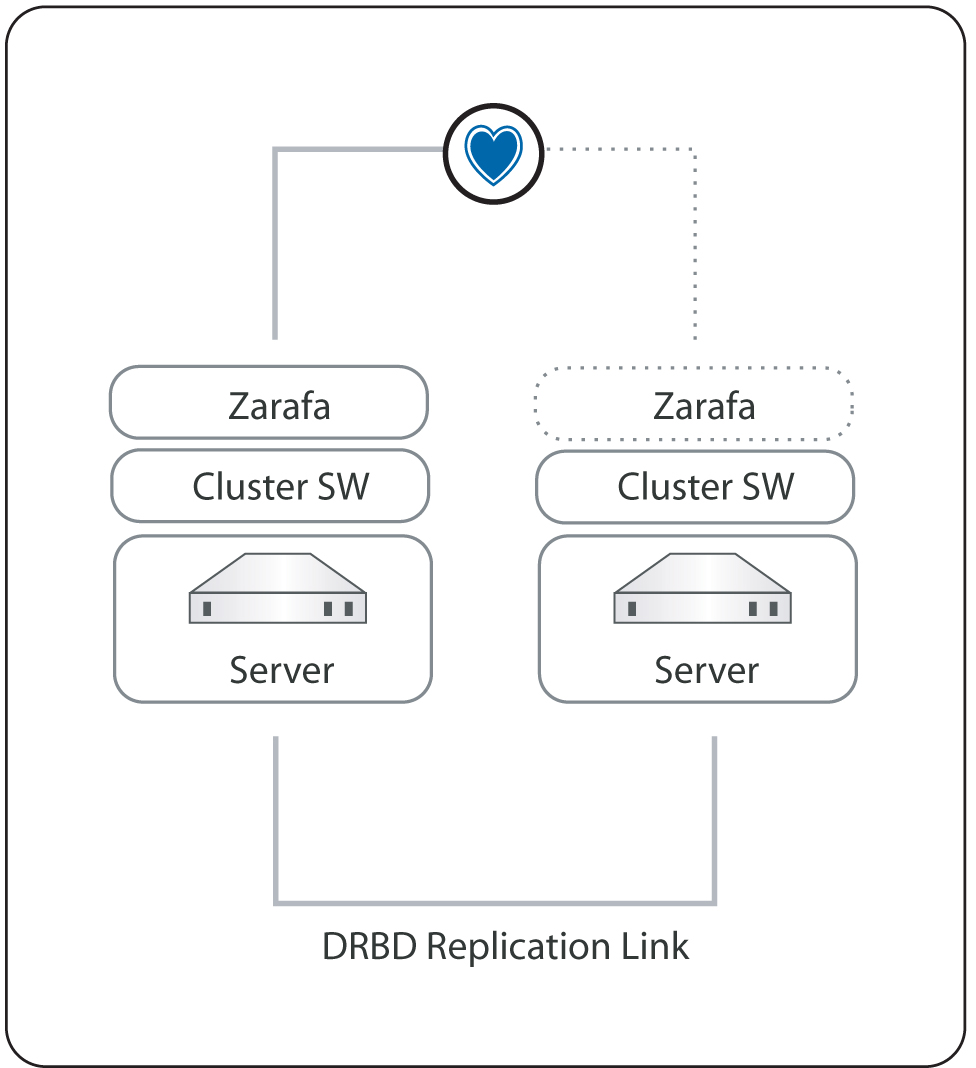
Kopano in a high availability setup with DRBD
Note
When there is a high available virtualization solution, Kopano recommends to use this solution for making the KC stack high available.
11.2. Installing
In the next chapters the installation and configuration of a High Availability setup with Pacemaker and DRBD is described. Pacemaker is a cluster resource manager which is included in most Linux distributions, like RHEL6, SLES11 and Ubuntu. Pacemaker will manage your cluster services by detecting and recovering from node and resource failures, by using the Heartbeat or Corosync messaging layer.
11.2.1. System Requirements
In this whitepaper a two node cluster setup is created based on RHEL6. These system requirements should be solved, before proceeding with this whitepaper:
- Two servers with RAID1 disk array for OS and RAID10 disk array for data storage
- Two network interfaces per machine
11.2.2. Installation
Do on both machines a minimal RHEL6 installation. The RAID10 disk array for the database and attachment storage should not be configured in the installation wizard.
11.2.2.1. Network configuration
In this whitepaper the two nodes will get the hostname bob and alice. The nodes will be connected with the first network interface to the LAN with subnet 192.168.122.0/24. The second network interface will be used for the DRBD replication.
| Servername | bob | alice |
| eth0 | 192.168.122.25 | 192.168.122.26 |
| eth1 | 10.0.0.25 | 10.0.0.26 |
Change the hostname of the nodes in /etc/sysconfig/network and configure the network interfaces in /etc/sysconfig/network-scripts/ifcfg-ethx. Add the following lines to the /etc/hosts file on both nodes.
192.168.122.25   bob
192.168.122.26   alice
Restart the network services to activate the changes:
service network restart
Check if the network configuration is successfully configured by using ifconfig.
[root@bob ~]# ifconfig
eth0    Link encap:Ethernet  HWaddr 52:54:00:4C:30:83
        inet addr:192.168.122.25  Bcast:192.168.122.255  Mask:255.255.255.0
        inet6 addr: fe80::5054:ff:fe4c:3083/64 Scope:Link
        UP BROADCAST RUNNING MULTICAST  MTU:1500  Metric:1
        RX packets:149 errors:0 dropped:0 overruns:0 frame:0
        TX packets:65 errors:0 dropped:0 overruns:0 carrier:0
        collisions:0 txqueuelen:1000
        RX bytes:12522 (12.2 KiB)  TX bytes:8736 (8.5 KiB)

eth1    Link encap:Ethernet  HWaddr 52:54:00:5F:6F:33
        inet addr:10.0.0.25  Bcast:10.0.0.255  Mask:255.255.255.0
        inet6 addr: fe80::5054:ff:fe5f:6f33/64 Scope:Link
        UP BROADCAST RUNNING MULTICAST  MTU:1500  Metric:1
        RX packets:27 errors:0 dropped:0 overruns:0 frame:0
        TX packets:29 errors:0 dropped:0 overruns:0 carrier:0
        collisions:0 txqueuelen:1000
        RX bytes:1242 (1.2 KiB)  TX bytes:1530 (1.4 KiB)
        Interrupt:10 Base address:0x6000
11.2.2.2. Package installation
After the network is successfully configured, install and configure KC like described in the Administrator Manual. By default the Kopano services will be started on boot time. In a clustered setup the services will be automatically started by the cluster software, so the Kopano services should be disabled at boot time.
chkconfig mysqld off
chkconfig kopano-server off
chkconfig kopano-spooler off
chkconfig kopano-dagent off
chkconfig kopano-gateway off
chkconfig kopano-ical off
chkconfig kopano-monitor off
Install the Pacemaker cluster software from the Red Hat yum repository.
yum install pacemaker corosync
Note
To install the pacemaker software, please make sure you have a valid subscription for the Red Hat High Availability software channel.
The DRBD software is not part of the standard Red Hat repositories. ELRepo.org provides packages, alternatively you can get packages directly from the CentOS Extras repository. Install the drbd packages and the correct drbd kernel module. To find out which kernel is in use, run uname -a. For other platforms than RHEL / CentOS, please check out https://www.linbit.com/en/drbd-community/
rpm -Uhv drbd-8.3.8.1-30.el6.x86_64.rpm drbd-kmdl-2.6.32-71.18.1.el6.x86_64-8.3.8.1-30.el6.x86_64.rpm
Enable Corosync and disable DRBD at boot time.
chkconfig drbd off
chkconfig corosync on
11.2.3. Cluster configuration
11.2.3.1. Corosync configuration
The communication between the different cluster nodes will be handled by the Corosync software. Execute the following steps to configure Corosync on both nodes:
cd /etc/corosync
cp corosync.conf.example corosync.conf
Change the bindnetaddr in the corosync.conf to the local LAN subnet address.
bindnetaddr: 10.0.0.0
To instruct CoroSync to start Pacemaker, create /etc/corosync/service.d/pcmk with the following fragment.
service {
        # Load the Pacemaker Cluster Resource Manager
        name: pacemaker
        ver:  0
}
Restart Corosync to activate the changes.
service corosync restart
11.3. DRBD device initialization
In order to have the MySQL database and the attachments on both nodes available, two DRBD devices will be created. Each DRBD device needs on both nodes a partition on the RAID10 device.
Create on both nodes two partitions on the RAID10 device. In this whitepaper the RAID10 device is available as /dev/sdb.
fdisk /dev/sdb
Use the following steps to initialize the partitions. .
Command (m for help): n
Command action
        e   extended
        p   primary partition (1-4)
        p
Partition number (1-4): 1
First cylinder (1-2031, default 1):
Using default value 1
Last cylinder, +cylinders or +size{K,M,G} (1-2031, default 2031): 100G

Command (m for help): n
Command action
        e   extended
        p   primary partition (1-4)
        p
Partition number (1-4): 2
First cylinder (501-2031, default 501):
Using default value 501
Last cylinder, +cylinders or +size{K,M,G} (501-2031, default 2031):
Using default value 2031

Command (m for help): w
The partition table has been altered!
The partitions can now used as DRBD devices. Add the following DRBD configuration to /etc/drbd.conf on both nodes:
global {
        usage-count no;
}

common {
        protocol C;
        syncer {
                rate 50M;
        }
}

resource mysql {
        on bob {
                device /dev/drbd0;
                disk /dev/sdb1;
                address 10.0.0.25:7788;
                meta-disk internal;
        }
        on alice {
                device /dev/drbd0;
                disk /dev/sdb1;
                address 10.0.0.26:7788;
                meta-disk internal;
        }
}

resource kopano {
        on bob {
                device /dev/drbd1;
                disk /dev/sdb2;
                address 10.0.0.25:7799;
                meta-disk internal;
        }
        on alice {
                device /dev/drbd1;
                disk /dev/sdb2;
                address 10.0.0.26:7799;
                meta-disk internal;
        }
}
Reload DRBD on both nodes to activate the changes.
service drbd reload
Before the DRBD devices can be used, both resources has be initialized. Run the following commands on both nodes.
[root@bob etc]# drbdadm create-md mysql
Writing meta data...
initializing activity log
NOT initialized bitmap
New drbd meta data block successfully created.
drbdadm up mysql
drbdadm create-md kopano
Writing meta data...
initializing activity log
NOT initialized bitmap
New drbd meta data block successfully created.
drbdadm up kopano
Check if the DRBD devices are successfully created, by using the following command:
[root@bob etc]# cat /proc/drbd
version: 8.3.8.1 (api:88/proto:86-94)
GIT-hash: 0d8589fcc32c874df57c930ca1691399b55ec893 build by gardner@, 2011-02-23 08:32:21
0: cs:Connected ro:Secondary/Secondary ds:Inconsistent/Inconsistent C r----
        ns:0 nr:0 dw:0 dr:0 al:0 bm:0 lo:0 pe:0 ua:0 ap:0 ep:1 wo:b oos:251924
1: cs:Connected ro:Secondary/Secondary ds:Inconsistent/Inconsistent C r----
        ns:0 nr:0 dw:0 dr:0 al:0 bm:0 lo:0 pe:0 ua:0 ap:0 ep:1 wo:b oos:771564
The DRBD synchronisation can be start with the following command on bob.
[root@bob ~]# drbdadm -- --overwrite-data-of-peer primary all
To check the progress of the synchronisation, use cat /proc/drbd.
[root@bob ~]# cat /proc/drbd
version: 8.3.8.1 (api:88/proto:86-94)
GIT-hash: 0d8589fcc32c874df57c930ca1691399b55ec893 build by gardner@, 2011-02-23 08:32:21
0: cs:SyncSource ro:Primary/Secondary ds:UpToDate/Inconsistent C r----
ns:94336 nr:0 dw:0 dr:103160 al:0 bm:5 lo:2 pe:87 ua:256 ap:0 ep:1 wo:b oos:160340
        [======>.............] sync'ed: 37.1% (160340/251924)K
        finish: 0:00:29 speed: 5,328 (5,088) K/sec
Both DRBD devices can now be formatted with a filesystem.
[root@bob ~] mkfs.ext4 /dev/drbd0
[root@bob ~] mkfs.ext4 /dev/drbd1
11.4. Pacemaker configuration
Before the actual cluster configuration can be done, the mysql and kopano service will be assigned to a cluster ip-address. The cluster ip-addresses which are used in this example are:
mysql   192.168.122.101
kopano  192.168.122.100
Add to the file /etc/my.cnf the bind-address in the [mysqld] section. Make sure this change is done on both nodes.
bind-address = 192.168.122.101
To let the kopano-server access the MySQL database, the privileges has to be set.
mysql> GRANT ALL PRIVILEGES ON *.* TO 'root'@'192.168.122.0/255.255.255.0' IDENTIFIED BY 'secret';
mysql> FLUSH PRIVILEGES;
Change in the file /etc/kopano/server.cfg the server_bind to 192.168.122.100.
server_bind = 192.168.122.100
The kopano-server will connect to the cluster ip-address of MySQL. Make sure the mysql_host in /etc/kopano/server.cfg is correctly set.
mysql_host = 192.168.122.101
The kopano-dagent should also listen on the kopano cluster ip-address, so the Postfix MTA’s on both nodes can deliver emails. Change in the file /etc/kopano/dagent.cfg the server_bind address to 192.168.122.100.
server_bind = 192.168.122.100
Change in the file /etc/postfix/main.cf the virtual_transport to the cluster ip-address instead of localhost. The Postfix service itself, will not be part of the cluster services.
virtual_transport = lmtp:192.168.122.10:2003
When the kopano-gateway and kopano-ical will be used, the server_socket of this processes should be changed. Change in /etc/kopano/gateway.cfg and /etc/kopano/ical.cfg the
server_socket.
server_socket = http://192.168.122.100:236/
The Pacemaker cluster configuration can now be done.
The Pacemaker cluster suite offers different tools to configure the cluster configuration. Some Linux distributions, like SLES11 include a graphical administration interface, but RHEL6 is not including this interface at the moment. Another tool for configuring the cluster is the CLI tool, called crm.
This tool will be used to configure for this cluster setup and to manage both nodes and resources. More information about the crm cli can be found in the Pacemaker documentation.
First the cluster will be changed to disable automatic fencing and quorum support for this two node cluster.
crm configure property stonith-enabled=false
crm configure property no-quorum-policy=ignore
The resources can now be configured. Two resource groups will be defined in this cluster, one group for MySQL and one for all kopano services. A resource group will contain the following steps:
- Make the DRBD resource primary
- Mount the DRBD device
- Assign cluster ip-address
- Start the services
Execute the following commands to add the mysql resources.
   crm(live)# configure
   crm(live)# edit
           primitive drbd_mysql ocf:linbit:drbd \
           params drbd_resource="mysql" \
           op start interval="0" timeout="240" \
           op stop interval="0" timeout="100" \
           op monitor role=Master interval=59s timeout=30s \
           op monitor role=Slave interval=60s timeout=30s
           primitive mysql_fs ocf:heartbeat:Filesystem \
           params device="/dev/drbd0" directory="/var/lib/mysql" fstype="ext4" options="noatime" \
           op monitor interval="30s"
           primitive mysql_ip ocf:heartbeat:IPaddr2 \
           params ip="192.168.122.101" cidr_netmask="32" nic="eth0" \
           op monitor interval="30s"
           primitive mysqld lsb:mysqld \
           op monitor interval="10" timeout="30" \
           op start interval="0" timeout="120" \
           op stop interval="0" timeout="120"
           group mysql mysql_fs mysql_ip mysqld
           ms ms_drbd_mysql drbd_mysql \
           meta master-max="1" master-node-max="1" clone-max="2" clone-node-max="1" notify="true"
           colocation mysql_on_drbd inf: mysql ms_drbd_mysql:Master
           order mysql_after_drbd inf: ms_drbd_mysql:promote mysql:start

crm(live)# commit
The mysql resources are now configured, to check the status of the resources use:
crm(live)# status
============
Last updated: Sun Feb 27 22:42:20 2011
Stack: openais
Current DC: alice - partition with quorum
Version: 1.1.2-f059ec7ced7a86f18e5490b67ebf4a0b963bccfe
2 Nodes configured, 2 expected votes
2 Resources configured.
============

Online: [ bob alice ]

Resource Group: mysql
        mysql_fs   (ocf::heartbeat:Filesystem):    Started bob
        mysql_ip   (ocf::heartbeat:IPaddr2):       Started bob
        mysqld     (lsb:mysqld):   Started bob
Master/Slave Set: ms_drbd_mysql
        Masters: [ bob ]
        Slaves: [ alice ]
Now the Kopano resource group can be added.
crm(live)# configure
crm(live)# edit
        primitive drbd_kopano ocf:linbit:drbd \
        params drbd_resource="kopano" \
        op monitor interval="60s"
        primitive kopano_fs ocf:heartbeat:Filesystem \
        params device="/dev/drbd1" directory="/var/lib/kopano" fstype="ext4" \
        op start interval="0" timeout="240" \
        op stop interval="0" timeout="100" \
        op monitor role=Master interval=59s timeout=30s \
        op monitor role=Slave interval=60s timeout=30s
        primitive kopano_ip ocf:heartbeat:IPaddr2 \
        params ip="192.168.122.100" cidr_netmask="32" nic="eth0" \
        op monitor interval="30s"
        primitive kopano-server lsb:kopano-server \
        op monitor interval="30" timeout="60"
        primitive kopano-dagent lsb:kopano-dagent \
        op monitor interval="30" timeout="30"
        primitive kopano-gateway lsb:kopano-gateway \
        op monitor interval="30" timeout="30"
        primitive kopano-ical lsb:kopano-ical \
        op monitor interval="30" timeout="30"
        primitive kopano-monitor lsb:kopano-monitor \
        op monitor interval="30" timeout="30"
        primitive kopano-spooler lsb:kopano-spooler \
        op monitor interval="30" timeout="30"
        group kopano kopano_fs kopano_ip kopano-server \
        kopano-spooler kopano-dagent kopano-monitor kopano-gateway kopano-ical
        ms ms_drbd_kopano drbd_kopano \
        meta master-max="1" master-node-max="1" clone-max="2" clone-node-max="1" notify="true"
        colocation kopano_on_drbd inf: kopano ms_drbd_kopano:Master
        order kopano_after_drbd inf: ms_drbd_kopano:promote kopano:start
        order kopano_after_mysql inf: mysql:start kopano:start

crm(live)# commit
To check the status of the cluster services use:
crm(live)# status
============
Last updated: Mon Feb 28 08:31:32 2011
Stack: openais
Current DC: bob - partition WITHOUT quorum
Version: 1.1.2-f059ec7ced7a86f18e5490b67ebf4a0b963bccfe
2 Nodes configured, 2 expected votes
4 Resources configured.
============

Online: [ bob ]
OFFLINE: [ alice ]

Resource Group: mysql
        mysql_fs   (ocf::heartbeat:Filesystem):    Started bob
        mysql_ip   (ocf::heartbeat:IPaddr2):       Started bob
        mysqld     (lsb:mysqld):   Started bob
Master/Slave Set: ms_drbd_mysql
        Masters: [ bob ]
        Stopped: [ alice ]
Resource Group: kopano
        kopano_fs  (ocf::heartbeat:Filesystem):    Started bob
        kopano_ip  (ocf::heartbeat:IPaddr2):       Started bob
        kopano-server      (lsb:kopano-server):    Started bob
        kopano-spooler     (lsb:kopano-spooler):   Started bob
        kopano-dagent      (lsb:kopano-dagent):    Started bob
        kopano-monitor     (lsb:kopano-monitor):   Started bob
        kopano-gateway     (lsb:kopano-gateway):   Started bob
        kopano-ical        (lsb:kopano-ical):      Started bob
Master/Slave Set: ms_drbd_kopano
        Masters: [ bob ]
        Stopped: [ alice ]
The Apache webserver will be configured to run on both nodes, so a loadbalancer can be placed in front of the nodes. The Apache resource will check the status of the resource, by using the server-status page.
The server-status should be enabled in the Apache configuration file. Uncomment the following lines in the file /etc/httpd/conf/httpd.conf.
<Location /server-status>
        SetHandler server-status
        Order deny,allow
        Deny from all
        Allow from 127.0.0.1
</Location>
Now the Apache resource can be added to cluster configuration.
crm(live)# configure
crm(live)# edit
        primitive apache ocf:heartbeat:apache \
        params configfile="/etc/httpd/conf/httpd.conf" \
        op monitor interval="60s" \
        op start interval="0" timeout="40s" \
        op stop interval="0" timeout="60s"
clone apache_clone apache
crm(live)# commit
The Kopano WebApp should connect to the cluster ip-address of Kopano, to be available on both nodes. Change the server_socket in /etc/kopano/webapp/config.php.
define("DEFAULT_SERVER","http://192.168.122.100:236/");
Now the cluster configuration is ready and can be used.
11.5. Testing configuration
Before the cluster will be used for production use, it’s important to the test different failover scenarios. The tool crm_mon will show the realtime status of the cluster.
============
Last updated: Mon Feb 28 18:41:16 2011
Stack: openais
Current DC: bob - partition with quorum
Version: 1.1.2-f059ec7ced7a86f18e5490b67ebf4a0b963bccfe
2 Nodes configured, 2 expected votes
5 Resources configured.
============

Online: [ bob alice ]

Resource Group: mysql
        mysql_fs   (ocf::heartbeat:Filesystem):    Started bob
        mysql_ip   (ocf::heartbeat:IPaddr2):       Started bob
        mysqld     (lsb:mysqld):   Started bob
Master/Slave Set: ms_drbd_mysql
        Masters: [ bob ]
        Slaves: [ alice ]
Resource Group: kopano
        kopano_fs  (ocf::heartbeat:Filesystem):    Started bob
        kopano_ip  (ocf::heartbeat:IPaddr2):       Started bob
        kopano-server      (lsb:kopano-server):    Started bob
        kopano-spooler     (lsb:kopano-spooler):   Started bob
        kopano-dagent      (lsb:kopano-dagent):    Started bob
        kopano-monitor     (lsb:kopano-monitor):   Started bob
        kopano-gateway     (lsb:kopano-gateway):   Started bob
        kopano-ical        (lsb:kopano-ical):      Started bob
Master/Slave Set: ms_drbd_kopano
        Masters: [ bob ]
        Slaves: [ alice ]
        Clone Set: apache_clone
        Started: [ bob alice ]
11.6. Testing a node failure
- Login to alice and start
crm_mon - Give bob a hard shutdown
- Check if all services will be successfully started on alice
11.7. Testing a resource failure
- Login to bob and start
crm_mon - Shutdown the kopano-server with
killall -9 kopano-server - Check if the kopano-server is successfully restarted
Try this test for different services.
11.8. Getting more information
The following links will give more useful information about DRBD, Pacemaker or the crm commandline tool.
- http://www.drbd.org/users-guide for all documentation about installing, configurating and trouble shooting DRBD
- http://clusterlabs.org/pacemaker/doc/ for a complete reference of all crm commandline interface
- http://clusterlabs.org for many different example setups and architecture of Pacemaker