5. Configure KC Components¶
Most KC and 3rd party components are configured by a configuration file. This section explains most common options that are set to get these components up and running. It is important to note that components usually have to be restarted to make use of updated configuration files, read more about this in the Managing KC Components.
In short, after modifications have been made to a component’s configuration file, that component has to be restarted e.g. with:
/etc/init.d/kopano-<component name> restart
# or
service kopano-<component name> restart
# or
systemctl restart kopano-<component name>
5.1. Configure the Kopano Server¶
If a component requires custom configuration, these can be done in a system-wide configuration file located below /etc/kopano/. The default name for such a configuration file takes the name of the component and adds .cfg.
Each services allows to specify a custom location for the configuration as well. Please consult the man page for the appropriate syntax.
/etc/kopano/<component name>.cfg
# example for kopano-server
/etc/kopano/server.cfg
Annotated example configuration files can be found below /usr/share/doc/kopano/example-config/.
The options and their default values are explained both by the in-line comments of the example file and in the following manual page:
man <component name>.cfg
For example:
man kopano-server.cfg
If a config option is not present in the configuration file, the default setting will be assumed. For most setups these defaults will already be fine. In this chapter we only explain the basic configuration option of Kopano Server.
The Kopano Server needs a MySQL database to function, and therefor needs to know how to connect to the MySQL server and the authentication credentials for its database. It will create a database and the tables it needs at first start.
Make sure that the MySQL user that the Kopano Server uses to connect to the database has all privileges, including the right to create a new database. Also make sure to give the user enough permissions to connect from localhost to this database, or –if the Kopano server connects over the network to the MySQL database– allow it to connect from the IP-address from which the Kopano Server will connect.
For example the following MySQL statement grants all privileges to user “kopano” with password “password” from localhost:
GRANT ALL PRIVILEGES ON kopano.* TO 'kopano'@'localhost' IDENTIFIED BY 'password';
If you want to restrict the privileges of the kopano connection, the following grant command lists only the required privileges:
GRANT ALTER, CREATE, CREATE ROUTINE, DELETE, DROP, INDEX, INSERT, LOCK TABLES, \
      SELECT, UPDATE ON kopano.* TO 'kopano'@'localhost' IDENTIFIED BY 'password';
To configure the Kopano Server to use the MySQL server the options starting with mysql in the kopano-server.cfg need to be set. Once this is setup the Kopano Server should start normally.
5.1.1. Configure language for store creation¶
Note
The below instructions are valid for Kopano Groupware Core installations from 8.6.8 and newer. Older installations used /etc/default/kopano (Debian based) or /etc/sysconfig/kopano (rpm based).
After the creation of new users the Kopano Server will automatically create the actual mailbox. This mailbox is by default created in english. When another language is required the following configuration file has to be changed/created:
/etc/kopano/admin.cfg
Add/Change the option default_store_locale to the correct language, for example nl_NL.UTF-8 or fr_FR.UTF-8.
In order to use this language setting make sure the language packs are installed. Red Hat and SuSE based systems contain all language packs by default.
To install a language pack on an Ubuntu based system, use the following command (this example is for the Dutch -nl pack):
apt-get install language-pack-nl
On Debian based systems the locale needs to be enabled in /etc/locale.gen. The following command can be used to easily enable and generate the needed locales:
dpkg-reconfigure locales
In Debian distributions the follwing entry in /etc/apache2/envvars needs to be set to force the locale for Apache, else locale specific characters might not be displayed correctly in the WebApp.
## The locale used by some modules like mod_dav
#  export LANG=C
## Uncomment the following line to use the system default locale instead:
. /etc/default/locale
5.1.2. User Authentication¶
Another important configuration option for the Kopano Server is the user_plugin. This setting determines which back-end is used for managing users and groups. There are three options, namely db, unix and ldap.
By default the db plugin is used as it does not require any further configuration. The ldap plugin is used most in larger setups as it proves to be most flexible and integrates nicely with an organization’s the existing infrastructure. The `ldap` plugin can optionally also hold the required configuration for a multi-server Kopano environment. Multi-server support is only supported in the Kopano Enterprise edition.
More information on managing users can be found in User Management.
For a comparison between the different plugins, see the table below:
Table 4.1. User plugin comparison
| Feature | DB | Unix | LDAP |
|---|---|---|---|
| Create/delete/ modify users | yes | yes | yes |
| Set aliases | On MTA level | On MTA level | yes |
| Hide users | yes | ||
| Sendas permissions | yes | yes | yes |
| Sendas permissions of groups | yes | ||
| Security Groups | yes | yes | yes |
| Distribution groups | yes | ||
| Hide groups | yes | ||
| Dynamic groups | yes | ||
| Contacts support | yes | ||
| Multi-tenancy support | yes | yes | |
| Addresslists support | yes | ||
| Multi-server support | yes |
Important
Although multi-tenancy is already possible when using the DB plugin, we strongly suggest using an LDAP backend when planning to host multiple tenants within one installation.
5.1.2.1. The DB Authentication Plugin¶
This plugin uses the Kopano MySQL database to store user and group information. The kopano-admin tool can be used to manage users.
The DB plugin supports only basic user and group information. For more advanced configurations, we advise to use the LDAP plugin.
For more information about user management with the kopano-admin tool, see User Management.
5.1.2.2. The Unix Authentication Plugin¶
Important
This plugin is mostly delivered for backwards compatibility. Newer setups should either use the db plugin or the ldap plugin (recommended).
The Unix plugin is used on a server which has all its user information setup in the /etc/passwd file. Group information will be read from /etc/group. Passwords are checked against /etc/shadow, so the kopano-server process must have read access to this file (this process is normally run as root, so usually that is not a problem).
Since the unix files do not contain enough information for Kopano, there are some properties of a user that will be stored in the database. These properties are the email address, overriding quota settings, and administrator settings. The kopano-admin tool has to be used to update these user properties. All other user properties are done using the normal unix tools.
A configuration file, /etc/kopano/unix.cfg, exists for this plugin. The default set by this file are usually enough, in-line comments explain each option. In this configuration file the uid range of users wanted in the Kopano server needs to be defined. The same goes for the groups.
Non-active users are appointed by a specific shell, default /bin/false. These users cannot login, but the stores can be opened by other users. An administrator should setup the correct access rights for these stores.
For an overview of all configuration options of the unix authentication plugin, use:
man kopano-unix.cfg
5.1.2.3. The LDAP Authentication Plugin¶
The LDAP plugin is used for coupling any LDAP compliant server with the Kopano Server. This way, all users, groups and membership information can be retrieved ‘live’ from an LDAP server.
The LDAP plugin support next to the default users, groups and companies also the following object types:
- Contacts - External SMTP contacts which can be used as members of distribution lists
- Addresslists - Sub categories of the Global Address Book, based on a specified LDAP filter
- Dynamic groups - Dynamically created groups, based on a specified LDAP filter. Therefore LDAP plugin is the recommended user plugin for KC.
The Kopano Server needs two configuration directives in the server.cfg configuration file to use the LDAP backend, namely:
user_plugin = ldap
user_plugin_config = /etc/kopano/ldap.cfg
The defaults for OpenLDAP and for Active Directory can be found in the /usr/share/doc/kopano/example-config directory. Based on these examples the /etc/kopano/ldap.cfg file should be adjusted to configure the LDAP authentication plugin.
For more details about configuring the LDAP plugin see User Management with LDAP or Active Directory.
5.1.3. Autoresponder¶
KC contains an autoresponder that can be used when a user is out of the office to reply automatically to all incoming e-mails. The autoresponder will automatically be spawned whenever an e-mail is delivered by kopano-dagent to a store that has the ‘Out of Office’ option turned ON.
Users can manage the autoresponder of their own store as well as of stores to which one has at least secretary rights. Note that this includes public folders. Please refer to the User manual on how to manage these settings.
To prevent autoresponder loops (e.g. when sending automated responses to an automated response, which in turn sends an automated response, etc), the autoresponder will only send one autoresponse message per day for any unique sender e-mail address. The autoresponder will also not respond in any of the following cases:
- Sending an out-of-office message to yourself.
- Original message was to mailer-daemon, postmaster or root.
- Original message was from mailer-daemon, postmaster or root.
Furthermore, the autoresponder is configured by default to respond only to e-mails in which the user was explicitly mentioned in the ‘To’ header. This means that e-mails that were received because the user was in the ‘Cc’ header or because the user was in a distribution group, are not responded to.
Most behaviour can be configured by editing the file /etc/kopano/autorespond. This file contains the following settings, which will be used for all autorespond messages server-wide:
AUTORESPOND_CC=0
Set this value to ‘1’ to allow autoresponding to messages in which the recipient was only stated in the ‘Cc’ header.
AUTORESPOND_NORECIP=0
Set this value to ‘1’ to autorespond to all messages, even if the recipient is not stated in any header (for example when the email was directed at a mailing list or group)
TIMELIMIT=$[24*60*60]
Sets the minimum number of seconds between autoresponses to the same e-mail address
The following settings normally do not need to be modified:
SENDDB=${TMP:-/tmp}/kopano-vacation-$USER.db
(file which stores the last date of sending per email address)
SENDDBTMP=${TMP:-/tmp}/kopano-vacation-$USER-$$.tmp
(temporary file used during update of the database)
SENDMAILCMD=/usr/sbin/sendmail
(command used to send actual vacation message)
SENDMAILPARAMS="-t -f"
(parameters used to send actual vacation message)
If an alternate autoresponder is required, please refer to the kopano-dagent manual page which describes how to use an alternate script (using the -a option).
5.1.4. Storing attachments outside the database¶
Since version 6.0 it is possible to save the attachments outside the database. KC 7.0.5 and higher will use the filesystem as default location for attachment storage. For better database performance it is recommended to store attachments outside of the database.
For first time installations, the attachment storage method should be selected before starting the server for the first time as it is not easy to switch the attachment storage method later on.
To change the attachment storage location, edit the following option in the /etc/kopano/server.cfg.
attachment_storage = files
attachment_path = /var/lib/kopano/attachments
For upgrades, a script exists that copies the attachments from the database to the file storage. This script can be found in /usr/share/doc/kopano, and is named db-convert-attachments-to-files. This script can be used as follows:
db-convert-attachments-to-files <myuser> <mypass> <mydb> <dest path> [delete]
Note
The script can be executed while the kopano-server process is running.
It is only possible to convert from database storage to file storage. The <delete> switch is optional. If this parameter is given, the attachments are also removed from the database. Keep in mind that during the conversion the storage of the attachments on the harddisk will double. The amount of storage in MySQL used by KC can be looked up the with the following MySQL statements:
use kopano;
show table status;
Check the data_length column for the lob table. This contains the number of bytes needed for the attachment storage.
To select this new storage method, change the attachment_storage option in the server.cfg file and point the attachment_path option to the folder where the attachments should be stored. After changing this option kopano-server needs to be started once with the --ignore-attachment-storage-conflict parameter.
Advantages of attachments outside the database are:
- MySQL does not save the large binary blobs in the database. This improves the general read and write access.
- Attachments will not cause cache purges of MySQL.
- Make use of deduplication techniques (for example filesystem capabilities or through hardlinking) to further reduce hard disk space.
Disadvantages of attachments outside the database are:
- A MySQLdump of the database is not enough for a full recovery.
- Remote storage of attachments requires a new system, like folder mounted through NFS or Samba.
Important
It is very important, when choosing to store the attachments outside the database, to update the backup strategy accordingly.
Important
When using NFS as storage backend for Attachment-Store or as WebApp TMP_PATH we recommend turning of NFS locking by using the -o nolock mount option as this potentially can cause severe performance penalties.
5.1.5. SSL connections and certificates¶
The Kopano Server is capable of directly accepting encrypted SSL connections.
This feature may already be available when the HTTPS Apache server is setup to proxy these connections to the Kopano Server.
However, having native SSL connections to the server has an interesting advantage: Kopano components running beyond localhost can login using their SSL certificate.
This section will describe how to setup certificates to add native SSL connections to Kopano.
First, we will create the directory to contain the certificate and setup the permissions, since it contains our private key.
mkdir /etc/kopano/ssl
chmod 700 /etc/kopano/ssl
If Kopano is run as another user, as described in the Running as non-root user section, do not forget to chown the directory as well.
Now we are ready to create a Certificate Authority (CA). This CA will be used to create the server certificate and sign it. We provide a ssl-certificates.sh script in the /usr/share/doc/kopano directory, which uses the openssl command and the CA.pl script from OpenSSL. Depending on the distribution used this script can be installed in different directories. The script will try to find it on its own. If it is not found, either OpenSSL is not installed, or the script is in an unknown location, and location of the script has to be provided manually. Normally, the ssl-certificates.sh script can be run without problems.
Note
With the release of Kopano 8.2.0 all Kopano components now check the validity of the CN and subjectAltNames fields of the certificate. Unlike browsers Kopano does not stop at self-signed certificates, so these can use used as well.
cd /etc/kopano/ssl
sh /usr/share/doc/kopano/ssl-certificates.sh server
The parameter server is added, so the name of the new certificate will be called server.pem. When the CA is not found in the default ./demoCA directory, it needs to be created. By pressing enter, the creation of the new CA is started.
Enter a password (passphrase) when asked for. This is the password used later on to sign certificate requests. Then certificate information should be entered. The Common Name has to reflect the hostname clients will use to connect to.
Now that we have a CA, we can create self-signed certificates. The ssl-certificates.sh script will automatically continue with this step. Enter a password for the request, and enter the certificate details. Some details need to be different from those typed when the CA was created. At least the field Organizational Unit Name needs to be different. The challenge password at the end may be left empty.
This step created a Certificate Request, that needs to be signed by the CA that was created in the first step of the script. Type the password of the CA again when asked for. The details of the certificate will be shown, and asked for acceptance. Accept the certificate.
As the last step, the public key of this certificate will be offered. Since the server certificate just was created the public key of this certificate is not needed.
Now that the the CA certificate and the server certificate have been created, SSL can be enabled in the server.cfg file, which is normally disabled. The port 237 is set for SSL connections. This port number can be changed if necessary.
server_listen_tls = *:237
The CA certificate must be set in the server_ssl_ca_file setting. The server certificate and password must be set in the server_ssl_cert_file and server_ssl_cert_pass options.
server_ssl_ca_file = /etc/kopano/ssl/demoCA/cacert.pem
server_ssl_key_file = /etc/kopano/ssl/server.pem
server_ssl_key_pass = <password>
Restart the kopano-server process, and now it’s possible to connect directly to the SSL port. Create a new Outlook profile, and mark the SSL connection option. Set the port to 237. The connection to the server has now been encrypted.
5.2. Configure Kopano Konnect¶
Kopano Konnect is an OpenID provider (OP) that directly integrates a web login and consent form. It brings support for both OpenID Connect (OIDC) and Open Authentication (OAuth 2.0). In addition to the easier integration with third-party applications, Kopano Konnect will also provide the authentication part for the Kopano RestAPI and clients consuming it.
Konnect was primarily designed to allow easy sign in with your Kopano account, but it is also able to validate users against an LDAP and a cookie-based backend. The architecture of Kopano Konnect favours a mostly stateless setup, where no session data is stored locally but rather encapsulated within the token (jwt) that is sent to the user. In fact, the only requirements that Konnect has apart from the user backend are an encryption secret key, a private key to sign the user tokens and if services are running under a different hostname a yaml file that services as a client registry. If the encryption secret key or private key are missing Konnect will generate a random key at startup (user sessions won’t survive a restart in this case). For convinience these keys are auto-generated through systemd before Kopano Konnect starts.
5.2.1. Configuration¶
Configuration of Konnect is performed in /etc/kopano/konnectd.cfg. When running with Kopano, the only setting that needs changing is the OpenID Connect Issuer Identifier, which has to be set to the hostname Konnect is accessible from (ideally using the same hostname as the other Kopano apps).
# OpenID Connect Issuer Identifier.
# This setting defines the OpenID Connect Issuer Identifier to be provided by
# this Konnect server. Setting this is mandatory and the setting must be a
# https URL which can be accessed by all applications and users which are to
# use this Konnect for sign-in or validation. Defaults to "https://localhost" to
# allow unconfigured startup.
#oidc_issuer_identifier=https://localhost
Remember to restart Konnect by executing systemctl restart kopano-konnectd after making configuration changes.
5.2.2. Configure a Webserver for Konnect¶
Kopano Konnect needs to be accessible on certain defined paths to fully work. This chapter gives example configuration snippets for Apache and Nginx. After the below snippets have been added your should be able to open https://your-domain/signin/v1/welcome and be greeted with the Kopano login mask.
Apache
Put the following snippet into /etc/apache2/conf-available (or your local equivalent) and enable it:
ProxyPass /.well-known/openid-configuration http://localhost:8777/.well-known/openid-configuration retry=0
ProxyPass /konnect/v1/jwks.json http://localhost:8777/konnect/v1/jwks.json retry=0
ProxyPass /konnect/v1/token http://localhost:8777/konnect/v1/token retry=0
ProxyPass /konnect/v1/userinfo http://localhost:8777/konnect/v1/userinfo retry=0
ProxyPass /konnect/v1/static http://localhost:8777/konnect/v1/static retry=0
ProxyPass /konnect/v1/session http://localhost:8777//konnect/v1/session retry=0

# Kopano Konnect login area
ProxyPass /signin/ http://localhost:8777/signin/ retry=0
Nginx
Put the following snippet into /etc/nginx/sites-enabled/default (or your local equivalent) and enable it:
upstream konnect {
        server 127.0.0.1:8777;
}

location /.well-known/openid-configuration {
        proxy_pass http://konnect/.well-known/openid-configuration;
}

location /konnect/v1/jwks.json {
        proxy_pass http://konnect/konnect/v1/jwks.json;
}

location /konnect/v1/token {
        proxy_pass http://konnect/konnect/v1/token ;
}

location /konnect/v1/userinfo {
        proxy_pass http://konnect/konnect/v1/userinfo;
}

location /konnect/v1/static {
        proxy_pass http://konnect/konnect/v1/static;
}

location /konnect/v1/session {
        proxy_pass http://konnect/konnect/v1/session;
}

location /signin/ {
        proxy_set_header Host $host;
        proxy_set_header X-Forwarded-Proto $scheme;
        proxy_set_header X-Forwarded-Port $server_port;
        proxy_set_header X-Forwarded-For $proxy_add_x_forwarded_for;
        proxy_pass http://konnect/signin/;
}
5.2.3. Configure 3rd Party Applications to Authenticate using Konnect¶
Note
Want to share how to configure your application for Kopano Konnect? Just drop us an email to feedback (at) kopano (dot) io and we will include it in this section. Need help configuring a certain application for Kopano Konnect? Either open a topic on our forum or when using a subscription open up a support case.
An important resource for configuring third-party clients for the use of Kopano Konnect is the so-called “discovery document”. When running the above proxy server configuration the discovery document will be available from https://$(hostname)/.well-known/openid-configuration. Some client applications are able to autoconfigure themselves from this url and for applications that do not support this, you will still be able to find a listing of all relevant url endpoints of Konnect and the supported claims and scopes.
Most claims and scopes supported by Konnect are defined by the OpenID Connect standard, but there are also some additional scopes defined by us that I want to quickly introduce.
- konnect/id → will change the return value for the user id to a numerical value.
- konnect/hashed_sub (introduced in 0.8.0) → the subject is normally equal to the unique user id in Kopano, but this value can include characters that are not allowed on the client side (like the plus sign for example), we, therefore, have introduced an additional claim that will convert the subject to an url safe value for these applications.
- kopano/gc (introduced in 0.9.0) → a scope that will be used by the by the Kopano Rest API to determine the unique user id, if konnect/hashed_sub is used.
In case an application is running on the same domain name as Konnect it will be automatically trusted. In case the application uses a different hostname, then the application needs to be “registered” before it can actually be used. For this registration, the file identifier-registration.yaml is used (please check the git repository for an example file).
5.2.3.1. Using Kopano Konnect to sign into Nextcloud¶
With this knowledge, we can now configure Nextcloud so that users will be able to sign into Nextcloud from Kopano Konnect. The below steps require the use of Kopano Konnect >=0.8.0 and have been tested with the Nextcloud 13.0.4 and the Nextcloud “Social Login” app in version 1.9.2 and 1.9.4.
The ability to sign into Nextcloud via OpenID Connect is unfortunately not a core component of Nextcloud, but instead needs to be achieved via the installation of a third party plugin (through the Nextcloud App Market). After the plugin has been installed administrators will see a new menu option called “Social Login” in the Nextcloud settings. From there a new “Custom OpenID Connect” can be configured.
The following values need to be filled in:
- Internal name → internal identifier can, for example, be set to “Kopano”
- Title → this is what will be displayed to the user on the Nextcloud login screen. Should be named “Kopano Konnect” or something else that the user can easily identify.
- Authorize url → this setting is named “authorization_endpoint” in the discovery document. value is for example
https://$(hostname)/signin/v1/identifier/_/authorize(replace$(hostname)with your actual hostname here and in the following instances) - Token url → this setting is named “token_endpoint” in the discovery document. Value is for example
https://$(hostname)/konnect/v1/token - User info URL (optional) → this setting is named “userinfo_endpoint” in the discovery document. Value is for example
https://$(hostname)/konnect/v1/userinfo - Client Id → self-defined value used to identify if the client registry is used (more below)
- Client Secret → self-defined value
- Scope → the list of required scopes, here openid profile email konnect/hashed_sub need to be entered.
In case Nextcloud is running on a different host or just on a different domain name, we also need to add an entry for it to the client registry. For this the following values need to be added to the end of the example file:
- id: nextcloud # same id as before
  name: Nextcloud # self-defined value
  application_type: web
  redirect_uris:
  - https://nextcloud.$(hostname)/apps/sociallogin/custom_oidc/Kopano
In the redirect_uris section the last part of the url (so the “Kopano”) needs to be the same value as the “internal name” in the Social Login configuration.
Once these settings are set there is a new button on the Nextcloud login page (with the text “Kopano Konnect”) that users can use to sign into Nextcloud.
In case the Kopano users already exist inside of Nextcloud (since both systems use a common ldap tree for example) it is recommended to check the options “disable auto create new users” and “allow users to connect social logins with their account” inside of the Social Login settings to prevent users from accidentally creating new user accounts when trying to login.
Once this is done the user can then link his existing Nextcloud user to the OpenID Connect user in his personal settings below the item “additional settings”.
5.2.3.2. Using Kopano Konnect to sign into services supporting ID4me¶
Starting with version 0.21.0 Kopano Konnect can be used to login into services that support logging in via ID4me. These services are commonly referred to as a “Relying Party”. The following requirements have to be met to use Kopano Konnect as a “Identity Agent” within the ID4me specifications:
- A domain name that is configured with DNSSEC
- A dns TXT record with the name
_openidand the valuev=OID1;iss=kopano.dev;clp=kopano.dev(wherekopano.devneeds to be replaced with the actual FQDN Konnect can be reached at) - A valid/trusted SSL certificate for the system providing Konnect
- The system running Konnect needs to publicly accessible
When the above requirements are met, the only configuration change within Konnect is to allow dynamic client registration by setting allow_dynamic_client_registration = yes in konnectd.cfg.
5.3. Configure Kopano Kraph¶
Kopano API provides a REST web service with the endpoints to interface with Kopano via HTTP APIs. In addition to installing kopano-kapid, Kopano API also needs to have the required REST endpoints, for Kopano Groupware this is provided by kopano-grapi. Kopano API is only required if the next generation clients such as Kopano Meet should be used and is not required if only Kopano WebApp and/or Z-Push should be used.
Note
Kopano API and Grapi are currently only supported on Debian 9, Ubuntu 16.04 and Ubuntu 18.04. For the upcoming Kopano Groupware Core 9.0 release we want to add the rest of our supported platforms.
5.3.1. Configuration¶
Configuration of Kapi is performed in /etc/kopano/kapid.cfg. When running with Kopano, the only setting that needs changing is the OpenID Connect Issuer Identifier, which has to be set to the hostname Konnect is accessible from.
# OpenID Connect Issuer Identifier.
oidc_issuer_identifier=https://localhost
Remember to restart Kapid by executing systemctl restart kopano-kapid after making configuration changes.
The use Kopano Api, some settings need to be adjusted in kopano-server as well
##############################################################
# OPENID CONNECT SETTINGS

# Enable OpenID Connect Issuer Identifier
# When set, the server attempts OIDC discovery using the configured issuer
# identifier on startup. An Issuer Identifier is a case sensitive URL using the
# https scheme that contains scheme, host, and optionally, port number and path
# components. This no Issuer Identifier is set, OIDC support is disabled.
#kcoidc_issuer_identifier =

# Disable TLS validation for OpenID Connect requests
# When set to yes, TLS certificate validation is skipped for all requests
# related to OpenID connect. This is insecure and should not be used in
# production setups.
#kcoidc_insecure_skip_verify = no

# Timeout in seconds when to give up OpenID Connect discovery
# When the OIDC initialize timeout is reached, server continues startup without
# OIDC and all OIDC validation will fail until the discovery completes. When
# set to 0, the server startup does not wait for OIDC discovery at all.
#kcoidc_initialize_timeout = 60

...

# Set to 'yes' if you have Kerberos, NTLM or OpenID Connect correctly configured for single sign-on
#enable_sso = no
The option kcoidc_issuer_identifier has to be set to the hostname Konnect is accessible from. Once this has been done enable_sso can be set yo yes.
5.3.2. Configure a Websever for Kopano Kraph¶
Kopano Api needs to be accessible on certain defined paths to fully work. This chapter gives example configuration snippets for Apache and Nginx. After the below snippets have been added the API will be available from https://your-domain/api/gc/.
Apache
Put the following snippet into /etc/apache2/conf-available (or your local equivalent) and enable it:
ProxyPass /api/gc/ http://localhost:8039/api/gc/ retry=0
ProxyPass /api/pubs/ http://localhost:8039/api/pubs/ retry=0
Nginx
Put the following snippet into /etc/nginx/sites-enabled/default (or your local equivalent) and enable it:
upstream kapi {
        server 127.0.0.1:8039;
}

location /api/gc/ {
        proxy_pass http://kapi/api/gc/;
}

# kapi pubs
location /api/pubs/ {
        proxy_pass http://kapi/api/pubs;
        proxy_http_version 1.1;
        proxy_set_header Upgrade $http_upgrade;
        proxy_set_header Connection "Upgrade";
}
5.4. Configure the Kopano Spooler¶
The Kopano-spooler sends email from the global outgoing queue to a SMTP server, which sends the email to the correct address.
When an email message is sent from Outlook or WebApp, the message is placed in the Outbox folder, and a submit message is sent to the Kopano server. The server notifies the Kopano spooler to send the email to the SMTP server. The spooler will now start to convert the message to a normal email message. When the conversion is complete, a connection to the supplied SMTP server is created, and the email is sent to the SMTP server.
The spooler will send the email, and after the mail is sent, will move the mail automatically to the user’s Sent Items folder.
If at any time an error was found, the user will be notified with an ‘Undeliverable’ message. The message will contain an error description on which error was found. Often, the user can retry to send the message.
Note
Both external and internal emails will be sent via the MTA.
5.4.1. Configuration¶
The Spooler is configured the same as the server. Options in the spooler configuration file are the name or ip-address of the SMTP server, where to find the Kopano server, and logging options.
smtp_server
The name or IP-address of the SMTP server, which will send the email to the destination. This server may also be given as an argument when starting the spooler.
server_socket
The UNIX socket of the Kopano server. The spooler will use this socket to create a connection to the server. This value should be the same as set in the server configuration file. The default value is /var/run/kopano/server.sock.
[logging]
The spooler has the same configuration options as the server to configure logging options.
For an overview of all the configuration options of kopano-spooler, use:
man kopano-spooler.cfg
5.5. Configure Kopano Caldav¶
Kopano Caldav is a component that enables users to view their calendar data by clients that support the Caldav standard, like Sunbird or Evolution. This component connects with the Kopano Server using MAPI over HTTP.
Caldav and iCal push and retrieve complete calendars. Sunbird and other clients support both retrieving and pushing, while Evolution does only support retrieving of calendars.
The Kopano Caldav component can be configured using a configuration file in the same fashion as the Kopano Server. It supports both plain and SSL/TLS secured connections. To increase security it is recommended to enable secure Caldav connectivity exclusively.
For an overview of all the configuration options of kopano-ical, use:
man kopano-ical.cfg
5.5.1. SSL/TLS for CalDAV¶
As mentioned before the Kopano Caldav component supports SSL/TLS, for this the OpenSSL library is used.
The private key (for encryption) and the certificate (for authentication) file can be set in the configuration file with ssl_private_key_file and ssl_certificate_file.
The Kopano Caldav component can also authenticate the calendar clients that try to connect to it verifying the client certificates using one or more verification files. This can be set with ssl_verify_client, ssl_verify_file and ssl_verify_path. Certificates can be self-signed or signed by a trusted certificate authority.
The following command generates an RSA key of 2048 bytes:
openssl genrsa -out /etc/kopano/privkey.pem 2048
This command creates a self-signed test certificate valid for 3 years:
openssl req -new -x509 -key /etc/kopano/privkey.pem -out /etc/kopano/cert.pem \
        -days 1825
If a .cer file and a .key file are already present, you can create a .pem file from these using the following command:
cat my_server.key > my_server_combined.pem
cat my_server.cer >> my_server_combined.pem
And then use the my_server_combined.pem file for ssl_private_key_file or ssl_certificate_file. Please make sure first the .key file is processed, and then the .cer file. The same approach can be used to include any neccesary intermediate certificates into the file.
5.6. Configure Kopano Gateway (IMAP and POP3)¶
The Kopano IMAP & POP3 Gateway enables users to view mail stored on the Kopano Server with an IMAP or POP3 client. For example Mozilla Thunderbird or a mobile device with Microsoft Pocket Outlook. To access the user data, the Kopano Gateway itself connects to the Kopano Server with MAPI.
POP3 can only retrieve the mail in the Inbox from the server. IMAP on the other hand displays all folders that can contain mail, such as Drafts and Deleted Items. All sub-folders are shown as in Microsoft Office Outlook or the Kopano WebApp.
For an overview of all the configuration options of kopano-gateway, use:
man kopano-gateway.cfg
5.6.1. SSL/TLS for Gateway¶
The Kopano Gateway supports SSL/TLS using the OpenSSL library. For more information see SSL/TLS for CalDAV, as the options are exactly the same for these two components.
5.6.1.1. Important notes¶
IMAP and POP3 are provided for backward compatibility and will not provide the same experience like clients that support MAPI (Microsoft Outlook or our WebApp). IMAP/POP3 clients use these protocols for mails only (where MAPI does mail, calendar and contacts).
Setting the Out of Office message is not possible with IMAP or POP3 clients.
Rules set in Microsoft Outlook do not work using the Kopano IMAP & POP3 Gateway. Some clients can set rules but these rules are not related to the rules set by a MAPI enabled client.
Deleting a mail using IMAP will mark the mail for deletion. This is not shown in Microsoft Outlook and Kopano WebApp. The mail will be deleted when the client expunges the folder. Some clients allow to expunge folders manually and some have settings when to expunge a folder. Other clients expunge the folder automatically when a mail is deleted.
Moving mail to a different folder with IMAP is done by copying the mail to the new folder and mark the originating mail for deletion. As long as the the original mail is not expunged from its folder, the mail will be shown in both folders as stated above.
5.7. Configure Kopano Quota Manager¶
Users can collect a lot of email, while disk space can be limited. The Kopano Quota Manager can be used to set server-wide or user specific space quotas. The Kopano Quota Manager knows three levels: warn, soft and hard quota. When one of the levels will be reached, the user receives an email with the quota sizes and which quota level was reached.
The quota settings can be configured server-wide in the server.cfg or per user via the user plugin.
When a user reaches the warning quota level, the user will receive an email with a warning and quota information. As the user reaches the soft quota limit, the user will not be able to sent email until the size of the store is reduced. When the hard quota limit is reached, email can also not be delivered to that user anymore.
5.7.1. Setup server-wide quota¶
The server-wide quota can be configured in the configuration file of the server:
quota_warn = 100
quota_soft = 150
quota_hard = 200
The values are all in megabytes. These values will be honored for all users present in the server. When the values are set to 0, that particular quota level is disabled.
5.7.2. Setup quota per user¶
By using the kopano-admin tool, the user quota can be set for a specific user. Example:
Set the quota of the user John with the settings: Warning level to 80 Mb, soft level to 90 Mb and hard level to 100 Mb.
kopano-admin -u john --qo 1 --qw 80 --qs 90 --qh 100
Note
Set user quota with kopano-admin is not supported for the LDAP backend. With LDAP the properties are stored in the LDAP server per user. See the User Management for more information.
5.7.3. Monitoring for quota exceeding¶
The kopano-monitor program checks every hour (by default) for users who have exceeded a quota level and sends emails to a user when the warning or soft quota limit is exceeded. Global quota settings can be set in the server configuration. User specific levels can be set via kopano-admin when using the db or unix plugin, or by editing the LDAP values as described in the User Management section.
To start the kopano-monitor, use:
systemctl start kopano-monitor.service
or
kopano-monitor -c /etc/kopano/monitor.cfg
The kopano-monitor will daemonise, so the prompt will almost immediately return. Use -F to start it in the foreground. More information about the configuration options can be found in the manual page:
man kopano-monitor.cfg
5.7.4. Quota warning templates¶
When working with the kopano-monitor, it is possible to modify the contents of the email which will be sent out when a user or company exceeds its quota. For each quota level a separate quota template can be specified, these can be configured with the following options:
userquota_warning_templatecompanyquota_warning_template
By default the templates are stored in /etc/kopano/quotamail, in each of these templates certain variables are provided which will be substituted for the real value before the email is sent:
KOPANO_QUOTA_NAME- The name of the user or company who exceeded his quotaKOPANO_QUOTA_COMPANY- The name of the company to which the user belongsKOPANO_QUOTA_STORE_SIZE- When a user exceeds his quota, this variable contains the total size of the user’s store. When a company exceeds its quota this variable contains the total size of all stores, including the public store within the company space.KOPANO_QUOTA_WARN_SIZE- The quota warning limit for the user or company.
Note
Variables containing a size always include the size unit (B,KB,MB,GB) as part of the variable.
5.8. Configure Kopano Search¶
The kopano-search service offers full text searching capabilities for the Kopano Server. The service will continuously index all mails of a single kopano-server instance. Each kopano-server instance in a multi-server setup needs its own kopano-search service.
When searching for a particular mail, the required time to find the requested emails will be seriously reduced. When attachment indexing is enabled, it is even possible to index the contents of attached files (for common file types that contain text).
5.8.1. Enabling the search service¶
To start the indexing service execute the following command:
/etc/init.d/kopano-search start
To enable the full-text searching, edit the /etc/kopano/server.cfg configuration file:
search_enabled = yes
During searching the kopano-server will connect with the kopano-search service. To set the connection path change the following configuration option:
search_socket = file:///var/run/kopano/search.sock
Note
Kopano-search will only create the search_socket once the initial index has been created. Until this process is done kopano-server will complain about the socket not beeing accessible and use the direct database search instead.
5.8.2. Search configuration¶
During indexing, the index file for each store is stored on the harddisk. The location of these files can be configured in /etc/kopano/search.cfg:
index_path = /var/lib/kopano/search/
In this folder a file will be created for each store located on the Kopano server node. A state file will also be present to remember where the indexing process has left upon restart.
Important
The files within this index path should not be touched while the indexer is running. If a store must be re-indexed, the kopano-search must be stopped first before deleting the file for that particular store.
The kopano-search service uses streaming synchronization offered by the kopano-server for fast indexing of messages. To enable streaming, ensure that the following configuration option is enabled in the kopano-server config:
enable_enhanced_ics = yes
This option is enabled by default, and normally there is no reason to disable it.
5.8.3. Attachments¶
Optionally the contents of attachments can be indexed as well. When this is enabled, searching for a message will also search through the attachment text as well.
To enable indexing of attachments can be done in /etc/kopano/search.cfg:
index_attachments = yes
Indexing of attachments is done through parsing the attachments to plain text and indexing the text into the main index for the email. The required time to parse and index a particular attachment depends on the actual size of the attachment. To prevent large attachments adding latency to the total indexing time, the configuration option index_attachment_max_size can be used to prevent large attachments to be indexed. The value provided to this configuration option must be set in kilobytes.
To parse the attachments to plain text a separate configuration script must be provided. By default this script is installed to /etc/kopano/searchscripts/attachments_parser but the exact location can be configured using the configuration option index_attachment_parser.
The default script attachments_parser will use the file attachments_parser.db to decide how the attachment should be parsed to plain text. Within this file is a list containing the command to parse each attachment type to plain text. This file can be edited to control the way attachments are parsed and to add or remove support for particular attachment types.
The layout of each line is as followed:
<mime-type>;<extension> `<command>`
Each line can have as many mime-types and extensions as needed, each mime-type and extension must be separated using semi-columns. The command must read /dev/stdin for the attachment data and must return the plain text through /dev/stdout. Some tools cannot parse attachment data from a stream, and require the data to be provided as file. To store the attachment in a temporary file, the script zmktemp can be used. That script will write all attachment data in a temporary file and print the location of the file to /dev/stdout.
Attachments which cannot be parsed (for example images), the command echo -n can be used.
After editing the command, it is advisable to test it to see if the desired output is returned. Testing the command can be done by executing the following command on the command line:
cat <attachment> | <command>
The resources used by the attachments_parser during the parsing of a single attachment can be restricted by limiting the total memory and CPU time usage. To control the maximum amount of memory the script can use is controlled by the configuration option index_attachment_parser_max_memory. By default this value is set to 0, to disable any memory consumption restriction. If a restriction should be applied, the maximum number of bytes should be provided. The best restriction size depends on the maximum attachment size which can be provided to the script (configured using index_attachment_max_size) and the 3rd party tools used to parse the attachments.
To prevent the script to take too much time, the configuration option index_attachment_parser_max_cputime can be used. By default this value is set to 0, to disable any CPU time restriction. If a restriction should be applied, the maximum number of seconds should be provided. The best restriction depends on the 3rd party tools used to parse the attachments.
If either of these limits is exceeded the script will be canceled and the attachment will not be indexed.
5.9. Configure Kopano WebApp¶
For configuration instructions for Kopano WebApp please check the WebApp Admin Manual.
5.9.1. Configure the Webserver¶
For instructions how to configure your webserver for Kopano WebApp please check the WebApp Admin Manual.
5.9.1.1. Installing php-mapi¶
Client applications such as Kopano WebApp and Z-Push rely on the php-mapi module to access data stored in Kopano. The php-mapi packages is part of the Kopano Groupware Core installation packages. As PHP modules have to be compiled against the abi of the same PHP version it is later used with, Kopano provides packages matching the default PHP version for each of the supported distributions.
5.9.1.1.1. As a HTTP Reverse Proxy for Kopano Server¶
The transmitted data between the different client applications (for example Kopano WebApp) and kopano-server is compressed XML, wrapped in HTTP packets. The use of HTTP allows packets to be forwarded by a proxy (or a webserver with built-in proxy functionality). Please make sure that the proxy fully supports HTTP/1.1 and “Chunked Encoding” is available as a transport.
The following lines are an example of how Apache can be configured to forward incoming connections on port 80 to the Kopano Server on port 236. In case the Apache server also accepts HTTPS connections, the proxyed connections can also be encrypted. The proxy and proxy_html modules of Apache need to be loaded for this to work(for example with a2enmod proxy proxy_http).
<IfModule mod_proxy.c>
   ProxyPass /kopano http://127.0.0.1:236/
   ProxyPassReverse /kopano http://127.0.0.1:236/
</IfModule>
This means that URLs that begin with /kopano will be forwarded to localhost on port 236, where the Kopano Server listens for incoming connections. These lines can be placed globally, or within a VirtualHost declaration.
Note
Keep in mind that using a HTTP proxy will create some performance overhead on your system, so it is not recommended to use this for larger setups.
Note
Chunked encoding can be forced within Apache by setting SetEnv proxy-sendchunked 1.
Apache 2.2 is known to have some trouble with chunked encoding. Therefore we recommend using Apache 2.4 (or even Nginx) when planning to implement such a proxy.
5.10. Configure Kopano for user management with LDAP (e.g. OpenLDAP/ADS)¶
In several network environments an LDAP tree is used to keep track of various bits of information, most notably: users and their credentials. Kopano integrates with any LDAP server and directly supports the use of OpenLDAP and Microsoft ActiveDirectory (ADS).
As Kopano doesn’t bundle a LDAP server of its own, this has to be setup separately if there is not yet a server available in the environment. Please read the documentation of the used Linux distribution on how to setup an LDAP server. Kopano provides an example LDIF file in Appendix C: Example LDIF.
Connections to the LDAP server usually run over port 389 or 636 (TLS/SSL). For best speed and reliability it is always recommended to install an LDAP server on the same host as the kopano-server itself. If required this local server can also be setup to replicate the main LDAP server. Besides performance improvements this also allows the kopano-server to function even when the main LDAP server is not available.
The following sections can be summarised into the following:
- Once the desired ldap backend is prepared, the file
/usr/share/doc/kopano/example-config/ldap.cfgneeds to be copied to/etc/kopano/ldap.cfg. - Only files in
/etc/kopanoshould be modified to configure Kopano or the ldap integration of Kopano. No files below/usr/shareneed to be modified! - In
/etc/kopano/ldap.cfgthe include statement should be switched according to used type of ldap (OpenLDAP or ADS). - Additionally the admin needs to define the required connection details in
/etc/kopano/ldap.cfg. - If there is a want/need to override any of the default configuration option (like for example
ldap_user_search_filter), then this should be added to the bottom of/etc/kopano/ldap.cfg.
5.10.1. Configuring OpenLDAP to use the Kopano schema¶
To make managing Kopano users easier it is recommended to import the Kopano LDAP schema. The schema can be imported by issuing the following command:
zcat /usr/share/doc/kopano/kopano.ldif.gz | ldapadd -H ldapi:/// -Y EXTERNAL
5.10.2. Configure LDAP indices in OpenLDAP¶
Indexing entries is a way to improve performance performing a filtered search on the LDAP directory. The following table shows the most important attributes to index and the type of index that should be implemented.
Depending on the Kopano ldap configuration the attributes may be different.
Please check the OpenLDAP or syslog logfiles for further attributes which are not yet indexed and could be included to increase performance. Check below for an example log message:
May 13 14:37:17 kopano slapd[4507]: <= bdb_equality_candidates: (mail) not indexed
When using the cn=config backend the following ldif file can be used to add the given attributes to the index of OpenLDAP:
dn: olcDatabase={1}mdb,cn=config
changetype: modify
replace: olcDbIndex
olcDbIndex: memberOf eq
olcDbIndex: entryCSN eq
olcDbIndex: entryUUID eq
olcDbIndex: objectClass eq
olcDbIndex: cn pres,eq,sub
olcDbIndex: gidNumber eq
olcDbIndex: mail pres,eq,sub
olcDbIndex: memberUid eq
olcDbIndex: ou eq
olcDbIndex: uid eq
olcDbIndex: uidNumber eq
olcDbIndex: uniqueMember eq
olcDbIndex: kopanoAccount eq,pres
olcDbIndex: kopanoAliases eq
olcDbIndex: kopanoViewPrivilege eq
olcDbIndex: sn pres,eq,sub
olcDbIndex: givenName pres,eq,sub
To import this the following comman can be used:
cat optimize-index.ldif | ldapmodify -Y EXTERNAL -H ldapi:///
5.10.3. Configuring ADS to use the Kopano schema¶
Kopano Groupware Core provides an installer for extending the Active Directory schema and installing an Active Directory snap-in for managing the Kopano specific attributes.
With Kopano ADS Extension it is possible to create and modify the following objects in Active Directory:
- Kopano Users
- Kopano Groups
- Kopano Addresslists
- Kopano Dynamic Distribution Lists
- Kopano Computers (For usage with Multi-Server support)
- Kopano Companies (For usage with Multi-Company support)
Make sure you have prepared the AD role based on the usual best practice. We do not cover details of the setup, just a basic setup howto to get you started with Active Directory.
Before you deploy the AD role, you should make sure the following tasks have been completed:
- The administrator account has a strong password set
- The networking has been setup accordingly (static IP)
- The latest windows updates have been installed
- The user the installer is run with, should be part of the “Schema Admins” group
To make your system ready to provide an Active Directory, please follow the following steps. The steps are based on Windows Server 2016, Installation might differ slightly for previous versions.
- In Server manager, select “Add roles and features” which starts the “Add Roles and Features Wizard”.
- After confirming the “Before you begin” page as a reminder to the tasks also mentioned above, continue with “Next”.
- Select “Role-based or feature-based installation”, continue with “Next”.
- Select the Server you want to install the AD role(s) to, continue with “Next”.
- Select “Active Directory Domain Services” and confirm the pop-up dialog to add the missing dependencies (including the management tools by keeping the checkmark enabled)
- Select “Active Directory Lightweight Directory Services” and confirm the pop-up dialog to add the missing dependencies (including the management tools by keeping the checkmark enabled)
- Continue with “Next” after having selected the roles mentioned above.
- Continue with “Next” without selecting any additional (required) features.
- Continue with “Next” confirming the installation of “AD DS” role.
- Continue with “Next” confirming the installation of “AD LDS” role.
- Continue with “Install” at the installation page to make the roles available. The checkmark for automatic restart can be set - in any case after deployment of AD a restart is required, whether this is done manually or automatic.
After these steps, with a reboot of the System your Active Directory should available and ready for installation of Kopano AD Extension.
The Kopano ADS Extension should be installed as a local administrator user on the Active Directory server which is the schema master. Following the above statement installs the schema role automatically on the system.
Note
Please restart the GUI after install of the Kopano ADS plugin to show the Kopano tab in the user details.
The Kopano ADS Extension is supported with Windows Server releases from 2008 R2 and 2016. The installation and schema extension are straight forward and it is possible to step through the setup by clicking the next button. The same installer can be used to install the MMC extension for non-AD-controllers to allow management of Kopano objects also remotely.
If the Kopano ADS Extension is installed, it is possible to edit the Kopano specific attributes. For editing a user go to Active Directory Users and Computers, select a user and get the properties. The Kopano tab should be available if the installation is successfully completed.
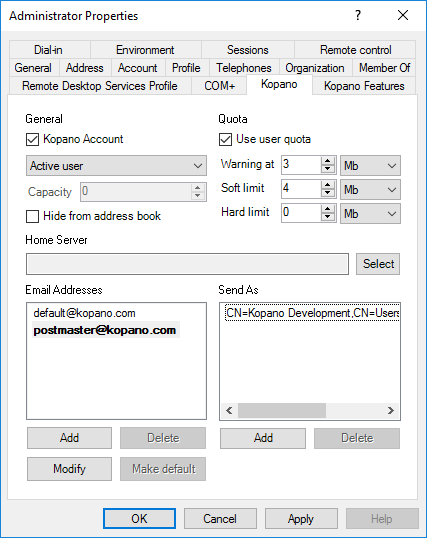
Figure 5.2. Kopano user tab

Figure 5.3. Kopano group tab
Note
It is also possible to use the Kopano AD Extension with an existing Zarafa-Schema. The installer still installs the Kopano Schema, to allow an administrator-defined timeframe for moving to the new schema. To enable the Zarafa Schema instead of the Kopano Schema, please modify the registry key HKEY_LOCAL_MACHINE\SOFTWARE\Kopano\Kopano ADS\Prefix from “kopano” to “zarafa”.
Note
Starting with version 1.1 it is possible to store a default email domain in the windows registry. For this set HKEY_LOCAL_MACHINE\Software\Kopano\Kopano ADS\MailDomain to your preferred domain. If the key is missing or empty Kopano ADS will fall back to the default behaviour. See KC-670 for more information.
5.10.4. Configuring Kopano for users stored in LDAP¶
To manage Kopano users/groups in an LDAP tree the the first thing to change is the user_plugin setting within server.cfg. To enable managing users in an ldap tree, this has to be set to ldap.
Editors remark: in earler versions there was also a backend called ldapms for multi server installations, this additional backend has been completely integrated within the ldap backend.
##############################################################
#  USER PLUGIN SETTINGS

# Name of the plugin that handles users
# Required, default = db
# Values: ldap, unix, db
user_plugin = ldap

# configuration file of the user plugin, examples can be found in /usr/share/doc/kopano/example-config
user_plugin_config      = /etc/kopano/ldap.cfg
Note
Always remember to switch the server.cfg setting user_safe_mode to yes when modifying ldap settings to prevent accidental deletes of users.
After the user plugin has been changed the ldap configuration template needs to be copied from /usr/share/doc/kopano/example-config/ldap.cfg into the Kopano configuration directory. As see above kopano-server expects this file by default at /etc/kopano/ldap.cfg.
The following modifications need to be done to your copy of ldap.cfg:
Select the matching include directive for your ldap tree:
# Select implementation.
# If you have any reason to override settings from /usr/share/kopano/*.cfg,
# do so at the end of this (/etc-resident) config file.
#
!include /usr/share/kopano/ldap.openldap.cfg
#!include /usr/share/kopano/ldap.active-directory.cfg
Kopano provides two default configuration files matching the two most common setups. Make sure to select the right include for your ldap backend.
Specify address of your ldap server through ldap_uri. For example:
ldap_uri = ldap://localhost:389
With this setting it is also possible to connect to multiple ldap servers (entries need to be separated by a space), once the first entry is not responding any longer, kopano-server will then switch over the the next entry in the list.
ldap_uri = ldaps://ldapserver1:636 ldaps://ldapserver2:636
Additionally kopano-server has to know how to connect the the LDAP server. Kopano will always only read to the LDAP and not write. Therefore a user account with only read access is sufficient.
ldap_bind_user = cn=Manager,dc=example,dc=com
ldap_bind_passwd = secret
Note
Please be cautious with adding restrictions via ACLs on the lda_bind_user for Kopano. It has been observed that excessive restrictions can greatly slow down read performance.
The LDAP search base (base DN) that the search for the different objects should start at. This should be the ‘root’ of the LDAP directory which contains the users, groups and contacts.
ldap_search_base = dc=example,dc=com
Any override to configuration options in the included default configuration files should be added to the end of /etc/kopano/ldap.cfg.
5.10.5. Fine-tuning user configuration¶
The following chapter is only neccesary if you want to override the default configuration.
In the default configuration a user store is created for each object in the LDAP directory that has a matching ldap_user_type_attribute_value attribute (posixAccount in openLDAP and user in ActiveDirectory). An additional search filter can be specified to limit store creation to a subset of the objects that have the user type attribute. For example:
ldap_user_search_filter = (kopanoAccount=1)
All user related fields can be mapped by the following options (example values taken from the openLDAP configuration):
ldap_emailaddress_attribute = mail
ldap_emailaliases_attribute = kopanoAliases
ldap_fullname_attribute = cn
ldap_isadmin_attribute = kopanoAdmin
ldap_loginname_attribute = uid
ldap_nonactive_attribute = kopanoSharedStoreOnly
ldap_password_attribute = userPassword
ldap_user_unique_attribute = uidNumber
The unique user attribute is the mapping between a mailbox in the database and the actual user in LDAP. Make sure this field is never changed as Kopano will perceive that as a user being deleted (and created), and will therefore orphan the user’s store.
The email aliases are shown in the Global Address Book details and can be used for resolving email aliases in Postfix. However it is not possible to deliver email to email aliases with kopano-dagent directly, this needs to be resolved by Postfix.
Extra user information, like addresses, phone numbers and company information can be mapped by an extra configuration file:
!propmap /etc/kopano/ldap.propmap.cfg
The specified attributes for users will also be used for contacts.
Important
The attribute otherMailbox is by default not indexed in Active Directory. It’s required to index this attribute in Active Directory, otherwise the Active Directory server will have a high CPU load during search queries on this attribute. For more information about indexing attributes in Active Directory, see https://technet.microsoft.com/en-us/library/cc737526(WS.10).aspx.
5.10.6. Fine-tuning group configuration¶
The groups can be filtered by an extra search filter as well.
ldap_group_search_filter = (objectClass=kopano-group)
ldap_group_unique_attribute = gidNumber
ldap_group_unique_attribute_type = text
For the membership relationships between groups and users, each group object has a group member attribute. This can be configured by:
ldap_groupmembers_attribute = memberUid
In ActiveDirectory environments this usually uses the following configuration:
ldap_groupmembers_attribute = member
ldap_groupmembers_attribute_type = dn
The Kopano Server will by default use the unique user attribute as value of the group member attribute. This can be changed by the group member’s relation attribute.
ldap_groupmembers_attribute_type = text
ldap_groupmembers_relation_attribute = uid
Groups are by default so called “security groups”. Security groups are available in the Global Address Book when creating a new email and setting permissions. To downgrade a group to a “distribution group” kopanoSecurityGroup must be set to 0. Distribution groups are only available in the Global Address Book when creating a new email but cannot be used for configuring mailbox permissions.
ldap_group_security_attribute = kopanoSecurityGroup
ldap_group_security_attribute_type = boolean
5.10.7. Addresslist configuration¶
Addresslists are groups of users that match a custom condition. These addresslists are showed as subfolders of the Global Address Book.
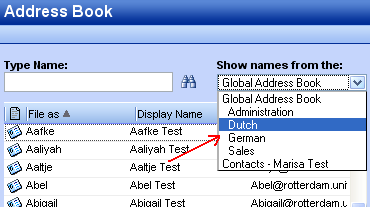
Figure 5.1. Addresslists in Global Adress Book
Change or add in ldap.cfg the following configuration settings for the addresslist objects.
ldap_addresslist_search_filter =
ldap_addresslist_unique_attribute = cn
ldap_addresslist_unique_attribute_type = text
ldap_addresslist_filter_attribute = kopanoFilter
ldap_addresslist_name_attribute = cn
See the User Management with LDAP or Active Directory for more information on how to administer address lists.
5.10.8. Testing LDAP configuration¶
After the LDAP configuration is done, the changes can be activated by reloading kopano-server.
systemctl reload kopano-server
Important
Only changes to the ldap configuration (mappings, searchbase, bind) can be applied by a reload. For changes to the user_plugin in server.cfg a proper restart is required.
To test whether users and groups will be listed correctly using the LDAP configuration, use:
kopano-admin -l
for users, and for groups:
kopano-admin -L
If no users or groups are shown, please check the Kopano server log file for errors. Setting the log_level to 0x00020003 in the /etc/kopano/server.cfg will display all LDAP queries send to the server and possible errors.
Note
The first time the kopano-admin -l is done, all mailboxes will be created, therefore it can take some time before the execution finishes, so be patient.
More information about other available LDAP attributes can be found in the man page.
man kopano-ldap.cfg
5.11. Postfix integration¶
Kopano does not include its own MTA, but can easily be integrated with the MTAs found in modern Linux distributions. Although Kopao Groupware is MTA agnistic, we recommend to use Postfix.
In order to deliver an email into a user’s mailbox, the kopano-dagent is executed. Messages are passed to the kopano-dagent from the standard input or by the LMTP protocol. The usage of LMTP is the recommended delivery method as this enables the use of Single Instance Attachment Storage across all attachment backends.
A few examples of the KC Postfix integration are described in the following sections. Keep in mind that Postfix is very flexible, so many different configurations are possible, most of which are beyond the scope of this document.
Note
Configuring antispam and antivirus scanning is beyond the scope for this manual. On the internet many example configurations are available for the most common MTAs and scanners.
5.11.1. Configure Kopano-dagent for delivery via unix socket¶
Starting with the 8.7 release of Kopano Groupware Core it is possible to deliver messages not only via a tcp LMTP connection, but also through a linux socket. While for backwards compatibility the default value will continue to use the tcp socket, we recommend to use the unix socket for new installations.
Configuring kopano-dagent for delivery via unix socket takes a few steps. Execute the following commands to create a secure local socket, that is onlz accessible by Postfix:
mkdir -p /var/spool/kopano
chown kopano:kopano /var/spool/kopano
chmod go= /var/spool/kopano
setfacl -m u:postfix:rwx /var/spool/kopano
After this is setup update/set the value of lmtp_listen in dagent.cfg to make use of the new socket:
lmtp_listen = unix:/var/spool/kopano/dagent.sock
Withing the Postfix configuration (main.cf) a matching transport line looks like:
virtual_transport = lmtp:unix:/var/spool/kopano/dagent.sock
5.11.2. Configure Postfix integration with OpenLDAP¶
The Postfix MTA can connect to an OpenLDAP server to resolve the primary mail addresses as well as aliases of users and groups. The Postfix package in most Linux distributions has LDAP support enabled by default. To read more about Postfix LDAP support see the LDAP README on the Postfix website.
All Postfix configuration files can be found in /etc/postfix directory. The main configuration file is logically called main.cf
By default Postfix will only accept incoming emails from localhost. To accept emails from the complete network, configure the following option:
inet_interfaces = all
In order to make Postfix aware of the local email domains, add the following line to the main.cf.
virtual_mailbox_domains = example.com, example.org, example.net
Postfix will now see the configured domains as its local email domains, however, to accept incoming emails, Postfix will do a recipient check. Add the following lines to the main.cf to have Postfix use LDAP for looking up (valid) recipients:
virtual_mailbox_maps = ldap:/etc/postfix/ldap-users.cf
virtual_alias_maps = ldap:/etc/postfix/ldap-aliases.cf, ldap:/etc/postfix/ldap-groups.cf, ldap:/etc/postfix/ldap-groups-expand.cf
virtual_transport = lmtp:unix:/var/spool/kopano/dagent.sock
All incoming emails are delivered to the LMTP service of the kopano-dagent. The delivery needs to be done on the primary mail address of a user.
For resolving the primary mail address of the user, create the file /etc/postfix/ldap-users.cf and add the following lines:
server_host = localhost
search_base = ou=Users,dc=example,dc=com
version = 3
scope = sub
query_filter = (&(objectClass=posixAccount)(mail=%s))
result_attribute = mail
For lookups of mail aliases create the file /etc/postfix/ldap-aliases.cf and add the following lines:
server_host = localhost
search_base = ou=Users,dc=example,dc=com
version = 3
scope = sub
query_filter = (&(objectClass=posixAccount)(kopanoAliases=%s))
result_attribute = mail
To deliver mails to member of a group the email addresses of the individual must be resolved:
For resolving group members create the file /etc/postfix/ldap-groups.cf and add the following lines:
server_host = localhost
search_base = ou=Groups,dc=example,dc=com
version = 3
scope = sub
query_filter = (&(objectclass=kopano-group)(mail=%s))
result_attribute = memberUid
To expand group members’ mail into uid create the file /etc/postfix/ldap-groups-expand.cf and add the following lines:
server_host = localhost
search_base = ou=Groups,dc=example,dc=com
version = 3
scope = sub
query_filter = (&(objectclass=kopano-user)(uid=%s))
result_attribute = mail
Note
While this approach creates an additional query, it has the benefit that the memberOf overlay does not need to be enabled in OpenLDAP.
The search base of users and aliases need to match the search base of the LDAP server. After the configuration files have been changed Postfix needs to be restarted:
service postfix restart
By default the kopano-dagent is configured to run as a deamon and started at boot time. With the following commands you can check if the default configuration is used.
For RPM based distributions use:
chkconfig kopano-dagent on
service kopano-dagent start
For Debian based distributions enable the kopano-dagent by setting the option DAGENT_ENABLED to yes in the file /etc/default/kopano-dagent. To enable the kopano-dagent at boot time use:
update-rc.d kopano-dagent defaults
Note
It is advised to enable logging of the kopano-dagent when running in LMTP mode for monitoring purposes. Enable the logging options in the kopano-dagent in /etc/kopano/dagent.cfg.
5.11.3. Configure KC Postfix integration with Active Directory¶
The Postfix can resolve primary mail addresses and aliases of users and groups from the Active Directory server. The Postfix package in most Linux distributions has LDAP support enabled by default. To read more about Postfix LDAP support see the LDAP README on the Postfix website.
All Postfix configuration files can be found in /etc/postfix directory. The main configuration file is logically called main.cf.
By default Postfix will only accept incoming emails from localhost. To accept emails from the complete network, configure the following option:
inet_interfaces = all
In order to make Postfix aware of the local emaildomains, add the following line to the main.cf:
virtual_mailbox_domains = example.com, example.org, example.net
Postfix will now see the configured domains as its local email domains, however, to accept incoming emails Postfix will do a recipient check. This recipient check can be done on the Active Directory server. Add the following lines to the main.cf
virtual_mailbox_maps = ldap:/etc/postfix/ldap-users.cf
virtual_alias_maps = ldap:/etc/postfix/ldap-aliases.cf
virtual_transport = lmtp:unix:/var/spool/kopano/dagent.sock
All incoming emails are delivered to the LMTP service of the kopano-dagent. The delivery needs to be done on the primary mail address of a user. For resolving the primary mail address of the user, create the file /etc/postfix/ldap-users.cf and add the following lines:
server_host = 192.168.0.100
search_base = ou=Users,dc=example,dc=local
version = 3
bind = yes
bind_dn = cn=kopano,ou=Users,dc=example,dc=local
bind_pw = secret
scope = sub
query_filter = (&(objectClass=user)(mail=%s))
result_attribute = mail
For lookups of mail aliases create the file /etc/postfix/ldap-aliases.cf and add the following lines:
server_host = 192.168.0.100
search_base = ou=Users,dc=example,dc=local
version = 3
bind = yes
bind_dn = cn=kopano,ou=Users,dc=example,dc=local
bind_pw = secret
scope = sub
query_filter = (&(objectClass=user)(otherMailbox=%s))
result_attribute = mail
Active Directory has the possibility to create distribution groups which can be used as email distribution list in KC. To use integrate Postfix with distribution groups, Postfix 2.4 or higher is required.
To support distribution groups add the following line to the virtual_alias_maps:
virtual_alias_maps = ldap:/etc/postfix/ldap-aliases.cf, ldap:/etc/postfix/ldap-groups.cf
Create a new file /etc/postfix/ldap-group.cf and insert the LDAP group configuration in there:
server_host = 192.168.0.100
search_base = ou=groups,dc=example,dc=local
version = 3
bind = yes
bind_dn = cn=kopano,ou=Users,dc=example,dc=local
bind_pw = secret
query_filter = (&(objectclass=group)(mail=%s))
leaf_result_attribute = mail
special_result_attribute = member
The search base of users, aliases and groups need to match the search base of the Active Directory server. After the configuration files have been changed Postfix need to be restarted:
/etc/init.d/postfix restart
Make sure the kopano-dagent is run as a daemon and started at boot time.
For RPM based distributions use:
chkconfig kopano-dagent on
/etc/init.d/kopano-dagent start
For Debian based distributions enable the kopano-dagent by setting the option DAGENT_ENABLED to yes in the file /etc/default/kopano-dagent. To enable the kopano-dagent at boot time use:
update-rc.d kopano-dagent defaults
Note
It is advised to enable logging of the kopano-dagent when running in LMTP mode for monitoring purposes. Enable the logging options in the kopano-dagent in /etc/kopano/dagent.cfg.
5.11.4. Configure KC Postfix integration with virtual users¶
If no OpenLDAP or Active Directory Server is available, Postfix can be configured with virtual users in a hash map. In this section we explain how.
By default Postfix will only accept incoming emails from localhost. To accept emails from the complete network, configure the following option:
inet_interfaces = all
All Postfix configuration files can be found in /etc/postfix directory. The main configuration file is logically called main.cf
In order to make Postfix aware of the local email domains, add the following line to the main.cf:
virtual_mailbox_domains = example.com, example.org, example.net
Postfix will now regard these domains as its local email domains. In order to accept incoming emails, Postfix will also need to validate the recipient. Add the following lines to the main.cf config file in order to have Postfix look up recipient from a hash map:
virtual_mailbox_maps = hash:/etc/postfix/virtual
virtual_alias_maps = hash:/etc/postfix/virtual
virtual_transport = lmtp:unix:/var/spool/kopano/dagent.sock
The file /etc/postfix/virtual should contain all email addresses and aliases of a user, in the following structure:
#Emailaddress or alias        primary mailaddress of user
john@example.com              john@example.com
user1@example.com             user1@example.com
user1@example.net             user1@example.com
alias_user1@example.com       user1@example.com
info@example.com              user2@example.com, user1@example.com
The left column contains the email address or alias, the right column contains the primary email addresses on which the message should be delivered.
After all users and aliases are added to this file, a hash map needs to be created. The following command will create the actual hash map /etc/postfix/virtual.db.
postmap /etc/postfix/virtual
All incoming emails are delivered to the kopano-dagent over LMTP using the primary mail address of as specified in the hash map.
After changing the configuration files restart Postfix by its init script:
/etc/init.d/postfix restart
For RPM based distributions use:
chkconfig kopano-dagent on
/etc/init.d/kopano-dagent start
For Debian based distributions enable the kopano-dagent by setting the option DAGENT_ENABLED to yes in the file /etc/default/kopano-dagent. To enable the kopano-dagent at boot time use:
update-rc.d kopano-dagent defaults
Note
It’s advised to enable logging of the kopano-dagent when running in LMTP mode for monitoring purposes. To alter logging options for the kopano-dagent, adjust the configuration file: /etc/kopano/dagent.cfg.
5.11.5. Configure KC Postfix integration with the DB plugin¶
Alternatively to managing virtual users in a file, the MySQL Database of Kopano can be used to check if a message should be delivered. For this to work most of the configuration for Configure KC Postfix integration with virtual users can be reused.
Note
For this to work Postfix needs the ability to do lookups against a MySQL database. In Debian and Ubuntu this can be accomplished by installing the postfix-mysql package. When using Red Hat or Centos Postfix doesn’t have the mysql module included. Alternatively the Postfix Package from the Centos Plus repository can be used.
Instead of executing virtual_mailbox_maps and virtual_alias_maps against /etc/postfix/virtual, a mysql lookup will be defined inside of main.cf.
alias_maps = hash:/etc/aliases
alias_database = hash:/etc/aliases
virtual_alias_maps = mysql:/etc/postfix/mysql-users.cf
This lookup is defined as pictured below:
# Replace with the user name and password to log into the MySQL server.
user = root
password = kopano
hosts = 127.0.0.1
dbname = kopano
query = select value from objectproperty where objectid=(select objectid from objectproperty where value='%s' limit 1) and propname='loginname';
This configuration only resolves the primary mail address of an user. Aliases should be kept in the /etc/aliases file or an extra aliases MySQL table.
5.12. Configure Z-Push (ActiveSync for Mobile Devices)¶
This chapter describes how to configure the Z-Push software to bridge KC with ActiveSync enabled PDAs and smartphones.
Z-Push is an independent project available as an open source from http://z-push.org/
In this manual only the server part of Z-Push is discussed, please refer to our User Manual for instruction on configuring mobile devices.
Mobile phones, smartphones and PDAs can be synchronized because Z-Push emulates the ActiveSync functionality of a MS Exchange server on the server side, allowing mobiles to synchronize via over-the-air ActiveSync (AirSync). Using Z-Push most mobiles can synchronize without installing any additional software on the device.
Z-Push needs to be installed on a web server. It is highly recommended to use Apache. It is also highly recommended to use PHP as an Apache module.
Important
Z-Push >=2.1 requires KC 7.0.6 or later.
5.12.1. Compatibility¶
Z-Push allows users with PDAs and smartphones to synchronise their email, contacts, calendar items and tasks directly from a compatible server over UMTS, GPRS, WiFi or other GSM data connections. Among others the following devices are known to by working with Z-Push:
- Apple iPhone and iPad
- Windows Phone 7, 7.5 and 8
- Android phones with Android 4.x and newer
- Blackberry PlayBook and 10 (with ActiveSync)
- other ActiveSync compatible devices
For detailed information about the devices and their compatibility status, please consult the Mobile Compatibility List at http://z-push.org/compatibility
5.12.2. Security¶
To encrypt data between the mobile devices and the server, it’s required to enable SSL support in the web server. Configuring Apache with SSL certificates is beyond the scope of this document, though many howtos can be found online.
Keep in mind that some mobile devices require an official SSL certificate and don’t work with self signed certificates. For Windows Phone and Windows Mobile you might need to install the certificates on the device (See Configuring SSL for Windows Mobile and Windows Phone for details).
5.12.3. Installation¶
Download the latest Z-Push software from http://z-push.org/download/
To install Z-Push, simply extract the Z-Push archive to the /usr/share/z-push directory:
mkdir -p /usr/share/z-push
tar zxvf z-push-*.tar.gz -C /usr/share/z-push/ --strip-components=1
The -C option is the destination where the files need to be installed.
Z-Push is using a state directory to store a per-user synchronisation status and a log directory for its default logging. Make sure that the ‘state’ and ‘log’ directories exists and are writeable for the webserver process, so either change the owner of the ‘state’ directory to the UID of the apache process or make it world writeable:
mkdir /var/lib/z-push /var/log/z-push
chown www-data:www-data /var/lib/z-push /var/log/z-push
The user and group name of Apache will differ per Linux distribution. The table below shows an overview of the user and group names of the Apache process.
Table 5.2. User and groupnames per distribution
| Distribution | Apache username | Groupname |
|---|---|---|
| Red Hat Enterprise Linux | apache | apache |
| SLES | wwwrun | www |
| Debian and Ubuntu | www-data | www-data |
On systems with SELinux enabled the security context of these folders might need to be changed, e.g.
chcon -R -t httpd_sys_rw_content_t /var/lib/z-push
chcon -R -t httpd_sys_rw_content_t /var/log/z-push
Now, Apache must be configured to redirect the URL Microsoft-Server-ActiveSync to the index.php file in the z-push directory. This can be done by adding the following line to the httpd.conf file:
Alias /Microsoft-Server-ActiveSync /usr/share/z-push/index.php
Make sure that the line is added to the correct part of the Apache configuration, taking care of virtual hosts and other Apache configurations.
Additional PHP Packages
To use the full featureset of Z-Push 2 and the z-push-top command line utility, additional php packages are required. These provide SOAP support, access to process control and shared memory.
Table 5.3. Additional packages per distribution
| Distribution | Package name |
|---|---|
| Red Hat Enterprise Linux* | php-cli php-soap php-process |
| SLES** | php53 php53-soap php53-pcntl php53-sysvshm php53-sysvsem php53-posix |
| Debian and Ubuntu | php5-cli php-soap |
- To install the php-process package you need to add an extra channel subscription from the RHEL Server Optional channel.
- The PHP Posix package is included in the SLES SDK Repository.
Important
It is not possible to simply rename the Z-Push directory to Microsoft-Server-ActiveSync. This will cause Apache to send redirects to the smartphone, which will prevent proper synchronization.
Lastly, make sure that PHP has the following settings:
php_flag magic_quotes_gpc = off
php_flag register_globals = off
php_flag magic_quotes_runtime = off
php_flag short_open_tag = on
Set this in the php.ini or in a .htaccess file in the root directory of Z-Push.
If you have several php applications on the same system, you could specify the z-push directory so these settings are considered only there.
<Directory /usr/share/z-push>
   php_flag magic_quotes_gpc off
   php_flag register_globals off
   php_flag magic_quotes_runtime off
   php_flag short_open_tag on
</Directory>
If not setup correctly, the smartphone will not be able to login correctly via Z-Push.
Reload Apache to activate these changes.
To use the Z-Push 2.X command line tools, access the installation directory /usr/share/z-push and execute:
./z-push-top.php
and/or
./z-push-admin.php
To facilitate the access symbolic links can be created, by executing:
ln -s /usr/share/z-push/z-push-admin.php /usr/local/sbin/z-push-admin
ln -s /usr/share/z-push/z-push-top.php /usr/local/sbin/z-push-top
With these symlinks in place the cli tools can be accessed from any directory and without the .php file extension.
5.12.4. Mobile Device Management¶
Users can remote wipe own mobile devices from Kopano WebApp without interaction of the system administrator by using the Kopano MDM plugin.
The system administrator can remote wipe devices from the command line using the z-push-admin tool.
5.12.5. Limiting Access to Certain Users¶
Starting with Z-Push 2.2.0 it is possible to allow/deny Z-Push access for certain users. For this Z-Push makes use of the enabled/disabled feature functionality of kopano-server (see Kopano Feature management). Z-Push uses the keyword “mobile”.
A more in details explanation of this functionality can be found on the Z-Push Wiki <https://kb.kopano.io/display/ZP/Disable+Z-Push+access>.
5.12.6. Upgrade¶
Upgrading to a newer Z-Push version follows the same path as the initial installation.
When upgrading to a new minor version e.g. from Z-Push 1.4 to Z-Push 1.4.1, the existing Z-Push directory can be overwritten when extracting the archive. When installing a new major version it is recommended to extract the tarball to another directory and to copy the state from the existing installation.
Important
It is crucial to always keep the data of the state directory in order to ensure data consistency on already synchronized mobiles.
Without the state information mobile devices, which already have an ActiveSync profile, will receive duplicate items or the synchronization will break completely.
Important
Upgrading to Z-Push 2.X from 1.X it is not necessary to copy the state directory because states are not compatible. However Z-Push 2 implements a fully automatic resynchronizing of devices in the case states are missing or faulty. Downgrading from Z-Push 2.X to 1.X is not simple. As the states are not compatible you would have to follow the procedure for a new installation and re-create profiles on every device. States of Z-Push 2.0 and Z-Push 2.1 are not compatible. A state migration script is available in the tools folder.
Please also observe the published release notes of the new Z-Push version. For some releases it is necessary to e.g. resynchronize the mobile.
5.12.7. S/MIME¶
Z-Push supports signing and en-/decrypting of emails on mobile devices since the version 2.0.7.
Important
Currently only Android 4.X and higher and iOS 5 and higher devices are known to support encryption/signing of emails.
It might be possible that PHP functions require CA information in order to validate certs. Therefore the CAINFO parameter in the config.php must be configured properly.
The major part of S/MIME deployment is the PKI setup. It includes the public-private key/certificate obtaining, their management in directory service and roll-out to the mobile devices. Individual certificates can either be obtained from a local (company intern) or a public CA. There are various public CAs offering certificates: commercial ones e.g. Symantec or Comodo or community-driven e.g. CAcert.org.
Both most popular directory services Microsoft Active Directory (MS AD) and free open source solution OpenLDAP allow to save certificates. Private keys/certificates reside in user’s directory or on a smartcard. Public certificates are saved in directory. MS AD and OpenLDAP both use userCertificate attribute to save it.
In Active Directory, the public key for contacts from GAB is saved in PR_EMS_AB_TAGGED_X509_CERT (0x8C6A1102) property, and if you save a key in a contact, it is PR_USER_X509_CERTIFICATE (0x3A701102).
In LDAP public key for contacts from GAB is saved in userCertificate property. It should be mapped to 0x3A220102 in ldap.propmap.cfg (0x3A220102 = userCertificate). Make sure it looks like this in LDAP:
userCertificate;binary::
   MIIFGjCCBAKgAwIBAgIQbRnqpxlPa...
Important
It is strongly recommended to use MS AD or LDAP to manage certificates. Other user plugin options like db or unix might not work correctly and are not supported.
5.12.8. Configuring SSL for Windows Mobile and Windows Phone¶
If you don’t have a certificate of one of the Certified Authorities, you also need to add the CA Certificate to the Trusted Root Certificates store of the device.
The certificates should be in DER format to install it on a windows device. By default the generated SSL certificates on Linux are in PEM format. The DER certificate is a base64 encoded PEM certificate. You can convert the certificate type by the following commands:
openssl x509 -in ca.crt -inform PEM -out ca.cer -outform DER
openssl x509 -in host.crt -inform PEM -out host.cer -outform DER
where ca.crt is your CA certificate file and host.crt is your certified file.
After converting both certificates you need to copy them to the PDA. It can be e.g. done by putting the files on a local intranet server and accessing them with the device’s browser:
http://intranet/certs/ca.cer
http://intranet/certs/host.cer
By selecting the certificates on your PDA they will be stored in the Trusted Root Certificates store of your device.
5.12.9. Troubleshooting¶
5.12.9.1. General configuration¶
Most of the difficulties are caused by incorrect Apache settings. The Apache setup can be tested using a webbrowser like Firefox pointing it to:
http://<server>/Microsoft-Server-ActiveSync
If correctly configured, a window requesting username/password should be displayed. Authenticating using valid credentials should display Z-Push information page, containing the following message:
A Z-Push information page should be displayed, containing the message:
*GET not supported*
This is the z-push location and can only be accessed by Microsoft \
ActiveSync-capable devices.
Verify the PHP and/or Apache configuration if an error is displayed.
5.12.9.2. Synchronization problems¶
Please refer to the Z-Push Wiki on information how to debug synchronization problems.
5.12.9.3. Log messages¶
- Repeatedly “Command denied: Retry after sending a PROVISIONING command”:
Most probably the mobile device does not support provisioning. The LOOSE_PROVISIONING parameter should be enabled in the configuration. If the messages continues, the ActiveSync profile should be reconfigured on the device. If this does not help, the PROVISIONING could be disabled completely in the config file (applies to all devices!).
In most cases Z-Push Provisioning will work without any issues.
The following message is shown when the provisioning is requested by the server to mobile.
POST cmd FolderSync denied: Retry after sending a PROVISION command
It’s normal to see this message when a device is reconfigured or e.g. a policy changed. If you see this messages repeated several times (more than 3), then your device is not “understanding” it should execute the provisioning. Follow this procedure to check how to proceed. Look into the Z-Push Mobile Compatibility List to check if this mobile supports provisioning. Some devices like older native Android clients need the LOOSE_PROVISIONING configuration parameter set (see how to set this below).
If your device supports provisioning, try to fully reconfigure the profile on your phone. Try a hard-reset if the error persists
Optionally you may also disable provisioning, however this will also disable the ability to wipe your phone remotely.
Location of the config.php depends on where you installed Z-Push.
Change
define('PROVISIONING', true);
to
define('PROVISIONING', false);
Also in order to enable LOOSE_PROVISIONING, change the following:
define('LOOSE_PROVISIONING', false);
to
define('LOOSE_PROVISIONING', true);
- Exceptions for Meeting requests cause duplicates if accepted on the mobile:
Please update to Z-Push 1.4 or later. In order to fix existing duplicates, the ActiveSync profile on the mobile has to be recreated or at least the calendar has to be resynchronized completely (disabling calendarsync and enabling it afterwards).
- Repeated incorrect password messages
If a password contains characters which are encoded differently in ISO-8859-1 and Windows-1252 encodings (e.g. “§”) the login might fail with Z-Push but it works fine with the WebApp. The solution is to add setlocale(LC_CTYPE, “en_US.UTF-8”); to the config.php file.
Important
The solution above is for KC 7 and later versions only. KC 6 and earlier versions might not work properly because they lack unicode support.