6. Usage
This section describes how the S/MIME Plugin is integrated within the Kopano WebApp client.
6.1. Passphrase policy
Not all characters are allowed in the passphrase. Special characters like “<, >, ?, -. +. @, #, %, !, $, _” and even spaces are allowed. Umlauts, Euro Sign (€) and characters other than standard ASCII are not allowed, due OpenSSL restrictions.
There is no minimal passphrase length or maximum length restriction.
Note
You won’t be able to decrypt the certificate if the passphrase contains non-allowed characters.
6.2. Importing Certificates
For being able to use the S/MIME functionality the private certificate needs to be uploaded to the server. The private certificate has to be of the PKCS#12 format for importing in the WebApp, this format can be obtained by exporting your certificate from Mozilla Firefox for example.
Please go to Option -> Advance -> Certificates -> View Certificates -> Your Certificates and select the certificate you want to use for signing and encrypting e-mails.
Note
The PKCS#12 format saves your private certificate encrypted, so it is recommended to use a strong passphrase. When generating the certificate we also recommend using a strong key-size (2048 bit), hash size (168 or 256 bits) and a strong hash algorithm (sha256 or higher). There are no character restriction regarding this passphrase.
Now that we have obtained a PKCS#12 file (usually called example.p12) we can import it in the WebApp, by navigating to Settings, click on S/MIME and click on Select and select your certificate and enter your passphrase and click on upload. If uploading the certificate was successful the WebApp will display a text notification.

When the passphare is not correct we are not able to decrypt the certificate.

Note
The WebApp will only import a public certificate if the CA verification is successful and the certificate is not revoked. When OCSP is disabled the certificate is always imported.
6.3. Signing and verifying email
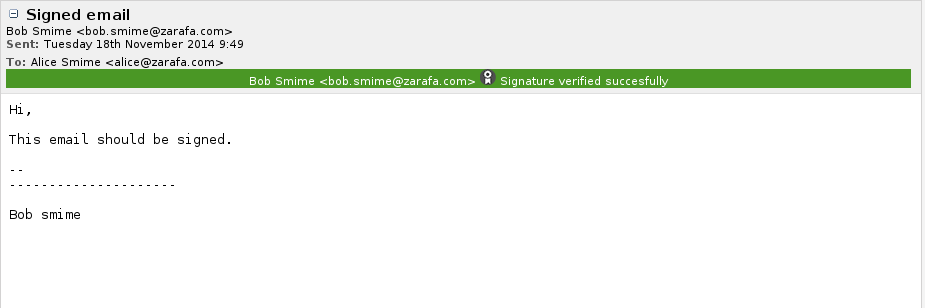
To verify email the WebApp only requires the public certificate of the recipient who has signed the email. WebApp will automatically import public certificates if they are newer then the current certificate of the recipient or if you don’t have a public certificate of the recipient. Depending on the verification status and configuration the Webapp will display a different color in the S/MIME status bar:
- Green bar, when verification is successful. When OCSP is disabled the bar is also green.
- Orange bar, when verification failed due a connection error with the OCSP server or unable to determine the revocation status.

- Red bar, when a certificate is revoked, CA verification failed or an internal server error.

In any case you can click on the colored bar, this will show a pop-up with extra information about the error or warning message.
To sign an email, the private certificate has to be already uploaded to the server. If the certificate is already uploaded to the server, we can create a new email and click on the sign button, the WebApp will show a popup where you have to enter the passphrase of your certificate. When you click on send, the WebApp will sign your email.
Note
Encrypted and signed email will appear in your mail overview’s S/MIME column as a lock symbol for encrypted email and a certificate symbol for signed email.
6.4. Decryption and encrypting email
To encrypt an email, we need to have the public certificate of the recipient. When you create a new email, click on the encrypt button, write your email and then click on send. If a public certificate is missing, you will receive a notification which recipient doesn’t have a public key.
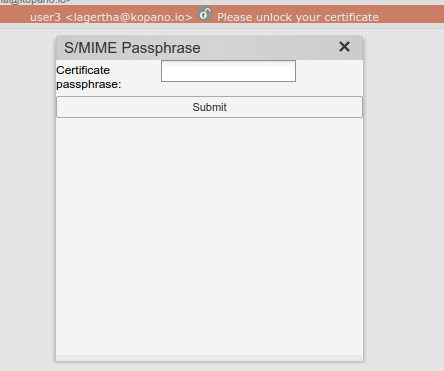
For decryption, you will first need to unlock your private certificate, this can be achieved by clicking on the bar and entering your passphrase in the pop-up. After entering your passphrase, the WebApp will show the decrypted email.
6.5. Encrypting and Signing email
Encrypting and signing email is as simple as clicking on the encrypt and sign button when creating an email. When the email is sent, the email will be first signed and then encrypted. When receiving a signed and encrypted email, the Webapp will show it as an encrypted email only since we only know this after the email has been decrypted.
6.6. Allow ‘remember passphrase’ by browser
Note
This functionality only works with Chrome and Firefox. Safari workaround: Add your passphrase to the passphrase vault reachable via: “Preferences -> Password -> Add domain + Password”
This functionality can be enabled by the administrator. See this config setting. After signing an e-mail the browser will ask to remember the passphrase providing your browser is configured to remember passwords. This option can be found in your browser settings.