12. Communication
12.1. Conceptual Overview
The back-end has a pluggable architecture, with functionality divided among a set of modules. Each module is a named entity, such as maillistmodule or taskitemmodule (or for Spreed plugin - class.spreedmodule), and exposes a specific part of the Zarafa server functionality. The client communicates with a module by sending it one or more actions. Each request may contain one or more actions for one or more modules. Several modules may implement the same actions (such as list) so actions are grouped by target module. The server processes each of the actions in a sequence and formulates a response, also containing actions. The process is shown in “Message exchange”.
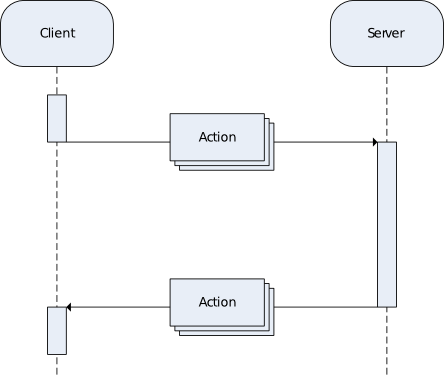
Message exchange
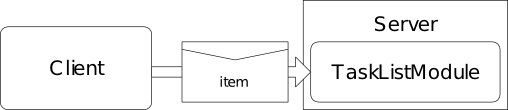
Although there is usually a one-to-one mapping between request and response actions, this does not neccesarily have to hold. As an example consider the situation in “Message exchange for creating a new item: client request” and “Message exchange for creating a new item: server response”. In this exchange the client wants to create a new task and sends save action to the tasklistmodule on the server, as shown in “Message exchange for creating a new item: client request”. If successful, the module on the server-side responds with an item action with information about the created task, such as the generated entry ID, but it will also send a folderupdate action containing updated information about the folder the item was created in. This is shown in “Message exchange for creating a new item: server response”. This last action is to notify the client that there is now one more item in the folder.
Message exchange for creating a new item: client request

Message exchange for creating a new item: server response
The exact data flow through the various classes is shown in “Request-Response flow”. The important components inside this diagram will be explained in details further down in this chapter.
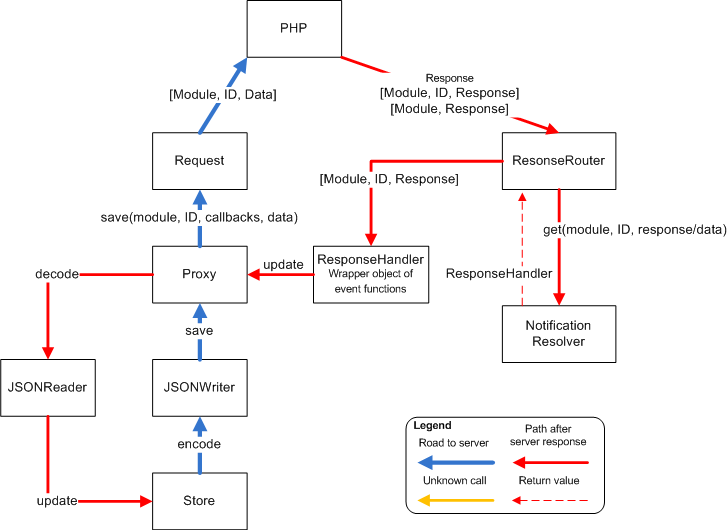
Request-Response flow
12.2. Protocol
Communication with the back-end starts with the client initiating a request. The data exchange format is JSON (JavaScript Object Notation). As explained in the previous section, a request may contain multiple actions for multiple modules.
The following listing shows a minimal client request for listing mails in a folder. First object is zarafa to define the correct scope for our request. The objects beneath there are different modules which are being accessed. Beneath each module can be one or more identifiers. Each request receives its own unique identifier. This is later used to match a response to the corresponding request. Beneath the identifier object the action tag is found which may contain a forest of key-value pairs. The server will respond with a similarly constructed reply.
{
        zarafa : {
                maillistmodule : {
                        maillistmodule1 : {
                                list : {
                                        store : [store MAPI ID]
                                        entryid : [folder MAPI ID]
                                }
                        }
                }
        }
}
A possible response from the server is shown below.
zarafa : {
        previewmailitemmodule : {
                previewmailitemmodule1 : {
                        item : {
                                [mail item details would be included here]
                        }
                }
        },
        mailnotificationmodule : {
                mailnotificationmodule1 : {
                        newitem : {
                                [mail item details would be included here]
                        }
                }
        }
}
12.3. Javascript Communication
To avoid having to construct HTTP requests manually, all client requests are made through a global instance of the Zarafa.core.Request class. This object provides JavaScript <-> JSON (de)serialisation, and allows other components to react to server actions via either events or callbacks.
Consider the code example listed below. A call is made to the request object (a global instance of which can be obtained from the container using getRequest()) to retrieve a single message. The first two arguments are module name and action type, which are taken from enumeration objects Zarafa.core.ModuleNames and Zarafa.core.Actions respectively (note that the unique request identification as mentioned earlier is auto-generated by the Zarafa.core.Request class). The third argument is a Javascript object containing the parameters to the action, which in this case are the message’s MAPI store Id and MAPI entry Id.
container.getRequest().singleRequest(
        'pluginNAMEmodule', // e.g.'REMINDER'
        'actionToPerform', // e.g. 'reminderlistmodule'
        {
                //data inclufed in action tag
                actions: actions
        }
)
12.4. Response Handlers
As described in the previous section a client should be able to handle the response data which is being send back from the server. For this we use Zarafa.core.ResponseRouter in combination with Zarafa.core.data.AbstractResponseHandler objects. Whenever the Zarafa.core.Request has received a response from the server, it will send this response to Zarafa.core.ResponseRouter which can then send out some events, and process the response. To notify the requestee of the initial request (for which the response was received), a Zarafa.core.data.AbstractResponseHandler is used. As described in the previous section a request can be created using the singleRequest function, this function has however a fourth argument; The Zarafa.core.data.AbstractResponseHandler object.
container.getRequest().singleRequest(
        Zarafa.core.ModuleNames.getListName('moduleName'),
        'actionToPerform',
        {
                'setting' : parameters
        },
        new Zarafa.core.data.ProxyResponseHandler({
                proxy: this,
                action: Ext.data.Api.actions['update'],
                options: parameters
        })
);
When a Request is made with the help of ResponseHandler object, the Zarafa.core.Request object will first generate a new Request idenfitication number, and then register the ID together with the ResponseHandler to the Zarafa.core.ResponseRouter. After receiving a new response the Router will search for all ID’s and use the registered ResponseHandler for processing this response (“Different class diagrams”).
The ResponseHandler which is used in the above example is a basic implementation which provides the basic communication with the Ext.data.DataProxy which made the request. Its primary task is checking for errors and firing the appropriate event in the Ext.data.DataProxy when a request has failed. See the class Diagram below for the various Response handlers:
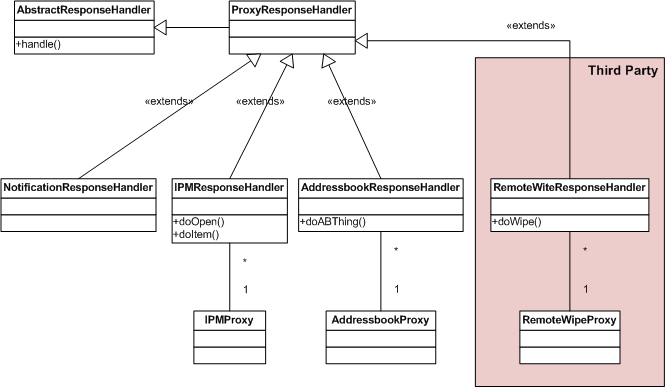
Different class diagrams
12.5. Notifications
In some situations the user might want to be notified of particular events, for example Errors, Warnings, New mail, etc. There are various methods to display such a message to the user. To streamline the interface, the Zarafa.core.ui.notifier.Notifier class is provided, which is accessible (as singleton object) through the Container class using:
container.getNotifier()
The Zarafa.core.ui.notifier.Notifier class holds references to various Zarafa.core.ui.notifier.NotifyPlugin plugins. Each plugin provides a single method for displaying the message to the user. For example, the ConsolePlugin will send all messages to the browser console, the MessageBoxPlugin will show an Ext.MessageBox for each message. Creating a new plugin only requires that Zarafa.core.ui.notifier.NotifyPlugin is extended (which only requires the notify function to be overridden). The plugin itself must then be registered with a unique name. For example:
container.getNotifier().registerPlugin('console', new Zarafa.core.ui.notifier.ConsolePlugin());
When using the Notifier class to display a message to the user, one simply has to call the notify function on the Notifier:
container.getNotifier().notify('error', 'Panic', 'This is a very serious panic');
The first argument is the category. This category should start with error, warning, info or debug, but subtypes are also possible (e.g error.json, info.newmail); Based on the category the Notifier class will determine which plugin must be loaded to display the message. This decision is fully configurable through the Settings. When a notification arrives for a certain category, the settings which belong to that category will be requested. For the category error the setting:
'zarafa/v1/main/notifier/error'
for the warning category, the setting will be:
'zarafa/v1/main/notifier/warning'
When using subtypes, the . will be converted into a /, thus a category named info.newmail will result in a request to the setting:
'zarafa/v1/main/notifier/info/newmail'
The value of this setting, is the unique name of the NotifyPlugin which is registered. So when newmail notifications should be send to the ConsolePlugin, then the setting will be:
'zarafa/v1/main/notifier/info/newmail/value' = 'console'
When a subtype is not found in the Settings, for example error.json is requested, but the setting zarafa/v1/main/notifier/error/json does not exist, then the system will automatically fallback to zarafa/v1/main/notifier/error, when that also is not defined, then the final fallback will be zarafa/v1/main/notifier/default.
Using this system with settings allows 3rd-party developers to easily develop new notification systems, while the user is capable of configuring the notifications exactly as he wants them.
Notifications cannot be processed by the ResponseHandler provided by the requestee (that response handler is dedicated to handling the response for the request),that’s why an alternative route is required. When a response is received for which no ResponseHandler has been registered, the ResponseRouter will give the response data to the Zarafa.core.data.NotificationResolver. This NotificationResolver will analyze the response, and return a ResponseHandler which is suitable for handling this response (Figure fig:rspnsrtr[]). With this ResponseHandler, the ResponseRouter can then continue its normal procedure to deserialize objects, handling the actions, and updating Ext.data.Store objects.